
截图
介绍
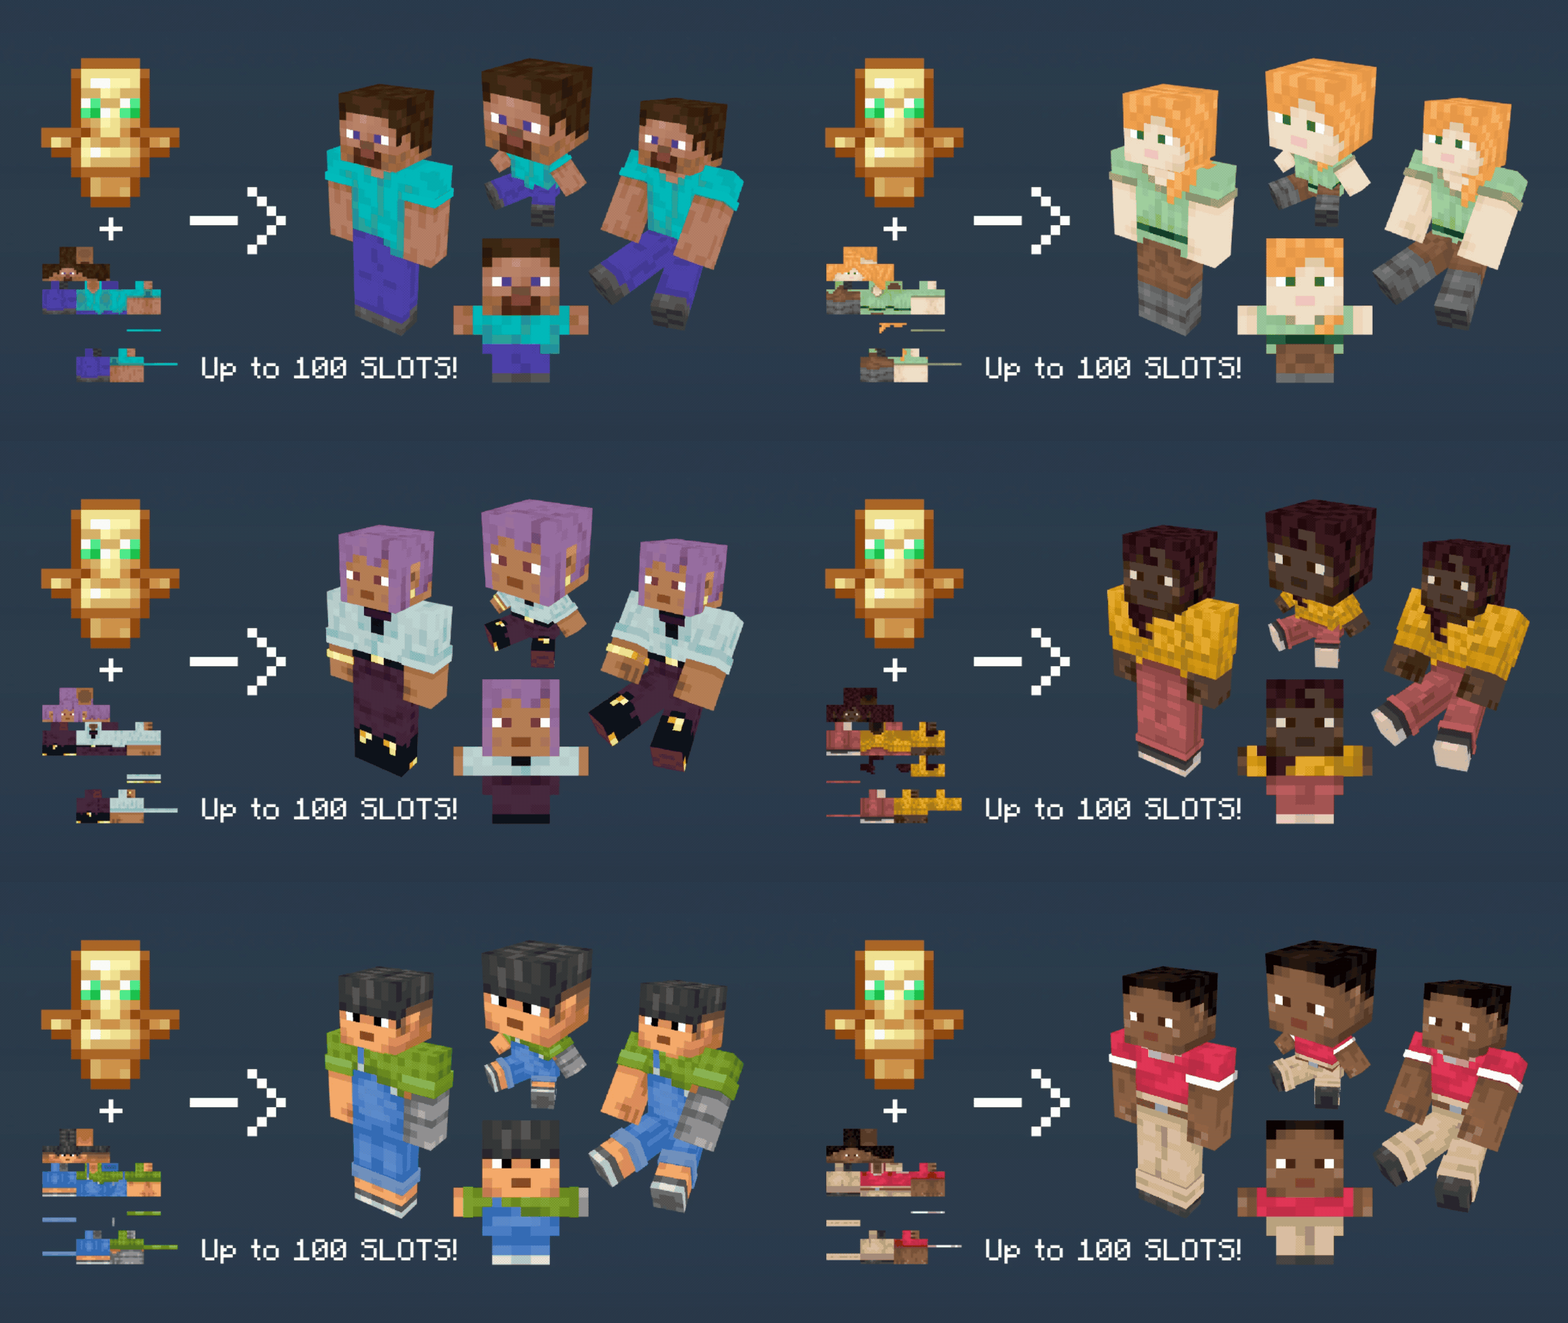
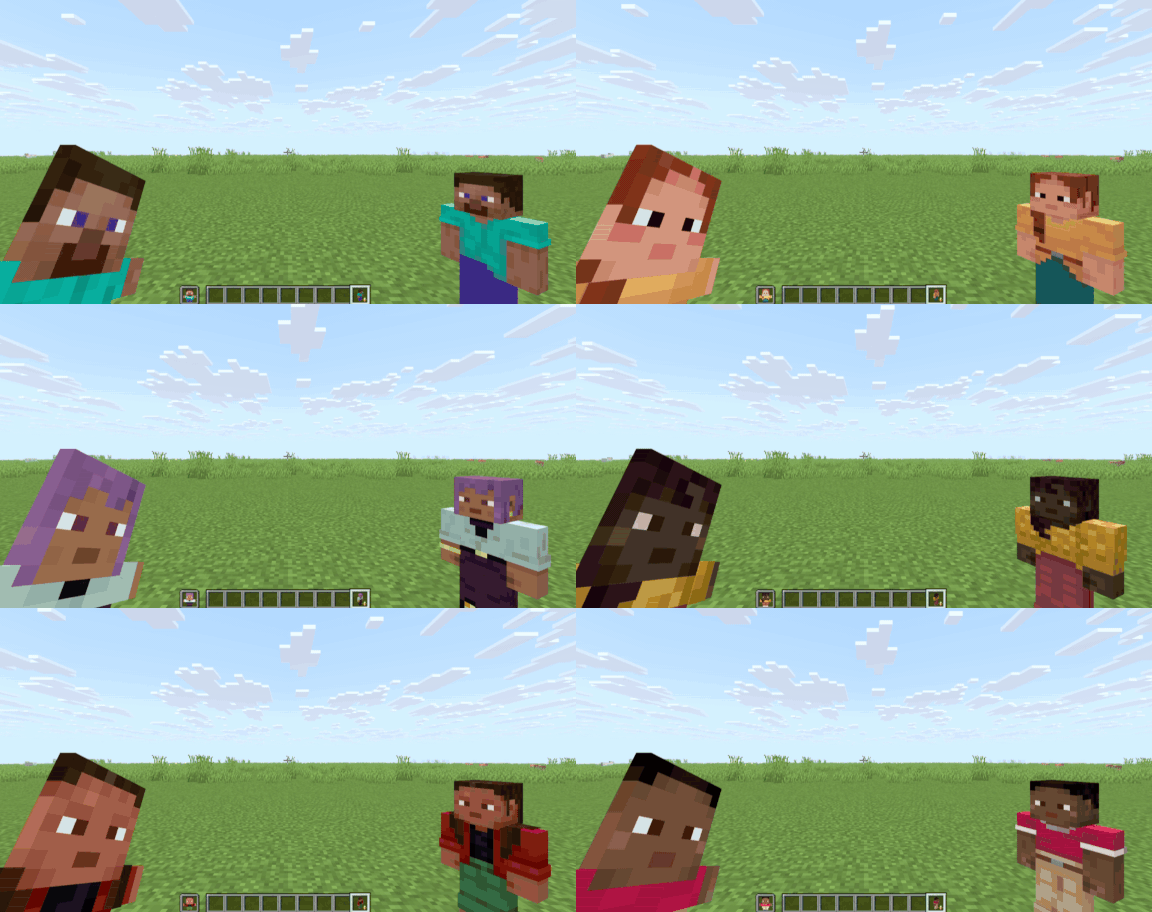
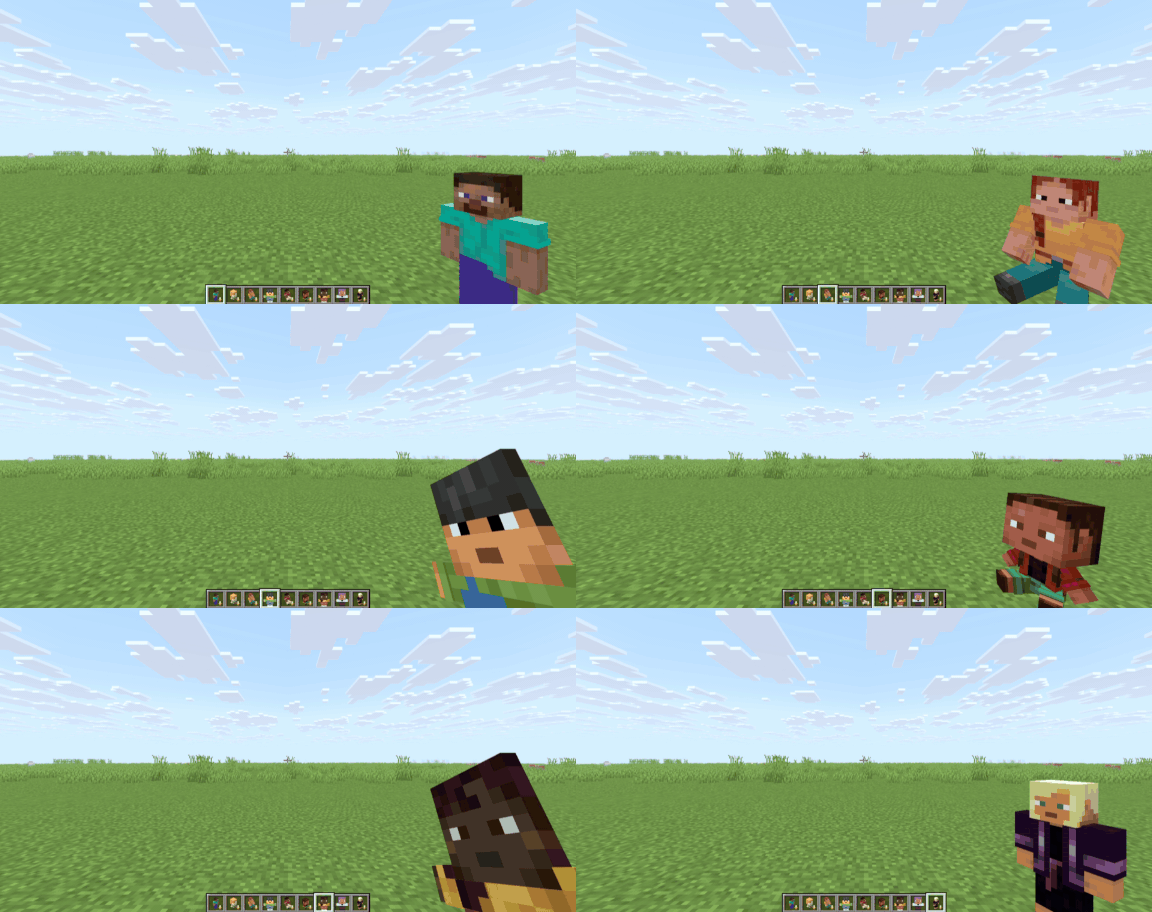
这个资源包会把你的不死图腾变成不同的自定义玩家皮肤,只需用铁砧重命名即可。
特性:
- 此资源包在100%原版环境下可用。
- 你可以在一个资源包中放入多个自定义皮肤,最多100个。
- 支持宽型和纤细型玩家皮肤类型。
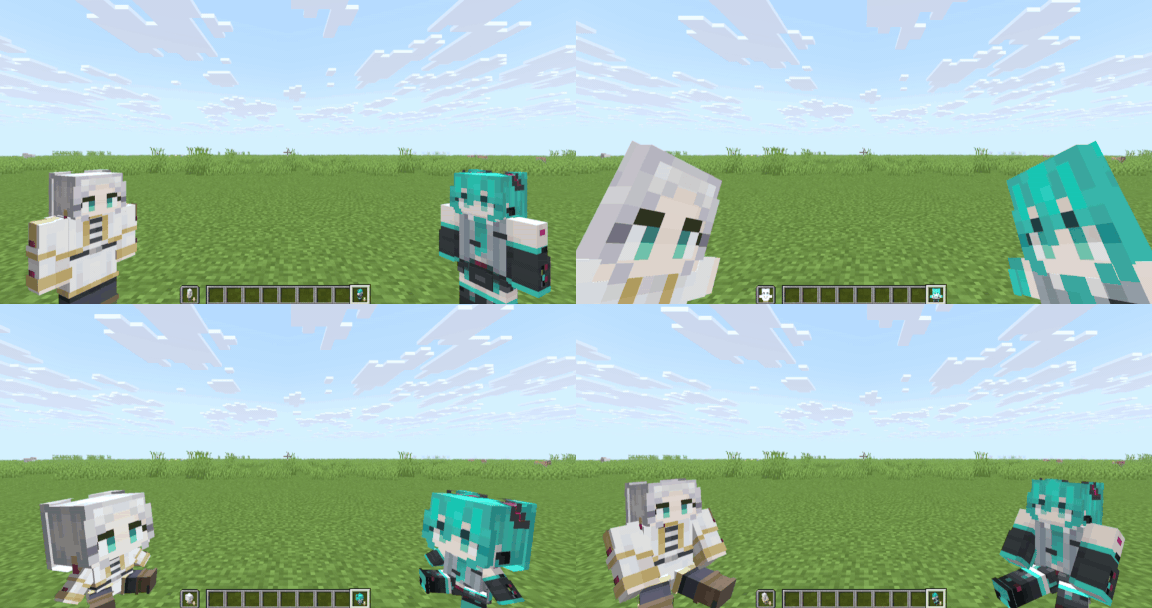
- 它为你的玩家皮肤提供了不同的模型。
- 它在游戏内提供了图腾名称和皮肤列表,只需重命名一张纸,这样你就不必打开文件来查找你的皮肤。
精选图片
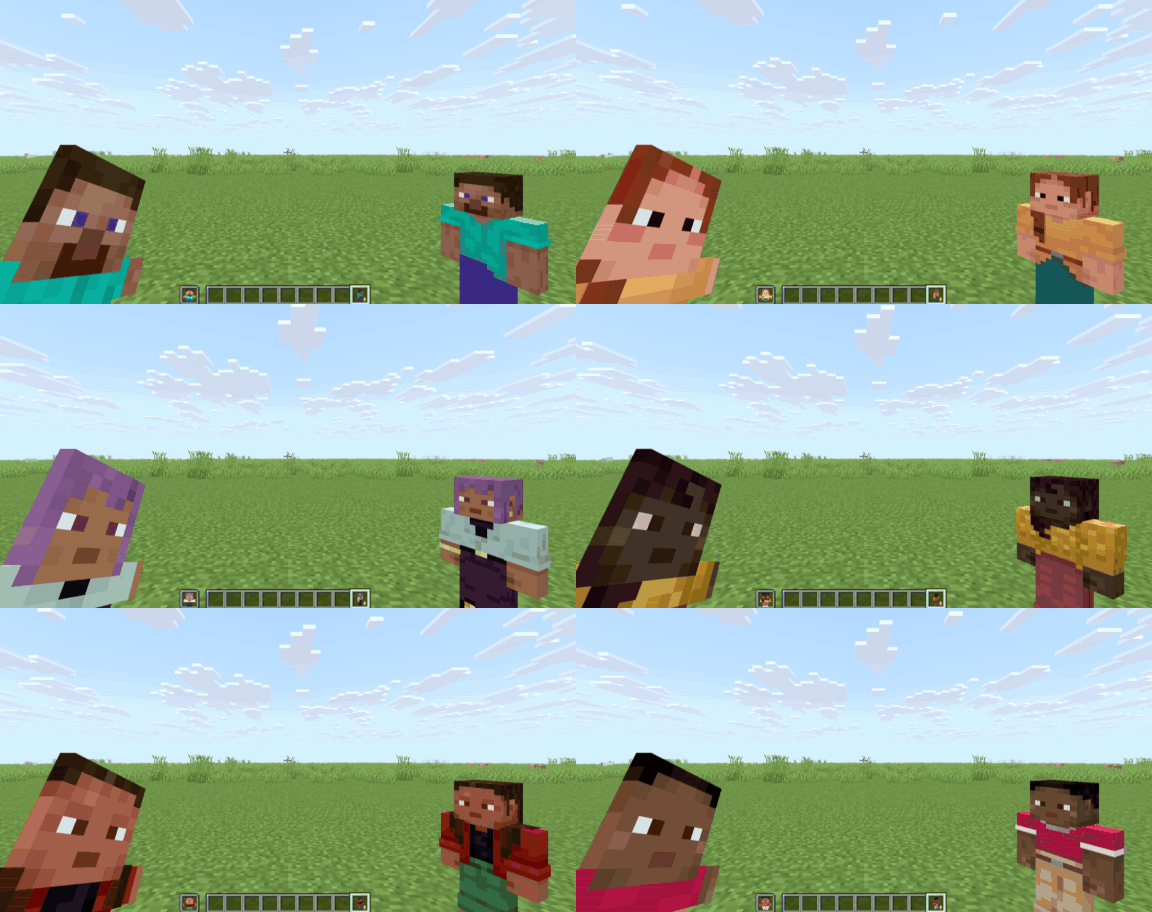
你可以在画廊中找到更多。
使用方法:
- 使用铁砧将不死图腾重命名为你想要的任意自定义玩家图腾。
- 重命名时,取决于你想要的模型和你应用的皮肤;例如,你可以将不死图腾重命名为“
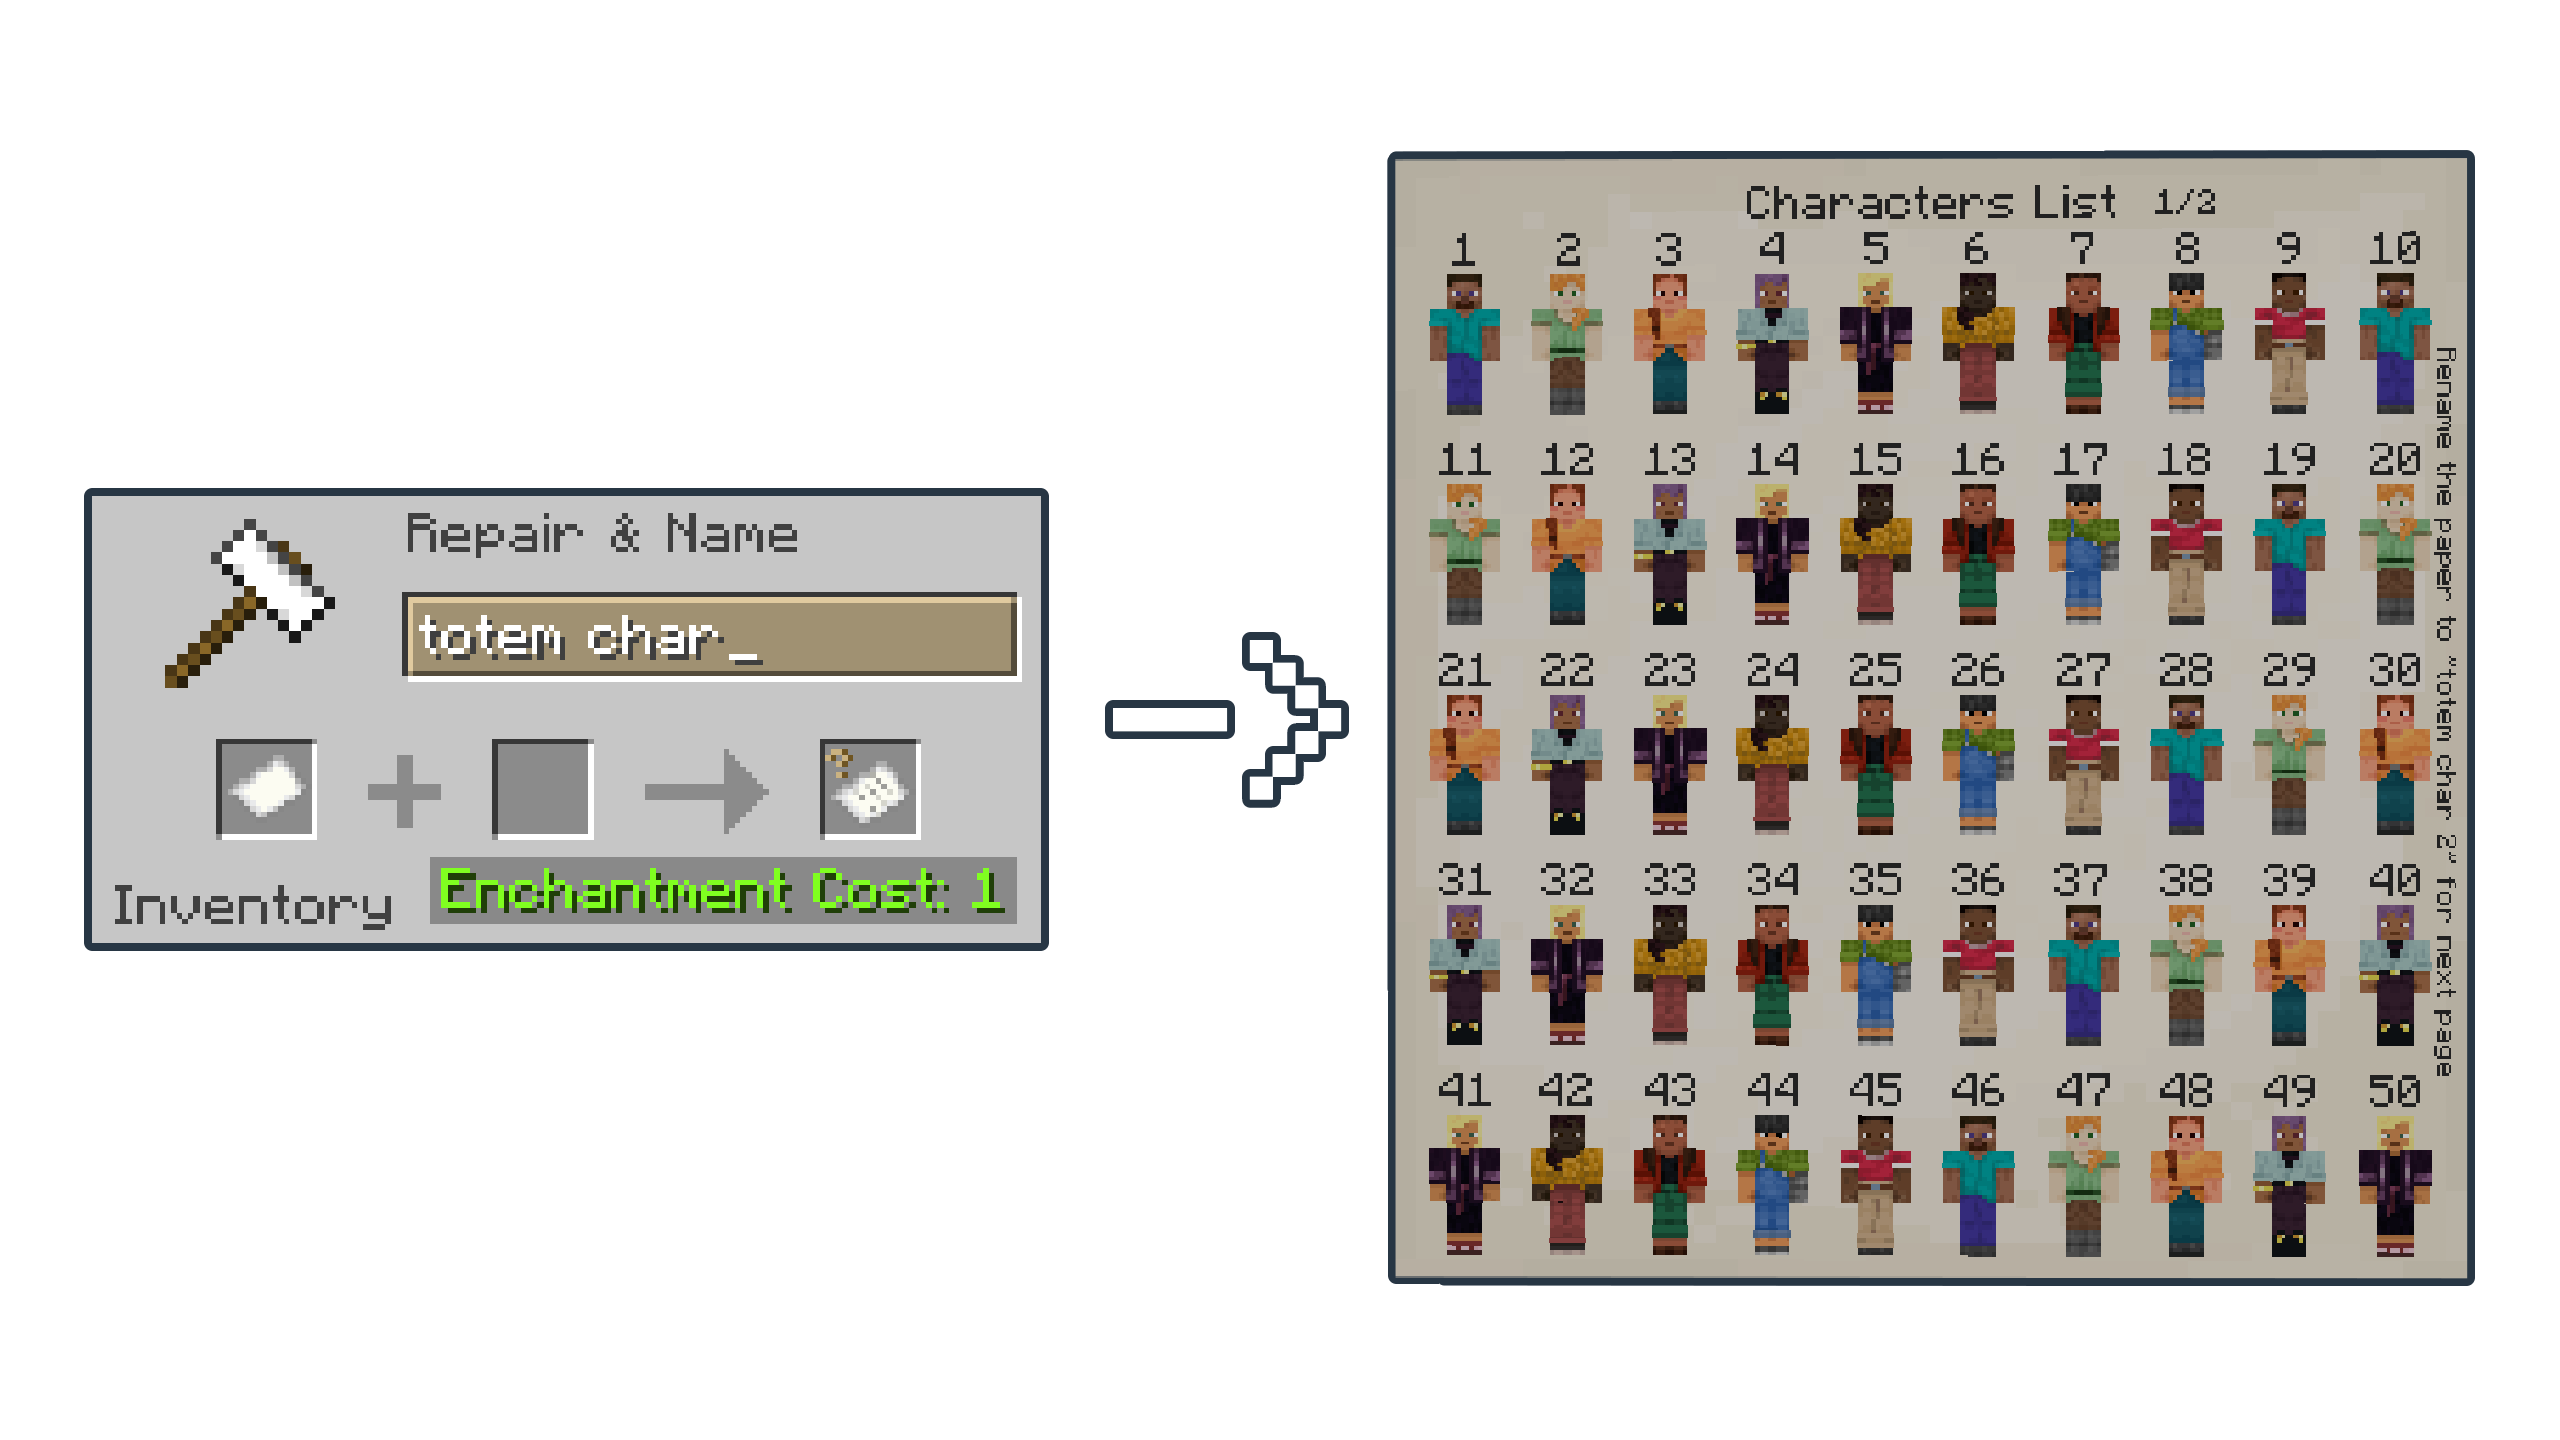
player 1`to change the totem into a Steve standing model or`player 2`if you want the Alex skin _(the number on the name`1`and`2“(代表资源包中的皮肤槽位,默认是Steve和Alex)_。 - 你可以通过将不死图腾重命名为“
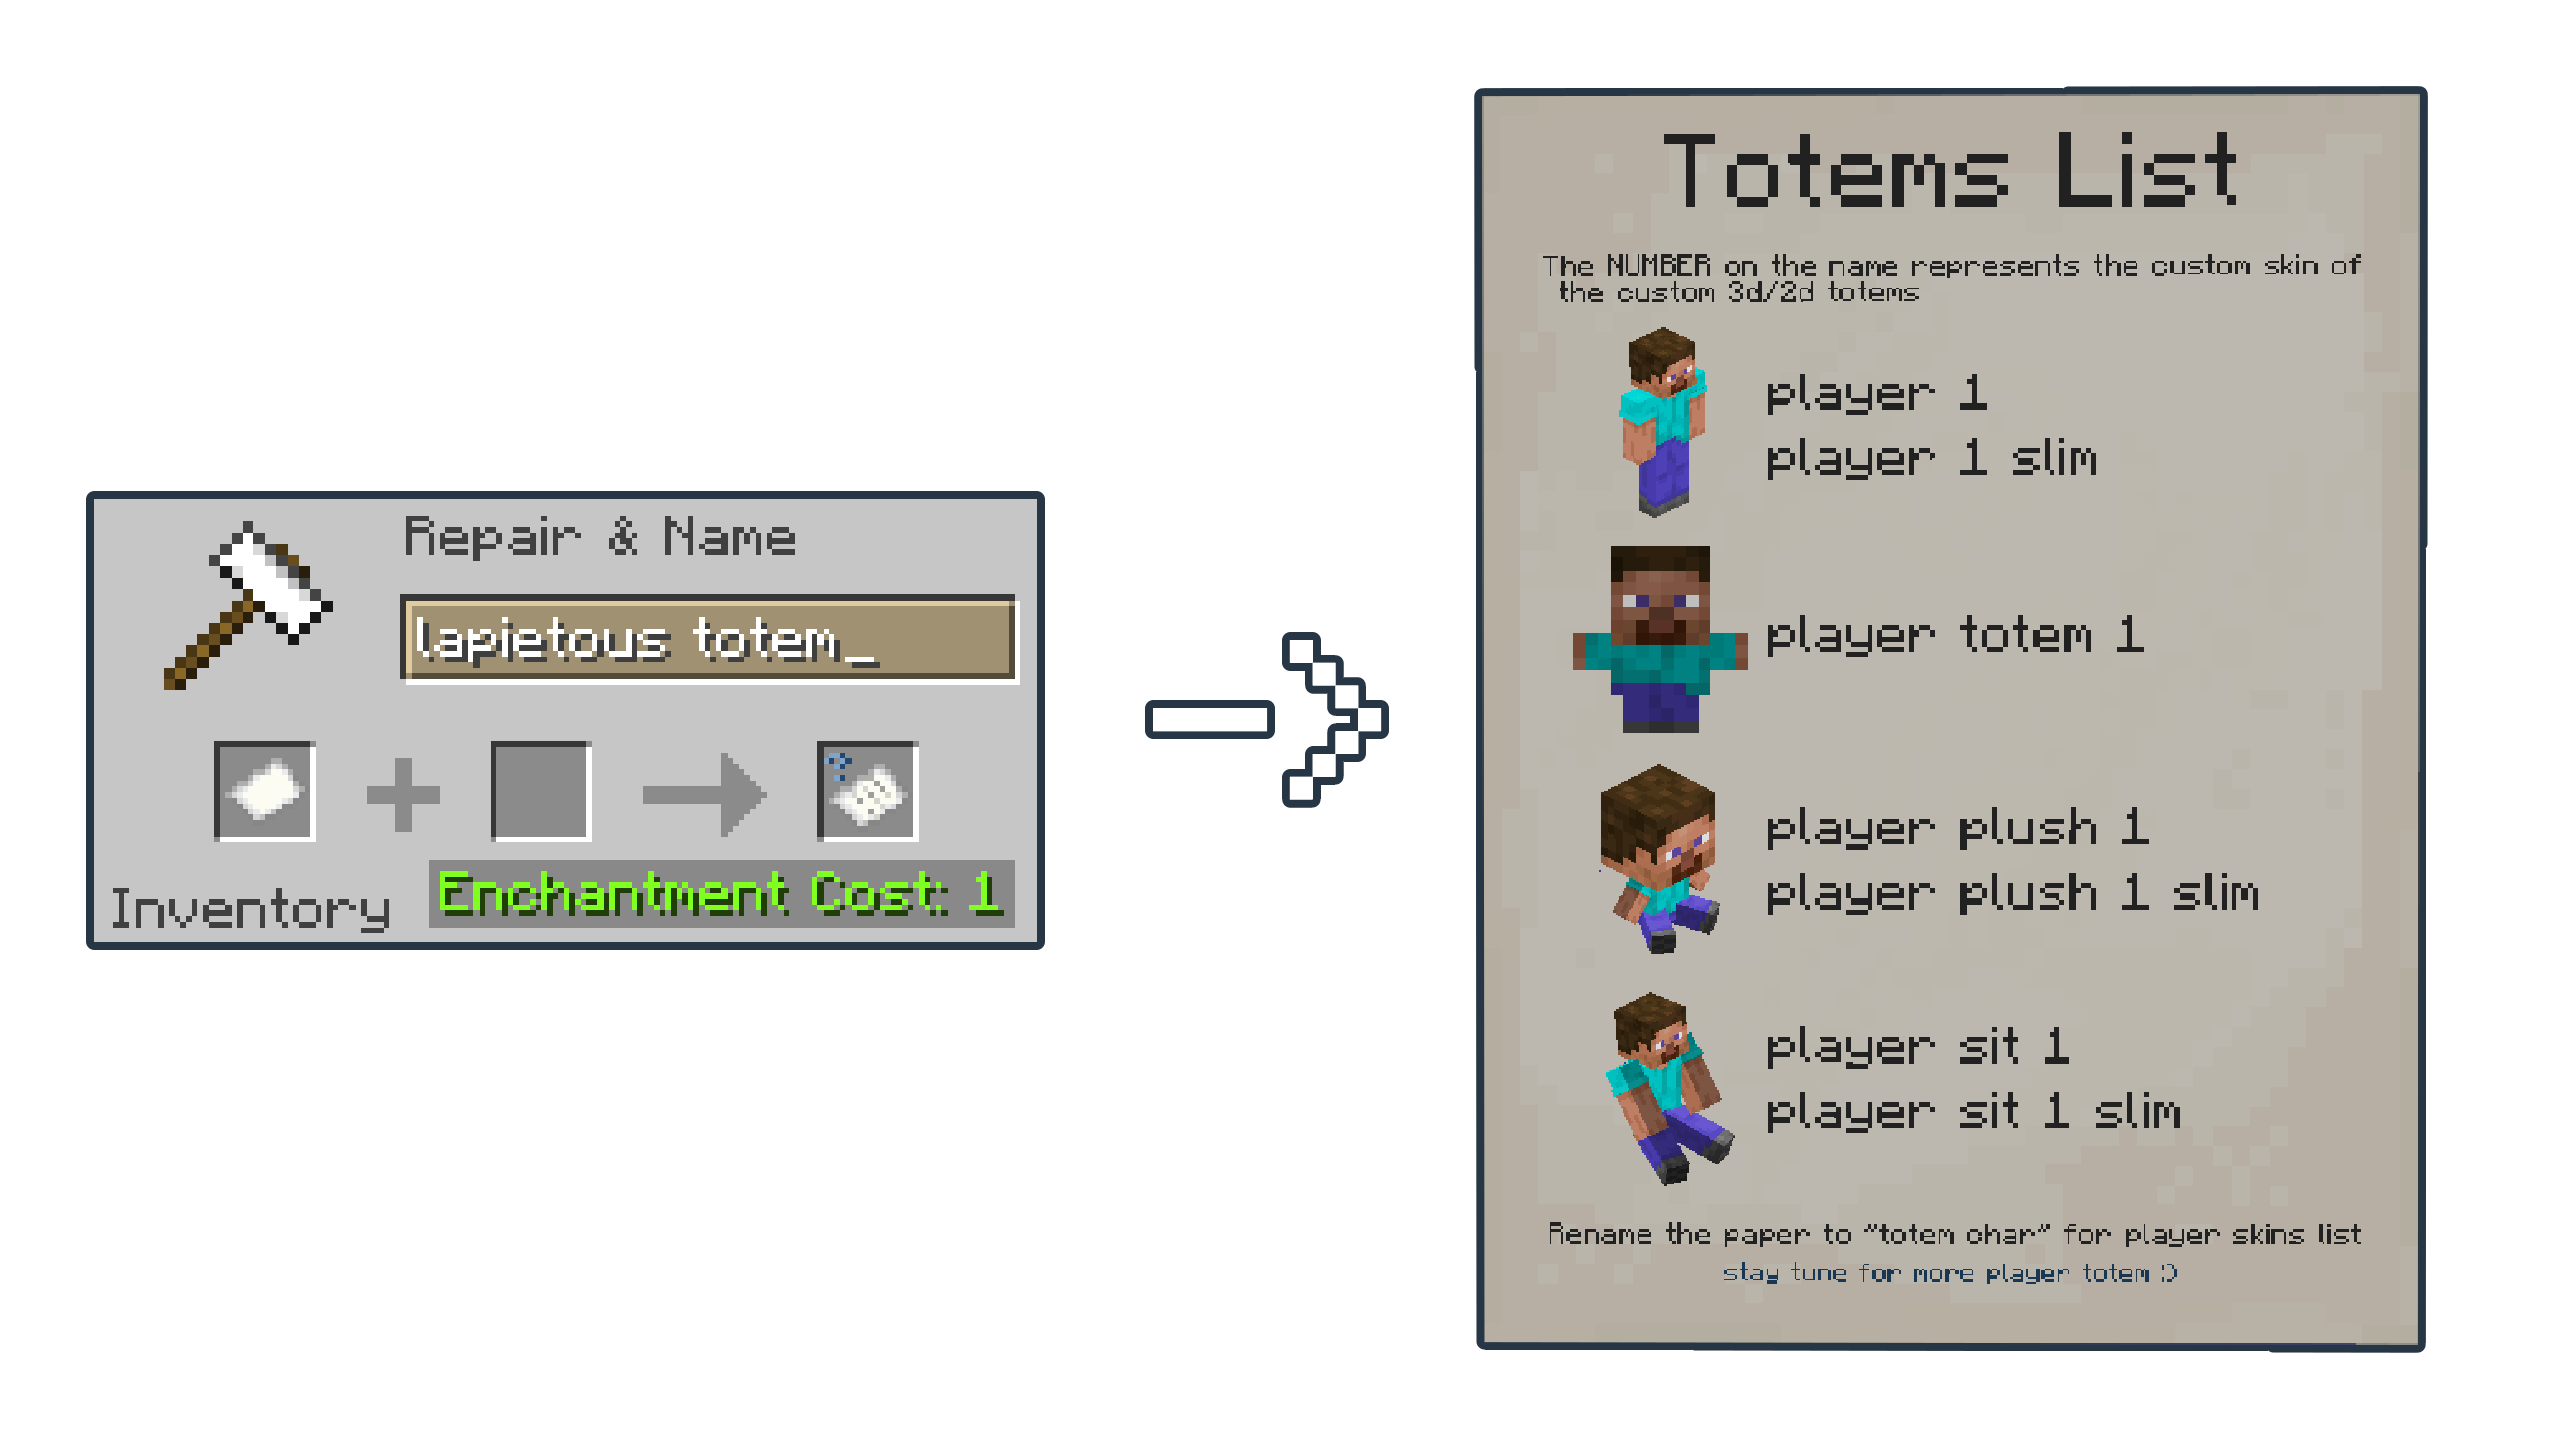
player plush 3`to turn into an Ari plush model,`player totem 1`for the Steve 2D totem model, and`player sit 8`for the Sunny Sitting model _(the numbers`3`and`8“来更改模型(名称中的内容默认对应Ari和Sunny皮肤)_。 - 如果皮肤是为纤细型模型制作的,你可以在名称后添加“
slim`to the name, for example,`player 5 slim`,`player sit 4 slim`, and`player plush 7 slim`_(the number`5`,`4`, and`7“(名称中的内容默认对应Kai、Efe和Noor皮肤)_。
| 图腾名称 | 示例物品 | 是否有纤细变体? |
| :——–: | :——–: | :——–: |
|“ player 1 `|<img src="https://cdn.modrinth.com/data/cached_images/f24762f705c59c9a62087def93ce5ddc901bb87f.png" alt="player 1 item preview" width="25%" height="25%">|YES|<br>`
| player totem 1 `|<img src="https://cdn.modrinth.com/data/cached_images/08a314a9162642f8610746c35e6fc1c00f76806c.png" alt="player totem 1 item preview" width="25%" height="25%">|NO|<br>`
| player plush 1 `|<img src="https://cdn.modrinth.com/data/cached_images/25e1005178204f3c64b96036e291ada63f2901d4.png" alt="player plush 1 item preview" width="25%" height="25%">|YES|<br>`
| player sit 1 `|<img src="https://cdn.modrinth.com/data/cached_images/495ec55382a62b5baad7f7f5a13cbd2e2b16f849.png" alt="player sit 1 item preview" width="25%" height="25%">|YES|<br>`
| player jack 1 `|<img src="https://cdn.modrinth.com/data/cached_images/2ff30843dbb80437b3bdfe641677d1bb747e964a.png" alt="player jack 1 item preview" width="25%" height="25%">|YES|<br>`
| player snowglobe 1 “| |是|
- 如果你忘记了图腾的名称,或者想查看皮肤列表,你可以将纸重命名为“
lapietous totem`for the Totem's name and`totem char`for the skins list _(the skin list has two pages, so add a number like this`totem char 2“(用于第二页)_。
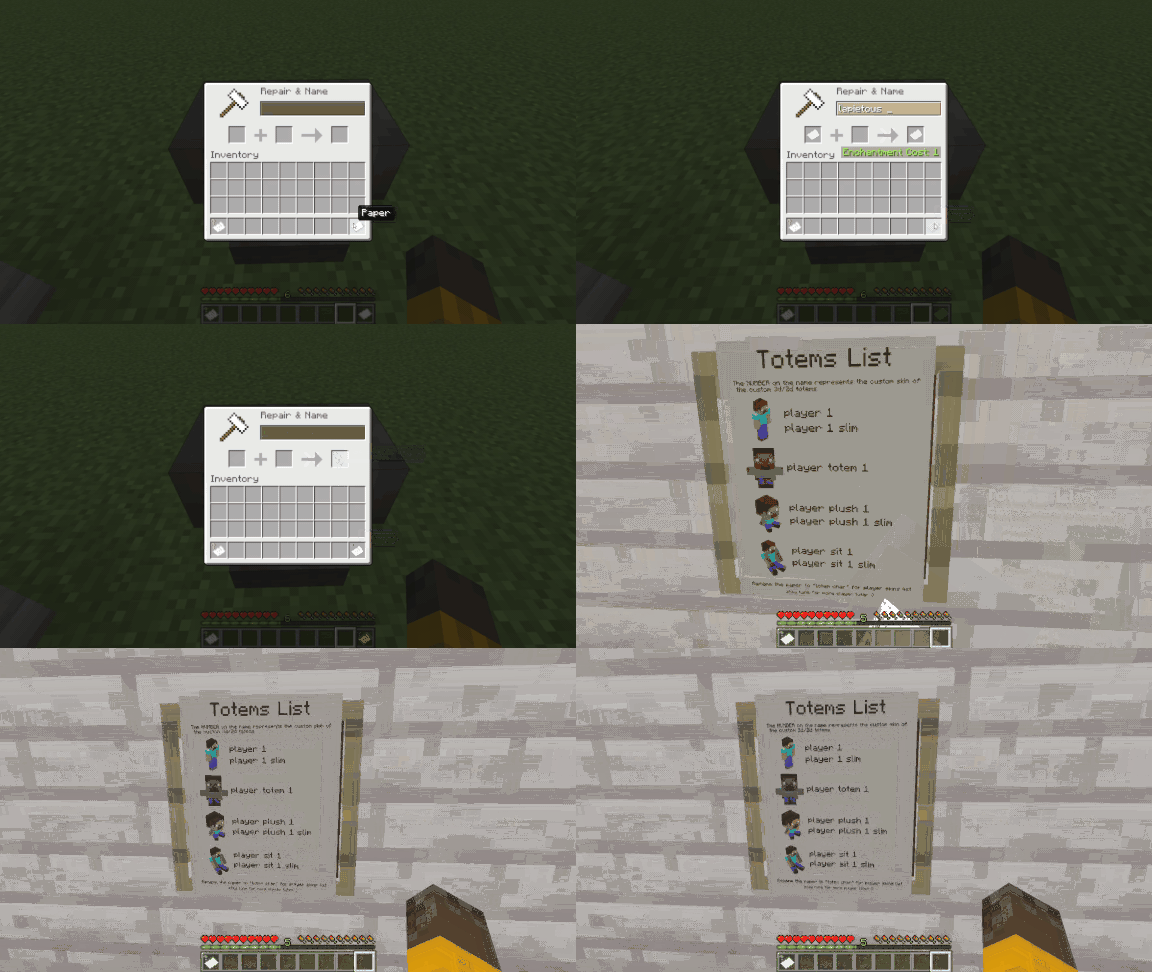
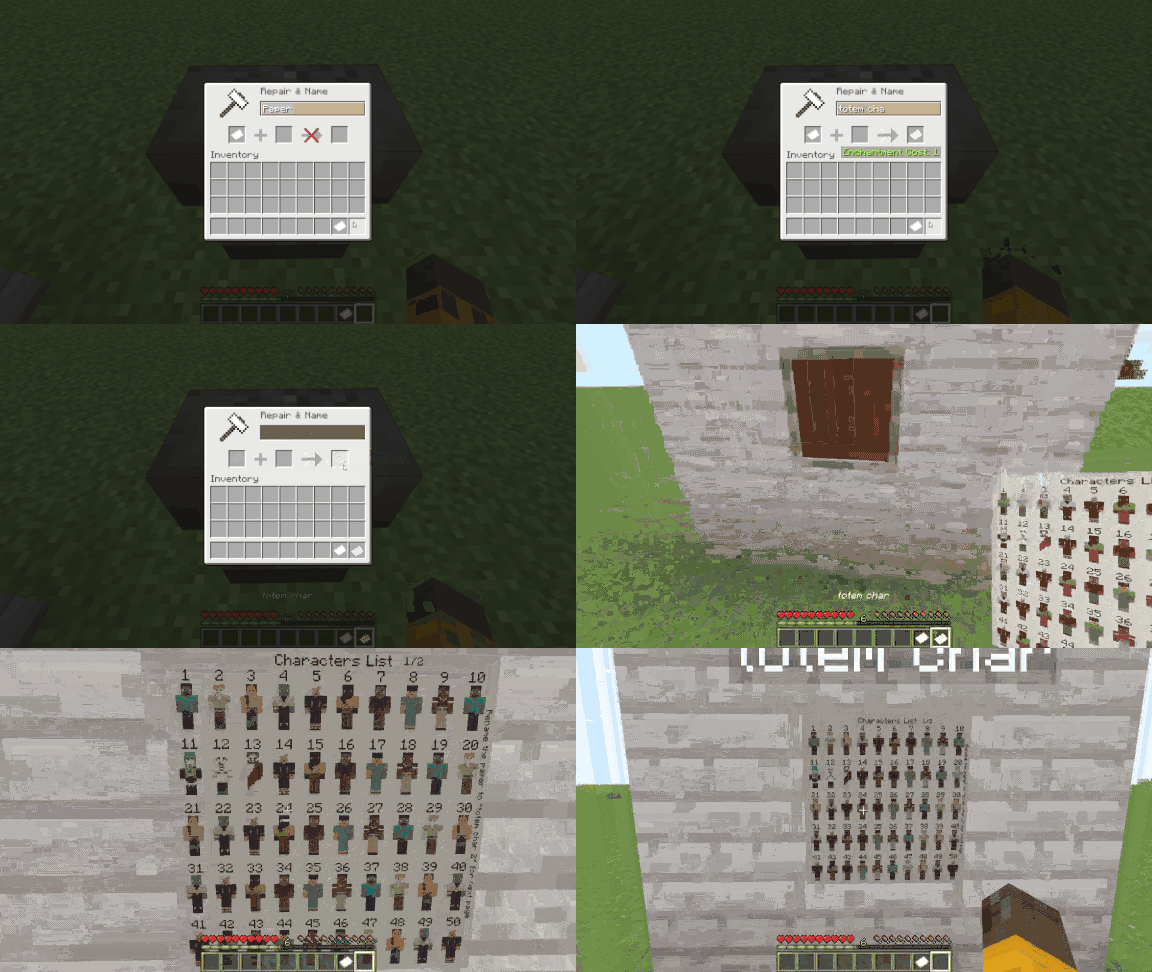
- 你可以通过在资源包中编辑,用你的皮肤替换默认皮肤来自定义皮肤。
如何应用你的自定义皮肤
- 禁用资源包。
- 将你的自定义皮肤图片文件重命名为你想要替换的槽位编号,例如:“
11.png`,`1.png`,`39.png“。
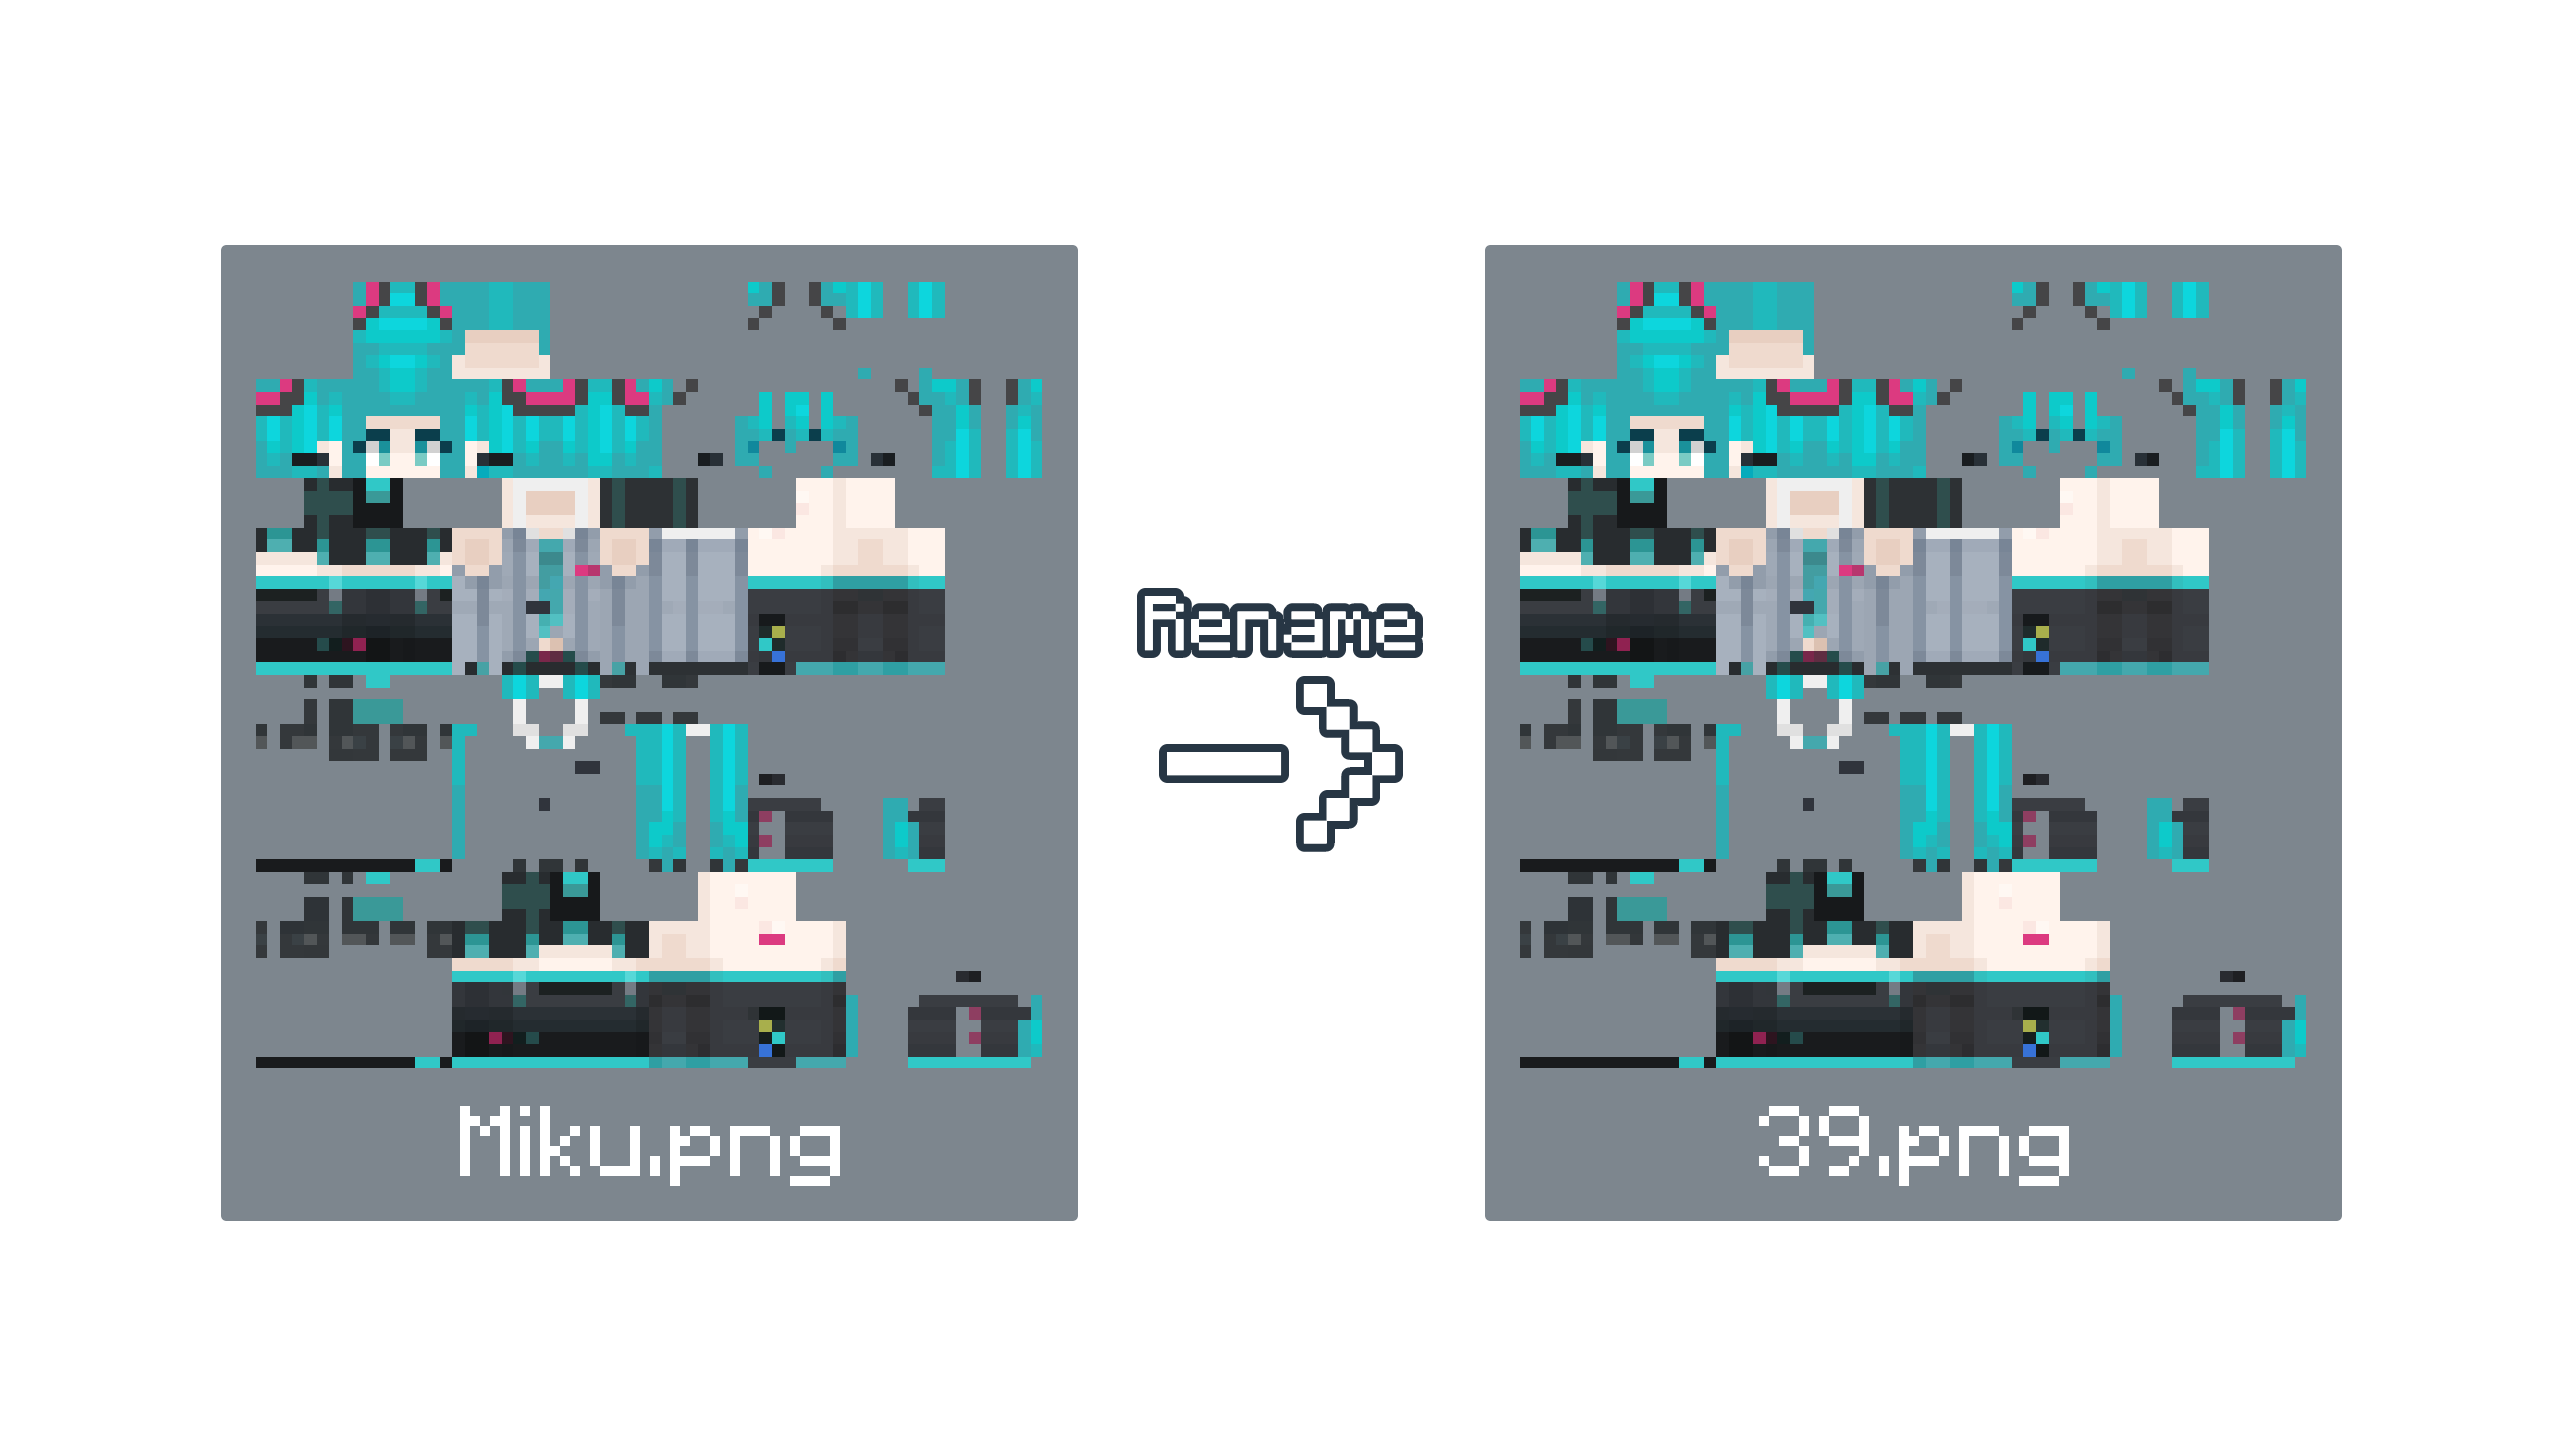
- 在 Minecraft 资源包设置中点击“打开资源包文件夹”进入资源包文件夹。
- 找到 “
Custom Player Totems [x.x].zip“ 并打开该文件。 - 前往此位置 “
\assets\customplayertotems\textures\item\skins`and copy and paste your custom skin image file _(renamed to the slot number)_ to the`skins“ 文件夹;它会提示或自动用你的自定义皮肤图片替换默认图片文件。或者,你也可以删除默认皮肤图片文件,然后放入你的自定义皮肤图片。
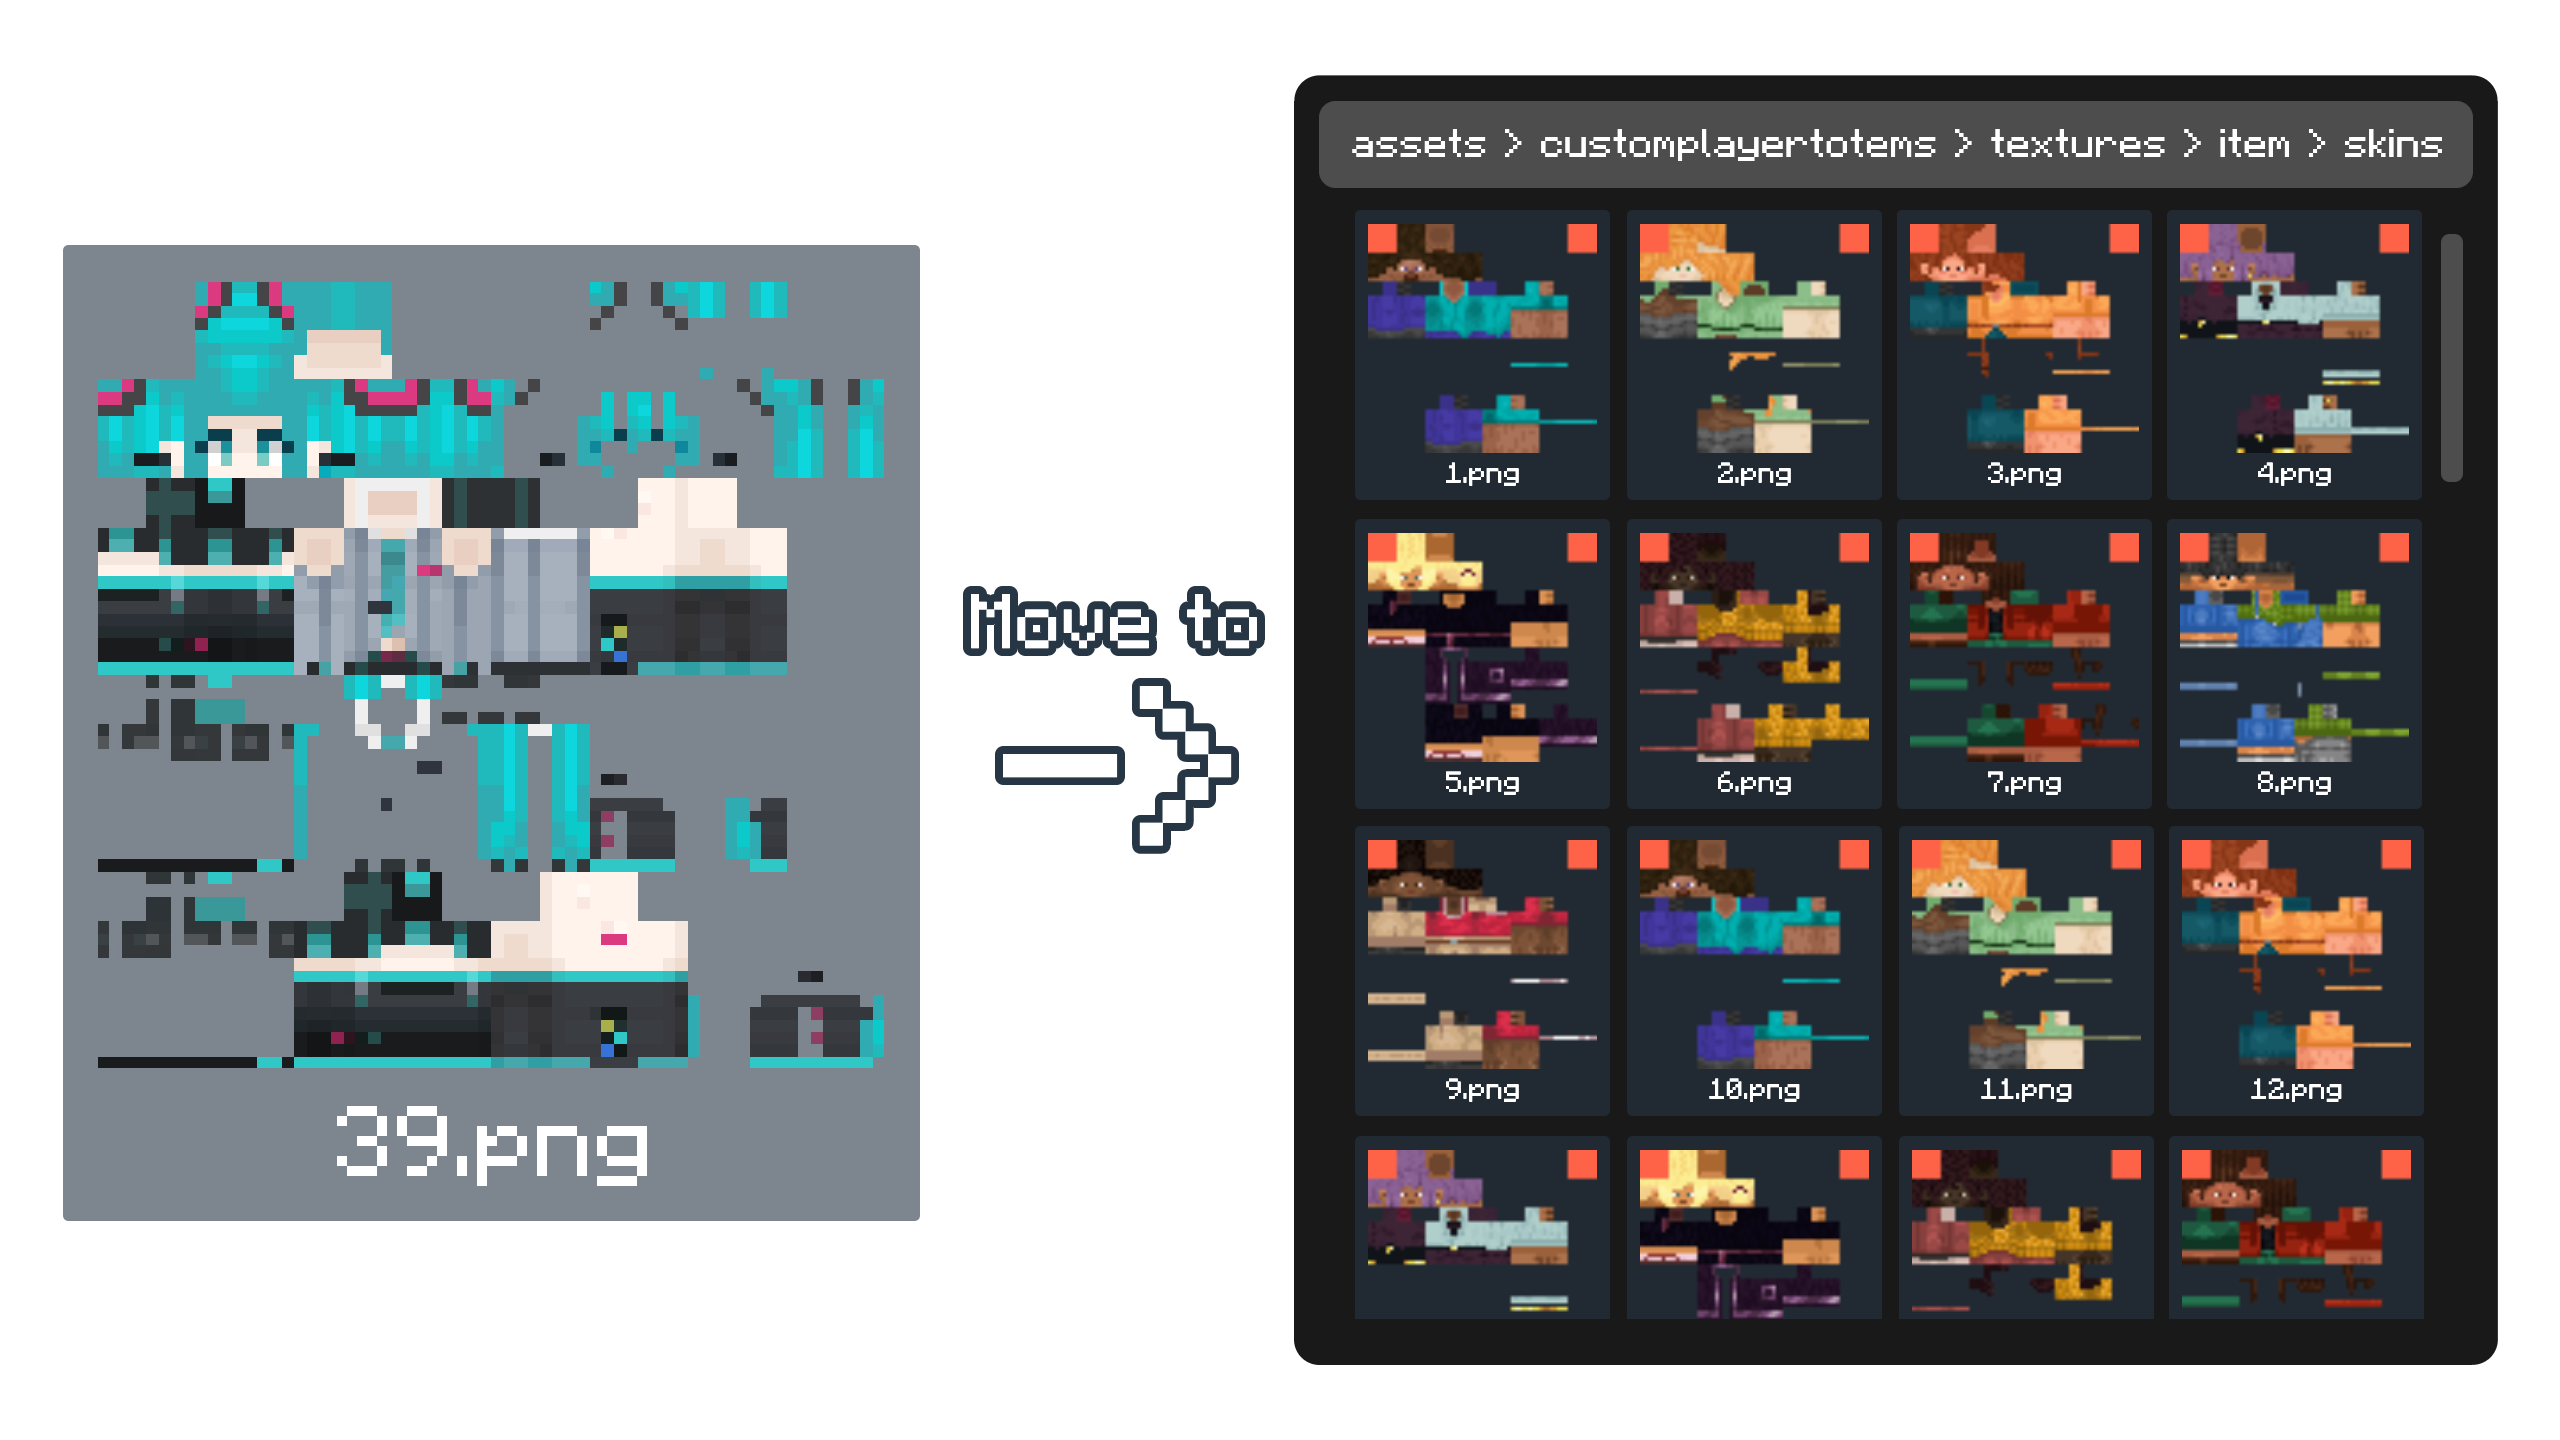
- 自定义完成后,启用资源包。
- 下方为如何在游戏内获取自定义玩家图腾的示例图片。
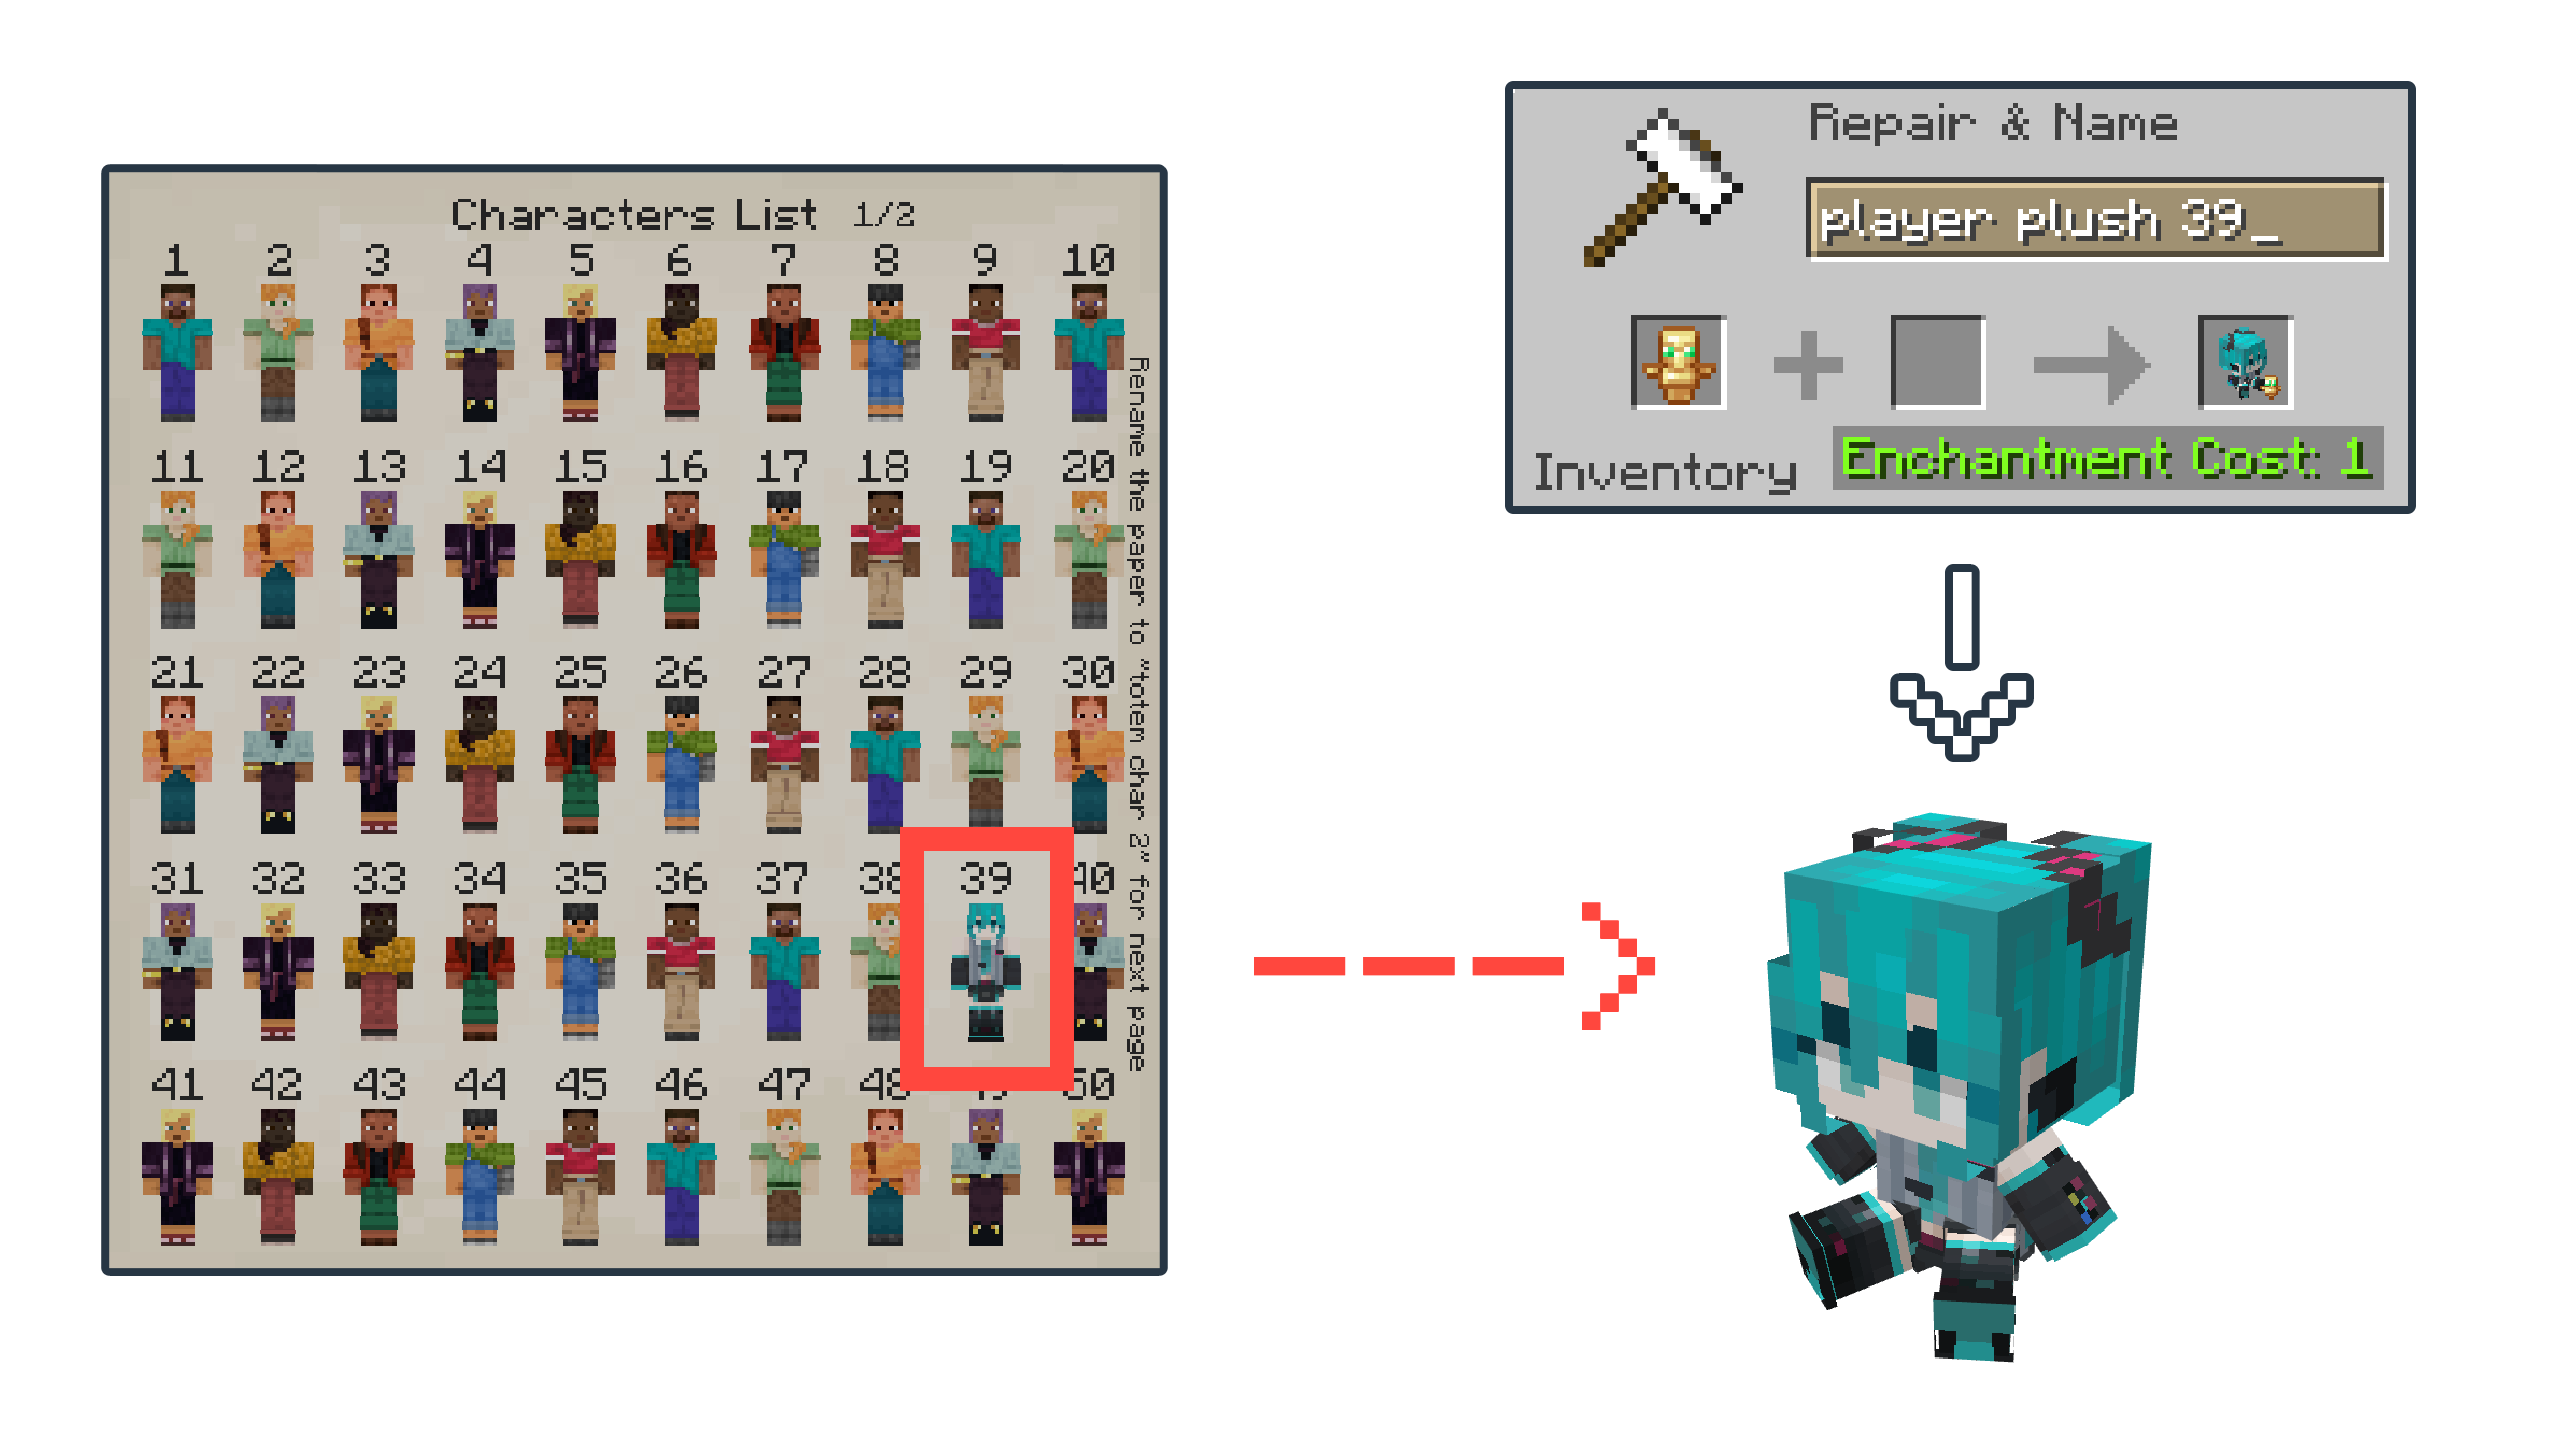
另一种方法是使用资源包扩展(见最新版本说明 “Custom Player Totem Skins [TEMPLATE].zip“):
- 下载资源包扩展(“
Custom Player Totem Skins [TEMPLATE].zip“)并打开该文件。 - 前往此位置 “
\assets\customplayertotems\textures\item\skins`and copy and paste your custom skin image file _(renamed to the slot number)_ to the`skins“ 文件夹;它会提示或自动用你的自定义皮肤图片替换默认图片文件。 - 自定义完成后,启用资源包并确保资源包扩展(“
Custom Player Totem Skins [TEMPLATE].zip`) is on **top** of the main resource pack (`Custom Player Totems [x.x].zip“)。

如何隐藏或移除小型图腾图标
- 禁用资源包。
- 在 Minecraft 资源包设置中点击“打开资源包文件夹”进入资源包文件夹。
- 找到 “
Custom Player Totems [x.x].zip“ 并打开该文件。 - 前往此位置 “
\assets\minecraft\models\lapietous“。 - 找到 “
totem_icon.json`and rename it whatever you want, or just rename it to`no_totem_icon.json“,如果你想永久移除它,则删除该文件。 - 找到 “
totem_icon_invisible.json`and rename it to`totem_icon.json“。 - 启用资源包,小型图腾图标应该就会消失。
如何将自定义皮肤转移到新版本
- 禁用旧版和新版资源包。
- 在 Minecraft 资源包设置中点击“打开资源包文件夹”进入资源包文件夹。
- 找到旧资源包(“
Custom Player Totems [old].zip`) with your custom Skins and find the New Fresh Version Pack (`Custom Player Totems [new].zip“)并打开这两个文件。 - 在旧资源包(含自定义皮肤)中,前往此位置 “
\assets\customplayertotems\textures\item`and copy the`skins“ 文件夹。 - 在新资源包中,前往你复制到的此位置 “
\assets\customplayertotems\textures\item`and paste the`skins“ 文件夹,它会提示或自动用你的自定义玩家皮肤替换。 - 启用新资源包。
如果你使用的是资源包扩展(“Custom Player Totem Skins [TEMPLATE].zip`) for customized skins, all you need is to replace the main resource pack (` Custom Player Totems [old].zip `) with (` Custom Player Totems [new].zip “),请将资源包扩展保持在主资源包之上。
附加信息:
- 本整合包尚未在 Punchy! 等模组上进行过测试。
- 我将在未来的更新中添加更多模型和功能。
你也可以在这里查看该资源包:


常见问题
Custom Player Totems 支持哪些 Minecraft 版本?
Custom Player Totems 支持 Minecraft Java 版 1.21.4–26.3,共 13 个版本。下载时注意选择和你游戏版本一致的文件。
Custom Player Totems 怎么安装?
把下载的 .zip 文件(不用解压)放进游戏目录的 resourcepacks 文件夹,进游戏后在「选项 → 资源包」里把它移到右边启用。


评论
登录后评论和评分