
GoingNuclear
Going Nuclear is a fully server-side mod for Fabric that lets players build working nuclear power plants in Minecraft. Players join with a plain vanilla client: nothing to install on their side.
截图

介绍
☢️ Going Nuclear – Power Your World with Fission!
Going Nuclear is a fully server-side mod for Fabric that lets players build working nuclear power
plants in Minecraft Java 26.3: fission reactors, coolant and steam loops, turbines and an electric grid.
Players join with a plain vanilla client: nothing to install on their side.
✨ Features
- ⚛️ Size-variable fission reactors (3×3×3 up to 15×15×15) with per-rod neutronics, decay heat, xenon
poisoning, coolant, steam pressure, core damage and meltdowns - 🔴 Two fuels, redstone and glowstone fuel rods, which can be enriched once in an Enrichment
Centrifuge for more power; coal control rods - 🔥 Boiling or pressurized cooling: heat exchangers, steam turbines, steam dump valves and condensers
- 💧 Water pumps, copper pipes, circulation pumps, check valves and expansion tanks
- ⚡ Electricity: ground cables, power poles with overhead wires that hang like leads, battery banks,
a backup generator and electric lamps - 🏭 Vanilla furnaces, blast furnaces and smokers that smelt on electricity
- 🎛️ A reactor control box GUI with manual, automatic and redstone rod control, a core map and SCRAM
- 🧰 Tools: pipe wrench, pliers, thermal probe and temperature sensor
- ☣️ Geiger counter and hazmat suit
- 🔊 Sounds and effects: the reactor hums, sirens wail, turbines whine and condensers plume
- 🛡️ Fully server-side: no client mod required!
🔧 Commands
/goingnuclearor/goingnuclear help– quick start guide/goingnuclear reload– reload the config (operators)
🧩 Requirements
Server
- Fabric Loader 0.20.1 or newer, for Minecraft 26.3
- Fabric API
Polymer, SGUI and Server Translations API are bundled inside the jar, so nothing else is needed.
Players
- Nothing: a plain vanilla client joins as it is (it is asked to accept the server’s resource pack).
📦 Installing on a server
- Install Fabric Loader for 26.3 and put Fabric API and GoingNuclear-*.jar in
mods/. - Start the server once. Then, to send the textures to players, edit
config/polymer/auto-host.json
and set"enabled": true(Polymer then serves the resource pack itself).
The mod marks the pack as required, so players must accept it to join. To let them decline it
(they then see the vanilla look-alikes), set"requireResourcePack": falsein the world’s config (see
Configuration) and restart the server. - Optional: tune the world’s config and run
/goingnuclear reload.
Singleplayer works too: put the same jars in your client’s mods/ folder.
🖥️ How “server-side only” works
The mod uses Polymer (bundled inside the jar):
| Thing | Players with the server resource pack | Players without it |
|---|---|---|
| Machines (reactor casing, pumps, turbine…) | Custom textures | Vanilla look-alikes (gray concrete, dispenser, blast furnace…) |
| Pipes, cables, poles, overhead wires | Drawn with display entities | Same (they use vanilla textures) |
| Fuel and control rod channels | One 3D model per block (light on the client) | The same shape built from vanilla blocks (about 12 pieces per block) |
| Items | Custom icons | Vanilla look-alike items with the right name and tooltip |
| GUIs | Chest-style menus (SGUI) | Same |
| Names | Translated by Server Translations API | Same |
Libraries bundled with include (Jar-in-Jar): Polymer core/blocks/resource-pack/virtual-entity/autohost,
SGUI, Server Translations API. The server only needs Fabric API + this jar.
🎮 Playing
Run /goingnuclear in game for a quick guide.
🏗️ 1. Build a reactor
- A closed box of Reactor Casing (Reactor Glass counts as casing), between 3×3×3 and 15×15×15.
- One Reactor Control Box and at least two Reactor Ports set into the walls (not on edges or corners).
- Inside: Fuel Channels, Control Rod Channels, and air or water.
- Put Reactor Glass in the walls to watch the core: fuel channels show their fuel pins (red = redstone,
yellow = glowstone, gold tie plates = enriched; dark red, pale yellow and grey = depleted) and glow blue while the reactor runs (orange above the warning
temperature, red when the fuel is being damaged). Control rods are black cross-shaped blades that slide
in and out as you change the insertion, and drop in fast on a SCRAM. - Stack channels to make them taller: fuel channels on top of each other join into one long assembly
(tie plates only at the very top and bottom), and control rod channels join into one tall channel with a
single drive housing on top. The control rods go in from the top and fill the stack downwards: at 50 %
insertion the upper half of the stack is fully in and the lower half is out, so the fuel near the bottom
is held back less (right-click a control rod channel to see how far in its rod is). - Pipe wrench on a port toggles INPUT (water in) / OUTPUT (steam or coolant out).
- The control box rescans the structure automatically; its GUI shows what is wrong if it doesn’t form.
Neutron model, per active fuel rod:
k = (1 + Σ coupling from fuel within 2 blocks / d²)   fuel close together boosts each other
    × moderation (water level in the core)            less water = less power (negative void coefficient)
    × Doppler feedback (hotter = less reactive)
    × (1 − control rod absorption within 2 blocks / d² × insertion of that channel)
rod power = base power × k²       (redstone 20 kW, glowstone 55 kW at k = 1)
Fuel cycle. A rod gives a fixed amount of energy, so a rod running hotter (higher k) burns out
sooner; below 10 % fuel left it starts losing power. Fuel only burns with the heat the reactor makes, so at
low load the rods last longer, and a shut-down reactor burns none. Lifetimes at k = 1:
| Rod | Base power | Fuel | Lasts (k = 1) | Burns down into |
|---|---|---|---|---|
| Redstone Fuel Rod | 20 kW | 100 kWh | 5 h | Depleted Redstone Fuel Rod |
| Enriched Redstone Fuel Rod | 30 kW | 100 kWh | 3 h 20 min | Depleted Fuel Rod |
| Glowstone Fuel Rod | 55 kW | 133 kWh | 2 h 25 min | Depleted Glowstone Fuel Rod |
| Enriched Glowstone Fuel Rod | 75 kW | 133 kWh | 1 h 47 min | Depleted Fuel Rod |
A rod makes a few kW of electricity (a redstone rod about 7 kW), so a plant’s output comes from the size
of its core: a 5×5×5 reactor (3×3×3 inside) with 5 redstone rods on one layer makes up to about 120 kW of
heat, and with all three layers filled (15 rods, which also boost each other from above and below) more
than three times that.
Glowstone fuel also drives the rods around it harder (neutron factor 1.5, redstone 1.0); enriching does
not change that. The Enrichment Centrifuge turns a depleted redstone or glowstone rod and 8 dust of
its kind (redstone dust, glowstone dust) into an enriched rod: 60 s at 20 kW, power in through the yellow
port on its back. An enriched rod has the same energy as a fresh rod of its kind at more power, so it burns
out sooner. Fuel is enriched once: enriched rods burn down into plain Depleted Fuel Rods,
which the centrifuge does not take (smelt them for iron). Every kind of depleted rod smelts into 2 iron.
- Right-click the centrifuge with depleted rods or dust to load them, or open it (empty hand) and click:
left-click a slot to put in all of that item from your inventory, right-click to take it back, click
the enriched rods to collect them (sneak-right-click with an empty hand collects them too). - It holds 16 depleted rods and 64 dust of each kind, and 16 finished rods of each kind; it waits while
those are full. Redstone goes first when both kinds are waiting. A redstone signal stops it; on too
little power it spins slower. Breaking it drops everything in it.
Power follows that target with a short delay; decay heat (6 % of power, 30 s time constant) keeps
heating the core after a shutdown, so keep the water flowing after a SCRAM.
A little heat also goes out through the casing (shellHeatLoss, 0.01 J/t per °C per casing block: about
17 kW for an 8×8×8 reactor at 300 °C), whatever the load. A core with no coolant flowing cools down by
itself only slowly (over two hours from 300 to 200 °C for an 8×8×8), so to get it below 200 °C for
refuelling sooner, keep the coolant flowing after you shut it down.
❄️ 2. Cooling modes (chosen in the control box)
Every fluid connection on a machine is a square copper socket the size of a pipe, in a coloured flange:
| Flange | Meaning |
|---|---|
| Blue | water or coolant going in: reactor INPUT port, heat exchanger bottom, circulation pump inlet, condenser back, Water Outlet (also the water pump outlet and the condenser bottom, where the condensate comes out) |
| Orange | hot side: reactor OUTPUT port (coolant or steam out), heat exchanger top (coolant in) |
| Cyan | coolant out after the heat exchanger: its sides, drawn by a circulation pump |
| White | live steam: heat exchanger front (out), steam turbine top (in) |
| Misty grey-blue | exhaust steam: steam turbine bottom (out), condenser top (in) |
| Purple | warm cooling water: condenser front (out) |
| Green | circulation pump outlet |
| Dark steel / black rubber | Pipe Wall Port / Cable Wall Port |
| Yellow (cable socket) | power in: the back of a Battery Bank, the faces around a Circulation Pump’s pipes, a Water Pump’s port |
| Red (cable socket) | power out: the left, right and back of a Steam Turbine; the left, right, top and bottom of a Battery Bank |
Boiling (BWR), the simple one:
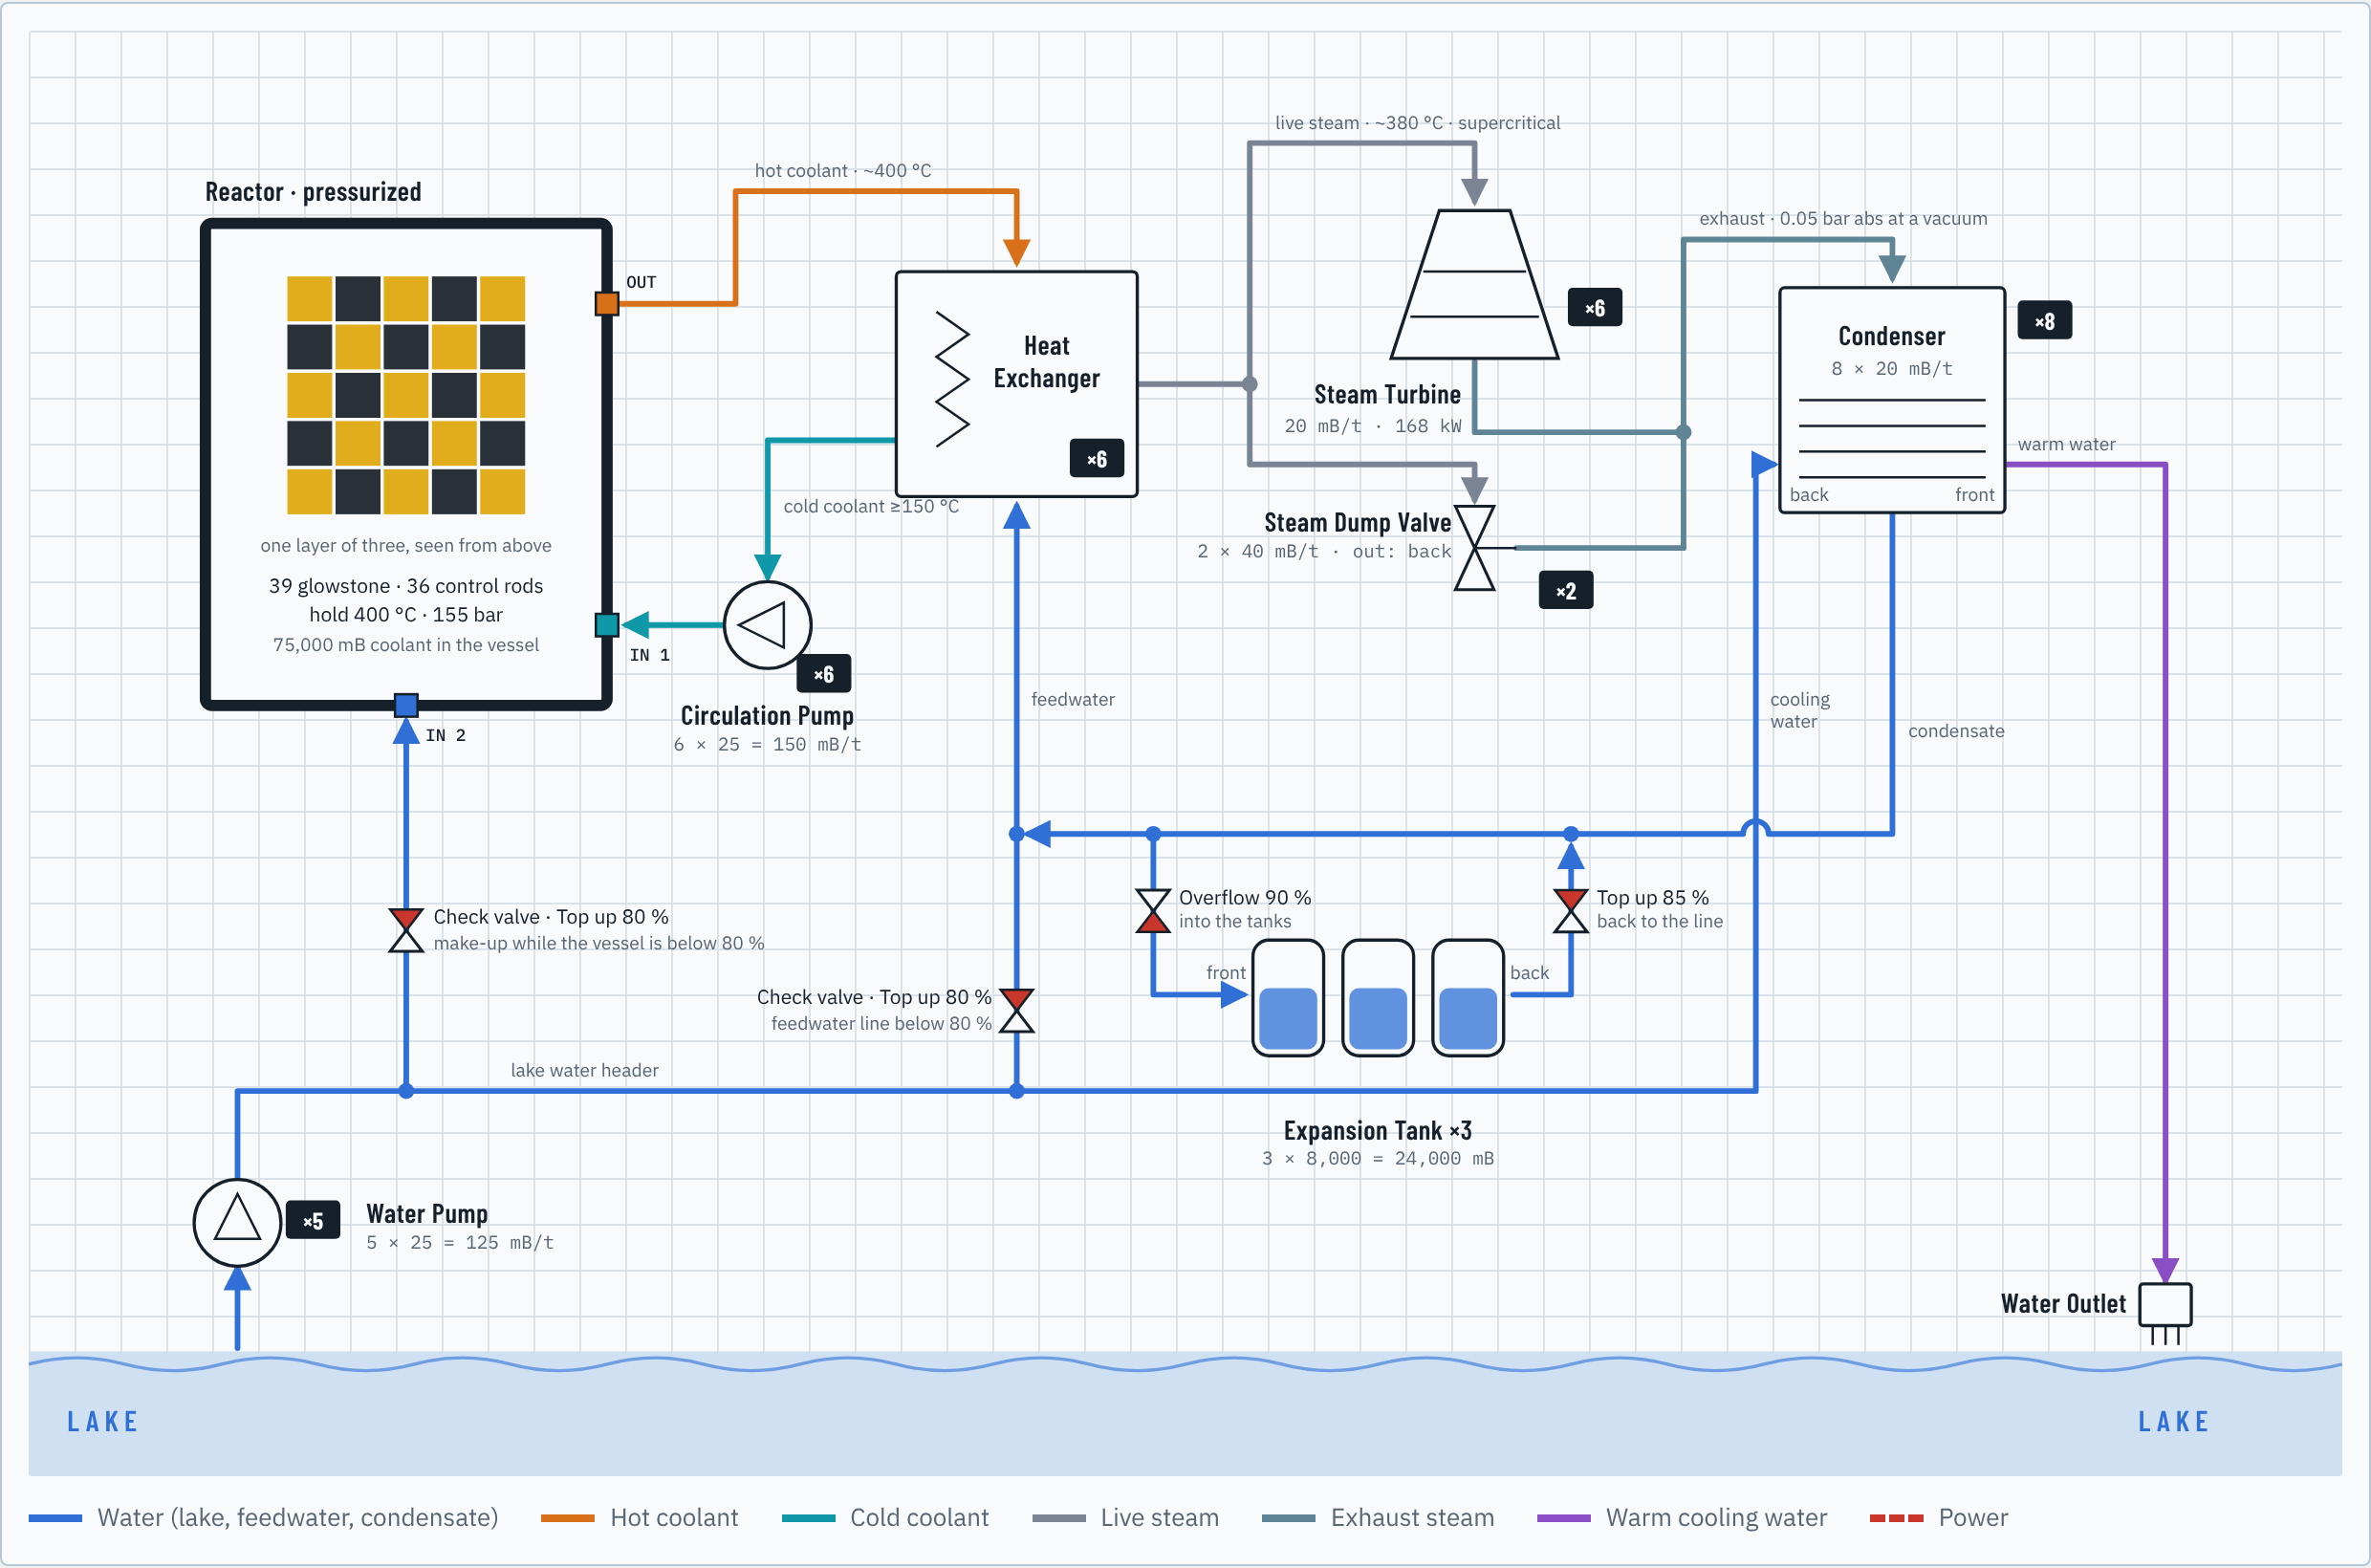
water source → Water Pump → pipes → INPUT port [reactor] OUTPUT port → pipes → Steam Turbine(s) → Condenser(s)Pressurized (PWR), a closed primary loop:
[reactor] OUTPUT → coolant → TOP of Heat Exchanger, SIDE → Circulation Pump → coolant → INPUT [reactor]
Water Pump → water → BOTTOM of Heat Exchanger, FRONT → steam → TOP of Steam Turbine(s)
Steam Turbine BOTTOM → exhaust steam → TOP of Condenser(s), BOTTOM → condensate → back to the heat exchangers' feedwater
river → Water Pump → BACK of Condenser(s), FRONT → warm cooling water → Water Outlet → river
The Heat Exchanger has one job per face:
| Face | Job |
|---|---|
| Top | coolant in |
| Bottom | water (feedwater) in |
| Front (faces you when placed, always sideways) | steam out |
| The other three sides | coolant out, drawn by a Circulation Pump |
It pushes steam out by itself, but the coolant only leaves when a Circulation Pump (back = in,
front = out) draws it from one of those sides, directly or through a pipe, and sends it to the reactor’s
INPUT port. If the pump stops, the exchanger fills up, stops cooling, and the reactor heats up. Coolant is
its own fluid, so it cannot get mixed up with the feedwater.
The coolant has a temperature (the Thermal Probe shows it on pipes, pumps, exchangers and the control
box). In the core it heats up towards the core temperature, faster the bigger the difference; it leaves
through the OUTPUT ports at its own temperature, keeps it through pipes and pumps, and mixes with what it
meets. A heat exchanger takes the heat it has above 150 °C (heatExchangerMinTemp) and turns it into
steam (like a real steam generator, it needs coolant hotter than the water it boils), so the coolant leaves
it at 150 °C at most. Colder coolant just passes through: a reactor that has been shut down and cooled
off keeps its pumps circulating, but makes no steam and no power. Each mB of coolant carries 10 J per °C
(coolantHeatCapacity), so coolant at 300 °C gives 1500 J per mB, and hotter coolant needs less flow
for the same heat.
Everything shares the load evenly. Whatever pushes the same fluid into one pipe or machine shares the
room in it equally, and whatever draws the same fluid from one pipe or machine outlet shares what is in
it equally, whichever machine happens to tick first. So three heat exchangers on one steam pipe each put
in a third, three circulation pumps each draw and push a third of the coolant (also when they sit on
three sides of one exchanger, or draw from several exchangers through a pipe), turbines on one steam
pipe each get the same steam and make the same power, and a reactor spreads its flow over all of its
INPUT and OUTPUT ports. A machine that cannot use its part (full, or out of power) leaves it to the
others. Remember that pumps do not create flow: together they move what the reactor heats.
Steam has a temperature and a pressure. A heat exchanger makes steam 20 °C cooler than the coolant
that comes in (steamApproachTemp); a reactor in boiling mode makes it at its core temperature. Pipes carry
the temperature along and mix it, like coolant. The pressure is the boiling pressure of water at that
temperature (280 °C: 64 bar, 300 °C: 86 bar; above 374 °C it is “supercritical”), so it follows the load:
when the turbines take less, the coolant comes back hotter and the steam gets hotter and higher in
pressure. The Thermal Probe shows both on pipes, heat exchangers, turbines and condensers. Pressures are
shown as absolute pressure (from a perfect vacuum, as in steam tables) with the gauge pressure next to it
(relative to the air around, what a normal gauge reads): a condenser’s vacuum is 0.05 bar abs, or -0.96 bar
gauge, and water boils at only 33 °C there, so its exhaust steam is that cool.
What a turbine gets out of one mB of steam depends on two things (the probe shows both):
-
Steam temperature: full rated power with 300 °C steam (
steamDesignTemp), less with cooler steam,
up to 120 % with hotter steam (steamMaxBonus). So a hotter reactor gives more power from the same
steam, which is the efficiency you trade against the risk. -
Exhaust back-pressure: the used steam leaves at the turbine’s bottom as cool exhaust steam.
- Into a Condenser (the turbine sitting right on it, or a pipe from the turbines’ bottoms to its
top): the condenser keeps a vacuum (0.05 bar abs), and the turbine gives full power. - Not enough condensing (too few condensers, no cooling water, or their water can’t get away): the
exhaust line fills up. Once it is past half full the back-pressure rises, and the power per mB
drops, down to half at the open air’s pressure. The condensers then also condense more (like real
ones, up to twice their rate), so the plant settles somewhere in between: at full load, 3 turbines on
2 condensers give about 80 %, 2 turbines on 1 condenser a bit over half. A full line lets the rest
out into the air through the relief, with a plume of steam. - Nothing below that takes it: the exhaust goes straight into the air (a big plume). The turbine
still runs, but at half the power per mB, and the water in that steam is lost. A cheap way to start;
condensers are the upgrade.
A turbine never puts its exhaust into a pipe that carries water or coolant (one fluid per pipe); it
vents it instead, and the probe says why. - Into a Condenser (the turbine sitting right on it, or a pipe from the turbines’ bottoms to its
The Condenser turns the exhaust back into water, cooled by river water. One job per face:
| Face | Job |
|---|---|
| Top | exhaust steam in |
| Back | cooling water in (river water from a Water Pump) |
| Front (faces you when placed) | the cooling water out again, a little warmer: pipe it to a Water Outlet |
| Bottom | condensate (water) out |
| Left, right | nothing |
Each condenser takes 20 mB/t of steam at a vacuum (condenserRate, one turbine’s worth: build one per
turbine for full power) and needs 0.5 mB of cooling water per mB (condenserCoolingWater), so about one
Water Pump for every two condensers. All the
water in the exhaust comes back as condensate: pipe it from the bottom back to the heat exchangers’
feedwater line for a closed secondary loop (the water pumps then only make up what the turbines’ seals
leak, see Small leaks below), or to a Water Outlet. Both waters leave by themselves. A plume of vapour rising high above it, like over a cooling
tower, shows that it is working (taller and denser with more load); a thick, fast plume with a hiss means
the steam is backing up into the turbines.
A Steam Dump Valve (turbine bypass) sends live steam around the turbines, straight into the
Condensers, so the reactor can get rid of heat without making electricity: to cool it down quickly for
refuelling, or when the reactor makes more heat than the grid needs. One job per face:
| Face | Job |
|---|---|
| Top | live steam in (from the heat exchangers’ steam line, like the turbines’ tops) |
| Back | dumped steam out: a pipe into the turbines’ exhaust line, or down into a Condenser’s top |
| Front (faces you when placed) | handwheel and gauge: the needle shows shut, partly or fully open |
| Left, right, bottom | nothing |
- It takes up to 40 mB/t of steam (
steamDumpRate), two turbines’ worth: about 840 kW of heat. Three
valves bypass six turbines. - Right-click it with an empty hand to set it. Auto (the default): it opens by itself when the steam
coming in is hotter than its setting, fully 10 °C above it. Steam is about 20 °C cooler than the reactor
core, so while running, set it a little above your normal steam (core at 360 °C: set it to 360 °C, so it
only opens if the core overshoots). To cool down for refuelling, shut the reactor down and turn the
setting down to about 150 °C. Closed keeps it shut, Open dumps at full flow. - Like a turbine it feels the exhaust back-pressure: when the exhaust line backs up (the Condensers can’t
keep up) less steam gets through, down to none when the line is full. While the reactor cools down the
turbines take little steam, so their condensers have room for most of what the valves dump. - With nothing behind it, or a pipe of water behind it, it dumps into the air with a plume, and that water is
lost (the water pumps make it up). - It throws away heat the reactor made. If it is set below the steam the reactor makes while the
reactor holds a temperature, the reactor keeps replacing the heat (and burns fuel for nothing): after
2 minutes of dumping without a break its screen and the Thermal Probe say so.
A Water Outlet lets water out of a pipe system, like a drain pipe into a river. Water goes in through
any face but the front and leaves through the front (the way you looked when you placed it; the Pipe
Wrench turns it), up to waterOutletRate (200 mB/t). It draws water from the pipes on its own (no pump
needed), and a condenser’s front or bottom can pipe straight into it.
- Water in front (a river, a lake): the water just flows into it.
- Open air (or grass and the like, which the water washes away): it pours out a water block there
while water comes out, and takes it back two seconds after the water stops (or when it is broken or
turned), so it leaves no stray water behind. A water block that was already there is never taken. - Anything else (a solid block, lava): nothing comes out and the pipes back up; the Thermal Probe
says the front is blocked.
It only takes water, never coolant or steam. It drains whatever water reaches it, so do not connect it to
your feedwater or make-up water lines.
Filling the primary loop (make-up water): give the reactor a second INPUT port and pipe plain
water into it (from the same water pumps that feed the heat exchangers’ bottoms, if you like). In
pressurized mode the reactor takes coolant coming back whenever it has room, but fresh water only
while its vessel is less than 90 % full (makeUpLevel in the config). So it fills itself at start-up
and replaces what the loop is short of later, but water can never overfill the closed loop, and no
coolant ever flows back into the water line. A Check Valve is not needed for this.
Water Pumps → water ─┬→ BOTTOM of each Heat Exchanger (feedwater)
                     └→ INPUT port 2 of the reactor (make-up, only taken below 90 %)
Circulation Pumps → coolant → INPUT port 1 of the reactor (always taken)
Keep the water line and the coolant line apart: a pipe carries one fluid, so if they meet,
whichever fluid gets into the shared pipe first blocks the other. A blocked pump says why on the Thermal
Probe.
Small leaks: like real plants, the loops are not quite closed, so keep make-up water on both:
- A Steam Turbine loses 0.5 % of the steam it uses at its shaft seals (
turbineSteamLoss); the rest
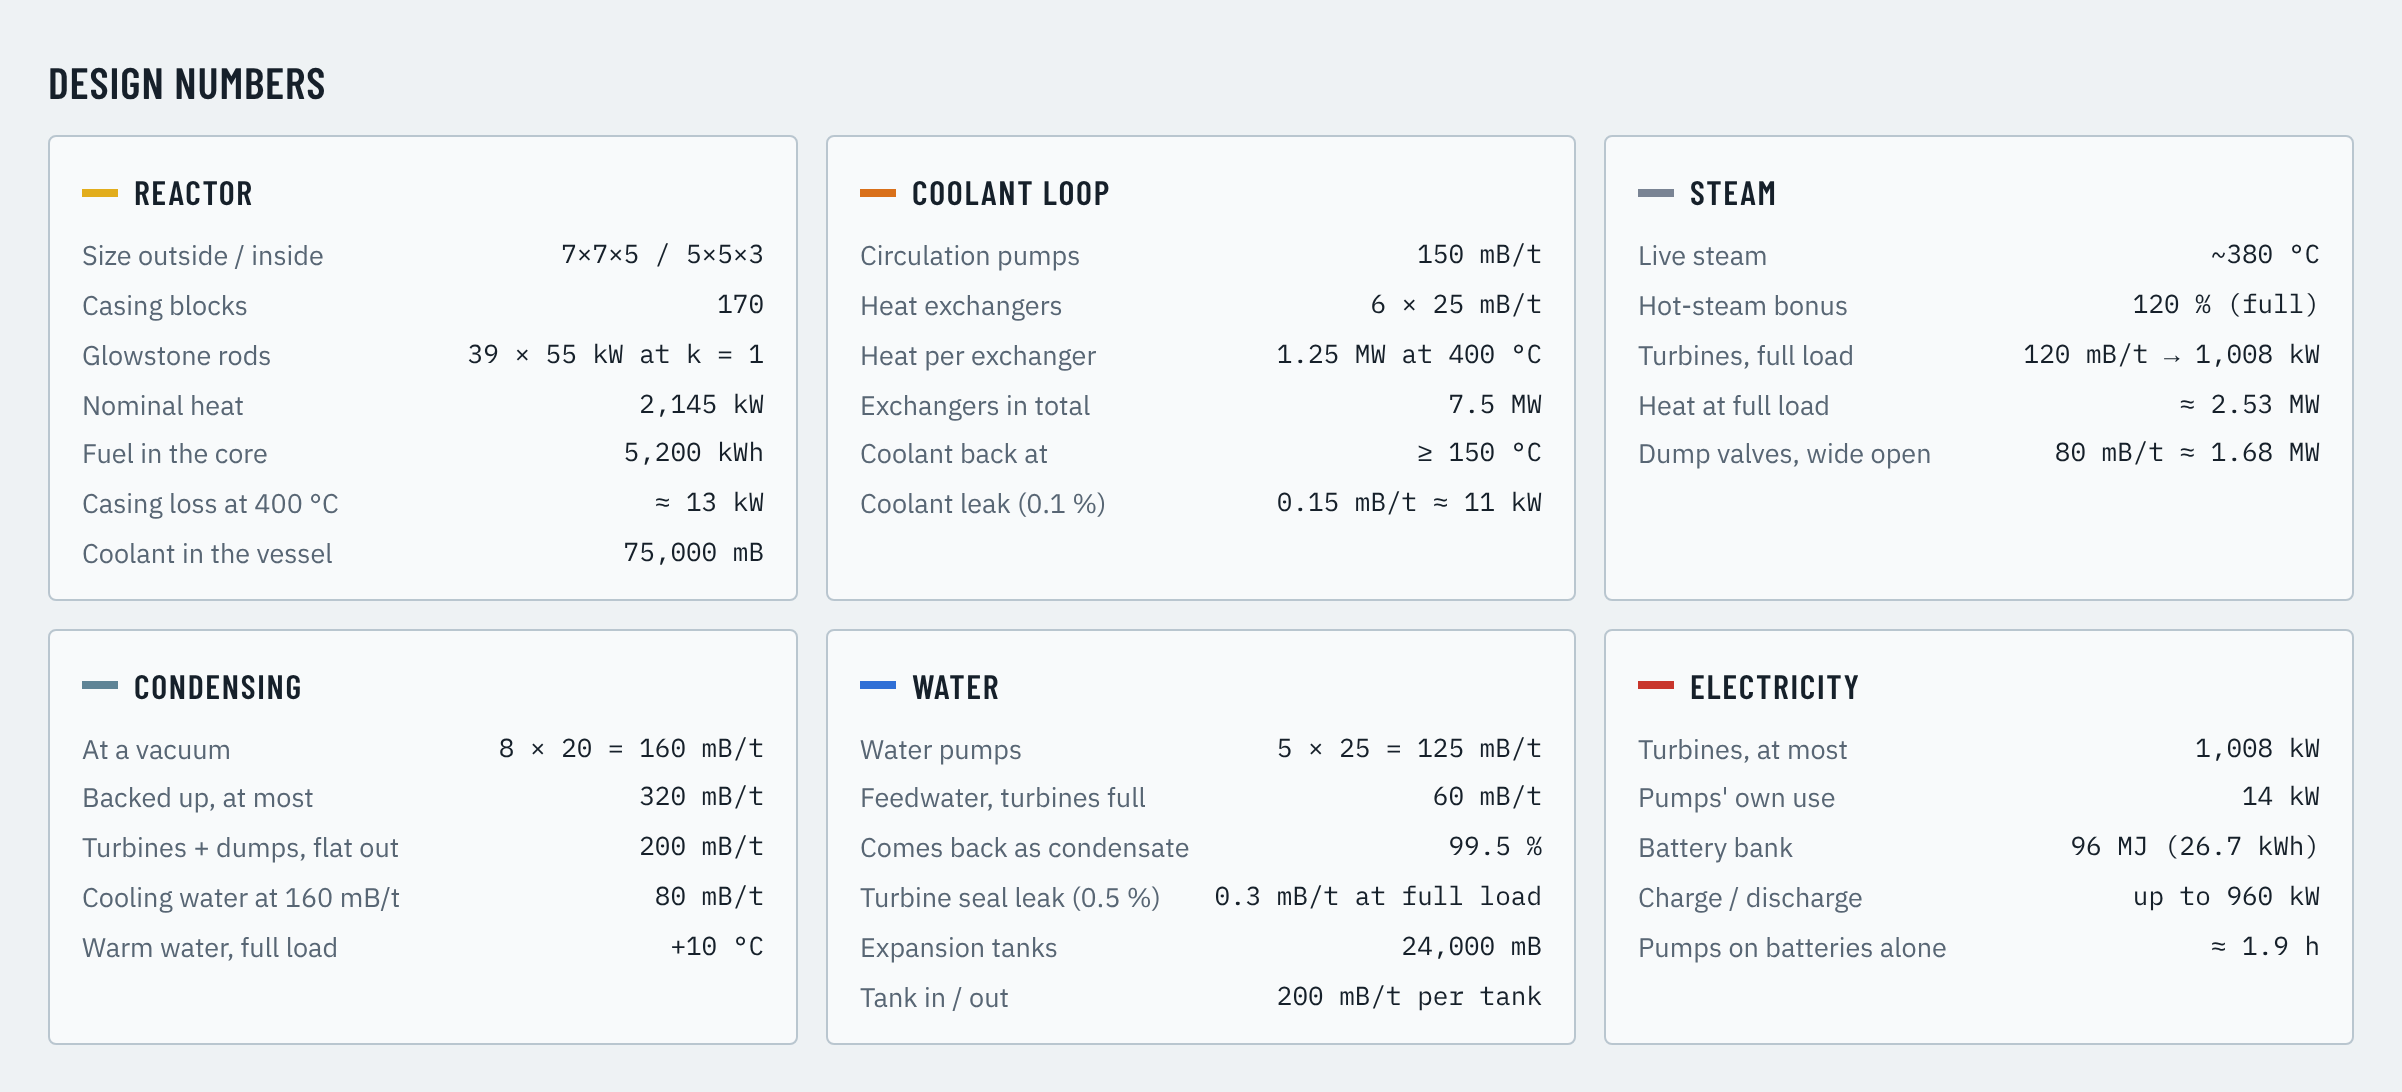
goes on as exhaust. Six turbines at full load (120 mB/t) lose 0.6 mB/t of steam, which is 0.3 mB/t of
water: about 21,600 mB an hour, made up by a Top up check valve from the water pumps into the feedwater
line. - A Heat Exchanger loses 0.1 % of the coolant going through it (
heatExchangerCoolantLoss), all the time
while the circulation pumps run, whatever the load: six exchangers (150 mB/t) lose 0.15 mB/t, about
10,800 mB an hour, made up by the water into the reactor’s second INPUT port. The lost coolant takes its
heat with it and the make-up water comes in at 20 °C, so this also costs a little heat: 10 J per °C per mB
(about 11 kW for 0.15 mB/t with the coolant at 400 °C).
The Thermal Probe shows both leaks. Set them to 0 in the config for fully closed loops.
If a loop does end up filled to the brim (nowhere for the coolant to move: the pumps, heat exchangers
and core all full) and the core overheats past the warning temperature, the reactor’s relief valve
lets coolant out as steam until the vessel is 95 % full. That room travels around the loop and everything
flows again. (The relief valve button in the control box turns this off.) A loop that stands still only
because the grid needs no power is left alone (see load following below).
A Check Valve lets fluid through one way only (the way you were looking when you placed it; the red
ring marks the outlet; the Pipe Wrench turns it around), up to checkValveRate (100 mB/t). Right-click it
with an empty hand to set its mode and level (5 % to 100 %, in steps of 5 % or 10 %):
- Top up (the default): it passes while the side it feeds is less full than the level (for a reactor
INPUT port: the vessel’s coolant level). At 100 % it is a plain one-way valve. - Overflow: it passes while the side it takes from is fuller than the level, and only what is over it.
A new valve starts in Top up at 80 % (checkValveTopUp). Next to a pipe line it moves no more than brings
that line to the level, so it does not overshoot.
An Expansion Tank stores water for a loop: water in at its front (the side facing you when placed),
water out at its back, nothing on the other faces. It draws the water in from the pipe at its front and
pushes it out into the pipe at its back (up to expansionTankRate, 200 mB/t per tank), so a check valve can
sit right at the tank or at the end of a pipe. Each block holds 8,000 mB (expansionTankCapacity),
and tanks touching each other on any face, side by side or stacked, share one store of water (so four hold
32,000 mB); every front and back works for the whole group. The sight glass on the sides shows how full it
is, and the Thermal Probe shows the water, its temperature and how many tanks are joined. Breaking a tank
loses its share of the water. Use it with two check valves to keep a loop (the condensate loop, say) from
overfilling or running short:
loop ──[Check Valve, Overflow 90 %]──→ FRONT Expansion Tank BACK ──[Check Valve, Top up 85 %]──→ loopWhat the loop has over 90 % goes into the tank, and when the loop drops below 85 % the tank gives it back.
Keep a few % between the two levels, or the water goes back and forth. The tank pushes its water out of the
back by itself, so always put the Top up valve between the back and the loop: a pipe from the back straight
into the loop would let the tank empty into it.
Pipes through walls: build a Pipe Wall Port into the wall where the line should pass. It is a full
block with a pipe inside, so the wall stays closed; pipes and machines on either side connect to it and it
counts as part of the pipe line (the Pipe Wrench toggles its sides like a pipe). One run still carries
one fluid, so use one wall port per line.
⚡ 3. Electricity
-
Backup Generator (coal, charcoal, wood, blaze rods) to start the pumps before the reactor runs.
-
Circulation Pump takes power through the four faces around its pipes (the yellow power-in ports; not
the front or back) and passes it on to whatever touches them, so a row of pumps side by side needs only
one cable or wire. -
Water Pump takes power only through its one yellow power-in port. Lying on its side it is on top;
upright (pointing up or down, as when placed while looking down) it is on the side that faced you when you
placed it, and right-clicking another side with the Pipe Wrench moves it there. The Thermal Probe shows
which face it is. -
Machines pass power through themselves between their electric faces, so turbines, pumps, generators and
lamps touching each other share one connection: a row of steam turbines side by side needs only one wire. -
Steam Turbine: up to 20 mB/t of steam → up to ~140 kW with 300 °C steam into a condenser (more with
hotter steam, half when the exhaust goes into the air), with a short spin-up. It holds only a few ticks’
worth of steam (100 mB; a heat exchanger 200 mB), so it stops within seconds when the steam stops, apart
from what is still in the steam pipes (250 mB per pipe). One job per face:Face Job Front (faces you when placed) rotor, connects nothing Top steam in Bottom exhaust steam out, to a Condenser (see above) Left, right and back power out (red ports) Power passes through a turbine between its three power faces, so turbines side by side (or back to back)
link up: a row of them needs only one cable or wire, on any of their red ports. -
Load following: turbines work like a real turbine with a governor. Each tick the grid works out what
it needs (what its machines and furnaces use, plus what its batteries can still take, less what backup
generators make anyway) and splits that evenly between its turbines; each turbine takes only the steam it
needs for its part. So all turbines run, each at part load, and steam is not burned for power nobody
uses. Steam that is not needed backs up the line. In pressurized mode that backs up the heat exchangers and
the core, and in temperature-hold mode the reactor turns itself down to hold its temperature: the
reactor follows the electrical load. (In boiling mode the core keeps boiling; unused steam builds up and
the relief valve vents it, so match the rods to the load or use the power-target mode.) Turbines with
no load at all spin down and need a few seconds to spin up again. -
Ground Cable: a block you lay like pipes; it joins neighbouring cables, machines, poles and furnaces.
-
Cable Wall Port: a full block with a ground cable inside. Build it into a wall to take a cable line
through without leaving a hole; it conducts like any ground cable.
Handy for short runs inside a building. -
Overhead wires (like a lead): hold Copper Wire and right-click a Power Pole or any electric
machine. The wire is tied on and hangs from it to your hand, following you as you walk. Right-click the
next pole or machine to tie the other end: the wire stays there, hanging between the two, and you are
already carrying a new one from that pole, so you can run a whole line. Sneak + right-click the air to
let go. Max 24 blocks per span (the wire turns red when it is too long, and slips out of your hand if
you walk much further), 1 copper wire per 3 blocks. Stack poles for height; longer spans hang lower
(wireSagBase/wireSagPerBlockin the config). Pliers: sneak + right-click a pole or machine to
cut its wires (you get the copper back), or a ground cable to take it up. -
Battery Bank stores 2 MJ; comparators read its charge. One job per face:
Face Job Front (faces you when placed) charge gauge, connects nothing Back power in (yellow port) Left, right, top and bottom power out (red ports), and any overhead wires tied to it So it sits between two grids: put the generators or turbines on its back and the things to power on its
red ports (the Pipe Wrench turns it). When the grid at its back runs short (the reactor tripped, the
turbines stopped) it powers that grid too, through the back, so the circulation pumps keep running. -
Battery banks share: batteries whose red ports touch (side by side, stacked in rows, or linked by a
cable) form one bank. They power their grid together, and the fuller ones top up the emptier ones, so a
whole wall of batteries charges even if only some of their backs are connected (each connected back
takes up to 20 kW, so connect more backs to charge faster). A battery whose red port touches the back of
another (directly or by cable) charges that one with what its own side does not need. Batteries doing
the same job (charging from one supply, or powering one grid) charge and discharge by the same amount;
one that is full, empty or at its 20 kW limit leaves its part to the others. -
Electric Lamp lights while powered; a redstone signal switches it off.
-
Enrichment Centrifuge uses 20 kW while it spins, through the yellow port on its back (see the fuel cycle
under Build a reactor). -
Vanilla furnaces, blast furnaces and smokers touching a cable, pole or machine smelt on grid power
(furnace 5 kW, blast furnace 10 kW, smoker 2 kW) without using their fuel slot.
🎛️ 4. Control and safety
- Control box GUI: tabs along the bottom row, with START and SCRAM always next to them:
- Overview: temperature, power, coolant, steam or coolant out, integrity, xenon, fuel, structure and
the control rods, plus shortcuts to the other tabs. - Rod control: pick the mode and set its target (below), with the control rods.
- Safety: automatic SCRAM and its threshold, the relief valve, boiling or pressurized mode.
- Core map: the core seen from above, as from the control box (its wall at the bottom), one slot per
column of channels. Stacked channels are one slot whose number is how many are stacked there; its
tooltip lists every level from the top (rod type, fuel left, heat; control rods and how far in). It
is coloured by the fuel left in its most spent rod (green, yellow, orange, red; grey for a spent rod
to replace), or, with the button on the right, by the heat it makes compared with the hottest
column, which shows where the fuel boosts itself and where control rods would help most. Cores wider
than 8 x 5 scroll with the arrows. - Refuel: load each kind of fuel rod (fresh and enriched redstone and glowstone), unload the spent
rods or all fuel, and insert or remove control rods. - Details: heat balance, neutronics, the xenon forecast, the structure check and a short guide.
- Overview: temperature, power, coolant, steam or coolant out, integrity, xenon, fuel, structure and
- Rod control modes (Rod control tab):
- Manual: you set the insertion.
- Hold temperature: the rods move to keep the core at a target temperature (with plenty of coolant
the core stays cooler, so the rods come all the way out; the mode mainly protects against coolant loss). - Hold power: the rods keep fission power at a % of the loaded fuel’s nominal power.
- Redstone: signal strength sets the rods (0 = fully in, 15 = fully out; no signal shuts it down).
The rod drives move at most 1 % per tick; automatic modes stop at a SCRAM until you press START.
- Xenon poisoning (
xenonPoisoning, on by default): fission makes iodine, which turns into xenon, a
neutron poison that a running reactor burns off. Real half-lives are hours; here a game minute stands for
an hour (xenonTimeScale), so iodine halves in 6.6 minutes and xenon in 9.1.- Running steadily it settles at a level that depends on the power: 1.0 at full nominal power, 0.8 at
half, about 0.57 at a quarter. At 1.0 it costs 10 % of the multiplication (xenonWorth), about 19 %
of the power at the same rods, so in the automatic modes the rods drift a little further out over
the first ~15 minutes. - After a shutdown or a power cut it rises: the iodine already made keeps turning into xenon, but
nothing burns it off. After a SCRAM from full power it peaks at about 1.7 (about 31 % less power at
the same rods) after about 8 minutes, is back below 1.0 after about 23 and nearly gone after about an
hour. Until then a reactor, especially one on redstone or half-spent fuel, may not get back to full
power even with the rods fully out (“iodine pit”): plan shutdowns, and keep batteries or a backup
generator for the pumps. - Restarting a poisoned reactor burns the xenon off within minutes, so the power climbs by itself.
Hold temperature pushes the rods back in for you; in Manual you have to. - The control box GUI shows it on the Overview and Details tabs (level, cost, where it is heading and
when), and so does the Thermal Probe on the control box, with a warning when it matters.
- Running steadily it settles at a level that depends on the power: 1.0 at full nominal power, 0.8 at
- A redstone pulse into the control box triggers a SCRAM (except in Redstone mode).
Comparators read temperature (1 per 100 °C). - Temperature Sensor next to a reactor wall, heat exchanger or turbine outputs redstone
(threshold or analog mode). - Thermal Probe: right-click anything to read it (pipes, grid, furnaces, reactor…). On a pipe it
shows the fluid flowing through it, its temperature and the flow (averaged over the last second), and
how much is waiting in the pipes. A pipe that passes everything straight on, like the one between the
heat exchangers and the circulation pumps, has nothing waiting in it but still shows the coolant flowing. - Above 1200 °C the core loses integrity; over-pressure in boiling mode does too (relief valve vents
above 95 %). Breaking the casing while the core is above 800 °C is a containment breach. - The control box shows steam made per tick: steam leaves through the output ports as fast as it is
made, so the amount inside the core is usually near zero. Pressure is the boiling pressure at the core
temperature (pressurized mode: about 155 bar abs), shown as absolute and gauge pressure. - Sounds: a running reactor hums (louder with more power), a siren sounds above 800 °C or with high
steam pressure (faster once the core is being damaged), and the rods clunk in on a SCRAM. - Machines are heard while they run: the water pump thumps and gurgles, the circulation pump
hums (and you hear water swirl only while fluid really moves, so a blocked pump sounds different), and
the steam turbine whines higher as it spins up, hisses while steam goes through it and winds down
when the steam stops.machineSoundVolumein the config makes them quieter or louder (0 = silent). - Fuel channels give off light while the reactor runs (brighter with more power).
💥 5. Meltdown (meltdownMode in the config)
FULL(default): explosion scaled by reactor size and power, molten corium and lava inside the
ruins, and a radiation zone around the corium (poison, wither, damage) until it cools into obsidian.EXPLOSION: explosion only.CONTAINED: no block damage; the fuel is lost and nearby players are irradiated.
Carrying depleted fuel rods (every kind) makes you sick; smelt them in a blast furnace to recover iron, or
enrich the redstone and glowstone ones.
☣️ 6. Radiation gear
- Geiger Counter: hold it (either hand) to hear clicks and see counts per minute. Background is about
20 CPM; a running reactor leaks a little (harmless); corium and carried spent fuel read high. - Hazmat suit: craft each leather armor piece with yellow dye and a slime ball. Every piece blocks
25 % of radiation (corium and spent fuel); the full suit blocks all of it. It does not protect against
the heat right next to corium.
🔨 Recipes (summary)
| Result | Ingredients |
|---|---|
| 4 Reactor Casing | smooth stone + iron ingots |
| 2 Reactor Glass | casing + glass |
| Reactor Control Box | casing, redstone, comparator |
| 2 Reactor Port | casing + hopper |
| 2 Fuel Channel / 2 Control Rod Channel | iron + glass / iron + iron bars |
| Redstone Fuel Rod | 6 iron, 2 redstone, 1 redstone block |
| Glowstone Fuel Rod | 6 iron, 2 glowstone dust, 1 glowstone |
| Enriched Redstone / Glowstone Fuel Rod | Enrichment Centrifuge: depleted rod of its kind + 8 dust of its kind |
| Enrichment Centrifuge | iron, glass, iron / copper ingot, circulation pump, copper ingot / iron, copper wire, iron |
| 2 Iron Ingots | any depleted fuel rod in a blast furnace |
| 2 Control Rods | 6 iron + 3 coal or charcoal |
| 8 Fluid Pipe | copper ingot, glass, copper ingot (in a row) |
| Pipe Wall Port | fluid pipe surrounded by 4 smooth stone (plus shape) |
| Check Valve | lever on top, fluid pipe + iron ingot + fluid pipe |
| Water Outlet | iron ingot, fluid pipe, iron ingot, with iron bars below the pipe |
| Condenser | iron, fluid pipe, iron / copper ingot, bucket, copper ingot / iron, fluid pipe, iron |
| Steam Dump Valve | iron, lever, iron / iron, check valve, iron / iron, fluid pipe, iron |
| Expansion Tank | iron, glass, iron / fluid pipe, bucket, fluid pipe / iron, glass, iron |
| Geiger Counter | iron, glass pane, copper, redstone |
| Hazmat Helmet / Jacket / Trousers / Boots | leather armor piece + yellow dye + slime ball |
| 8 Copper Wire | 2 copper ingots (shapeless) |
| 4 Ground Cable | dried kelp, copper wire, dried kelp |
| Cable Wall Port | ground cable surrounded by 4 smooth stone (plus shape) |
| 3 Power Pole | iron nuggets, copper wire, logs |
| Pumps, heat exchanger, turbine, battery, generator, lamp, sensor, tools | see src/main/resources/data/goingnuclear/recipe |
⚙️ Configuration
Every world has its own config, kept by its seed: config/GoingNuclear_Seed_<seed>/GoingNuclear.json (a
negative seed is written as an unsigned number). It is written with the defaults the first time the world starts.
Highlights: reactor size limits,
fuel power and lifetime, coupling/absorption, heat capacities and transfer, pump/turbine rates,
power use of every machine, wire length, meltdown mode, explosion cap, radiation radius and duration,
and whether the resource pack is required (requireResourcePack).
Units: energy J, power J/t (1 J/t = 20 W), fluids mB, temperature °C.
Rates of the plant machines (per machine): circulation pump circulationPumpRate 25 mB/t, heat exchanger
heatExchangerRate 25 mB/t of coolant, steam turbine turbineSteamRate 20 mB/t of steam, condenser
condenserRate 20 mB/t of steam with condenserCoolingWater 0.5 mB of cooling water per mB, steam dump
valve steamDumpRate 40 mB/t, expansion tank expansionTankCapacity 8,000 mB per block and expansionTankRate 200 mB/t in and out.
Leaks: turbineSteamLoss 0.005 of the steam a turbine uses, heatExchangerCoolantLoss 0.001 of the coolant
going through a heat exchanger (0 for fully closed loops).
The file is not updated when a new version of the mod changes a default: settings missing from it get
their defaults, but the ones it has keep their values. Delete it after updating to get every new default
(it is written again on the next start).
Fuel: redstoneRodPower 1000 J/t and redstoneRodEnergy 3.6e8 J, glowstoneRodPower 2750 J/t and
glowstoneRodEnergy 4.8e8 J, redstoneNeutronFactor / glowstoneNeutronFactor; enriched rods
enrichedRedstoneRodPower 1500 J/t and enrichedGlowstoneRodPower 3750 J/t, with enrichedEnergyFactor
1.0 × the energy of their kind. The centrifuge uses centrifugePower 1000 J/t for centrifugeTicks 1200
per rod, with centrifugeDust 8.
🌟 Why Going Nuclear?
It is a whole power plant to design, not a block that makes power: size the core, balance the coolant, steam
and water loops, wire up the grid, and keep it all from melting down. And since everything runs on the
server, your players just join and start building.
📜 License
This mod is licensed under the GNU AGPLv3 Licence.
💬 Feedback
Found a bug or have a feature suggestion?
Open an issue or PR on GitHub!
常见问题
GoingNuclear 支持哪些 Minecraft 版本?
GoingNuclear 支持 Minecraft Java 版 26.3,可用的加载器:Fabric。下载时注意选择和你游戏版本一致的文件。
GoingNuclear 怎么安装?
先用 PCL2 或 HMCL 启动器安装对应版本的 Fabric,再把下载的 .jar 文件放进游戏目录的 mods 文件夹,重新启动游戏即可。开启了版本隔离的,mods 文件夹在 versions/版本名 下面。
Sumutiu 的其他作品
查看全部 →
HomeLink
HomeLink 是一款轻量级、纯服务端的 Fabric 模组,让玩家轻松创建和管理自定义家园,并传送到家园。非常适合生存服务器、SMP 和冒险社区。

EasyEconomy
EasyEconomy 是一款轻量级、完全在服务端运行的 Fabric 模组,为你的 Minecraft 世界带来简单的钻石货币系统。你可以存款、取款、交易,还能经营自己的拍卖行——一切都由闪闪发亮的钻石驱动。

SimpleClumps
SimpleClumps 是一个轻量级、完全服务端的 Fabric 模组,可自动合并经验球和掉落物,让你的世界运行流畅。

SimpleProtect
SimpleProtect是一个轻量级且完全服务端的Fabric模组,为你的Minecraft世界带来一个简单的、基于绿宝石块的保护系统。
评论
登录后评论和评分