
Custom World Border
Custom World Border: Static, Shrinking, or Expanding (Minecraft Captive Style)
介绍






Features
- Static Border (doesnt change in size)
- Expanding Border (expands by 1 block every x seconds)
- Shrinking Border (shrinks by 1 block every x seconds)
- Custom Size
Config
/reload – to load the datapack (must also be done when you have the mod installed)
/trigger customborder.config
Guides

If something doesn’t work, feel free to join the discord server
How to Install a Datapack in Singleplayer
At the Creation of a World
How to install a datapack in singleplayer
- Open Minecraft Launch the game.
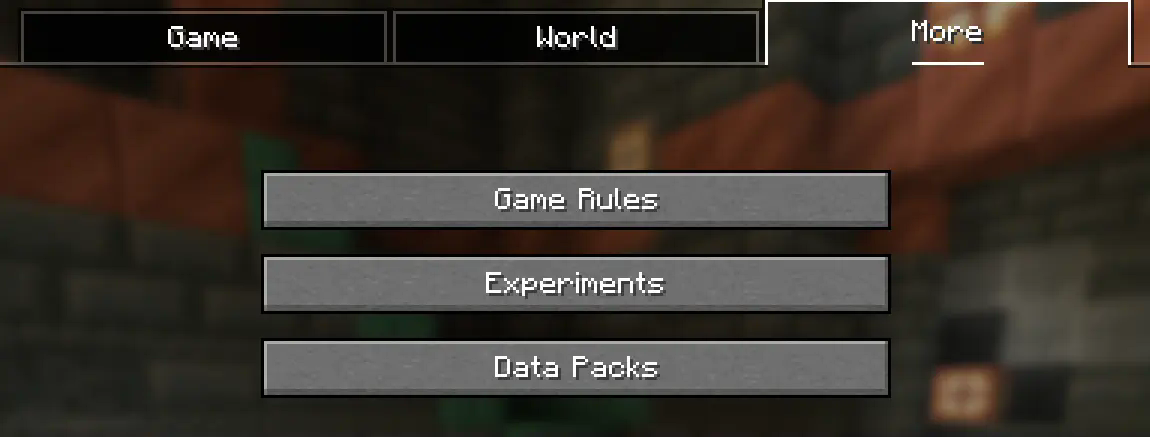
- Create a New World Navigate to “More” and click on “Data Packs”.
- Add the Datapack Drag the datapack (a
.zipfile or directory) into the Minecraft window.
- A confirmation screen will appear. Click “Yes”.
- Activate the Datapack Move the datapack to the right-hand side of the screen by clicking the triangle on its icon (visible when hovering over it).
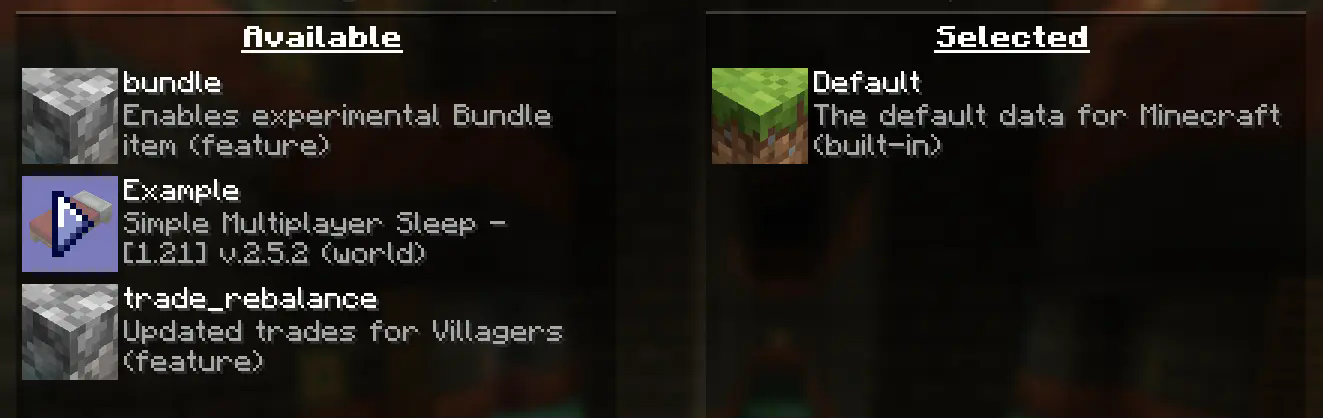
- Complete World Creation
- Click “Done” at the bottom of the screen.
- Continue creating your world and click “Create New World”.
⚠️ IMPORTANT ⚠️
The datapack only works if cheats are enabled.
You can verify the datapack is active by typing:
/datapack list enabled
This command should list an entry named [file/<your datapack file/directory name>].
In an Existing World
How to Install a Datapack in an Existing Singleplayer World
- Open Minecraft Launch the game.
- Select Your World
- Choose the world you want to install the datapack for.
- Click “Edit”, then “Open World Folder”.
- Add the Datapack
- Open the folder named
datapacks. - Place the datapack into this folder. It should be a
.zipfile or a directory.
- Reload the World
- If you are in the world during installation, type
/reloadin the chat or press F3 + T to reload resources. (Make sure cheats are enabled.)
⚠️ IMPORTANT ⚠️
The datapack only works if cheats are enabled.
You can verify the datapack is active by typing:
/datapack list enabled
How to Enable Cheats Permanently After World Creation
If you encounter this issue, here is a step by step guide on how to enable Cheats/Admincommands permanently after you have already created a Minecraft world.
⚠️ Before you begin, you should save and backup your world in case something goes wrong.
(I will not take any responsibility for any corrupt worlds. Do this at your own risk!)
But don’t worry this works without any problems.
If you don’t want to change this permanently check out this guide.
1. You need NBTExplorer
NBTExplorer is an open-source NBT editor for all common sources of NBT data. It’s mainly intended for editing Minecraft game data.
2. Open NBTExplorer and open your Minecraft world, where you want to enable Cheats/Admincommands.

3. Navigate to:
<Your Minecraft World>level.datDataallowCommands

4. Click on “Edit Tag Value”

5. Change the Value from 0 to 1 and click “OK”

6. Now click on “Save All Modified Tags”

That’s it. You are done. You can now join your world and check if you have permission to change your gamemode, for example.
How to Enable Cheats Temporarily After World Creation
Enabling Cheats Temporarily After World Creation
If you encounter this issue, here is a step-by-step guide on how to enable Cheats/Admin commands temporarily after you have already created a Minecraft world.
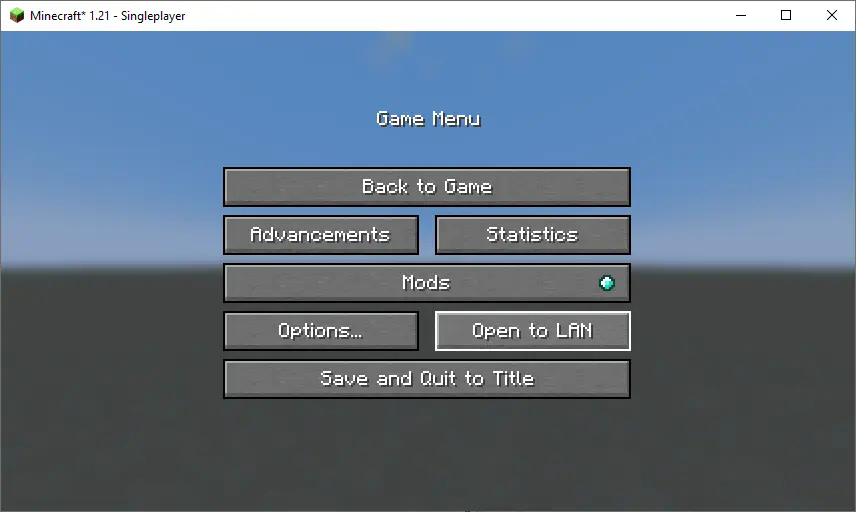
- Join Your World Open your single-player world and press “Escape”.
- Open to LAN Click on “Open to LAN”.
- Allow Commands Set “Allow Commands” to ON.
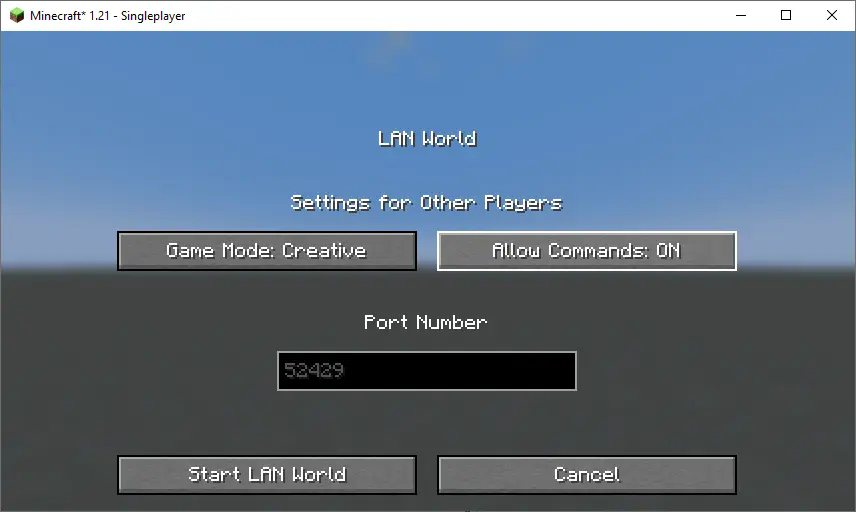
- Start LAN World Click “Start LAN World” to apply the changes.
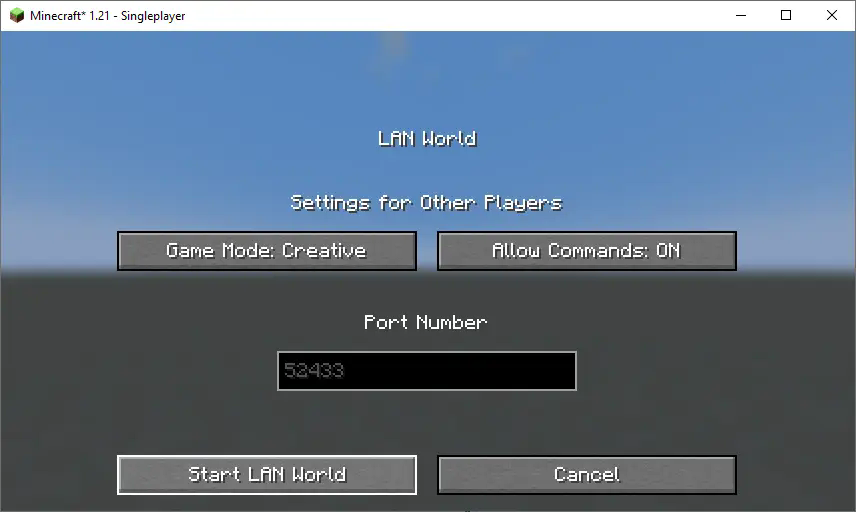
Now, you should be able to use commands like changing your gamemode. Keep in mind that this is only temporary and will need to be done every time you join the world.
How to Install a Datapack in Multiplayer
How to Install a Datapack in Multiplayer
- Open Your Server Folder Navigate to your server folder, then open the folder for the world you wish to install the datapack in (default:
world).
- Add the Datapack
- The datapack should be a
.zipfile. - Place the datapack into a folder named
datapacksinside the world folder.
- Reload the Server
- Type
/reloadfrom the console or as a level 3 operator if the server was running during the installation.
How to Uninstall a Datapack
How to Uninstall a Datapack from Your Singleplayer World or Server
- Run the Uninstall Command For my datapacks, run the command:
/function datapack_name:uninstall
- Delete the Datapack
- Delete the datapack from the folder you placed it in.
- Alternatively, you can run:
/datapack disable [file/your data pack file/directory name]
- Reload the World or Server After deleting or disabling the datapack, run:
/reload
How to Install a Mod on a Minecraft Server
Step-by-Step Guide to Installing a Mod on a Minecraft Server
- Download the Mod
- Make sure to download the correct version of the Mod that matches your server’s Minecraft version.
- Important: The mod file should be a
.jarfile.
- Ensure No Datapacks or Other Mods Conflict
- Do not have both a datapack and a mod installed at the same time, as they may conflict.
- Only install one or the other, depending on your server’s setup.
- Locate the Mods Folder
- Open your server’s root directory.
- Inside this directory, find the folder named
mods. - If the
modsfolder doesn’t exist, create one.
- Install the Mod
- Paste the downloaded
.jarfile for the Mod into themodsfolder.
- Restart the Server
- After adding the Mod to the
modsfolder, restart your Minecraft server for the mod to be activated.
- Verify Mod Installation
- Once the server has restarted, join the server and check if the Mod is working.
- You can use
/modsor a similar command (depending on the mod) to see if the Mod has been successfully loaded.
Additional Tips
- Backup Your Server: Always create a backup before installing the Mod to avoid data loss in case something goes wrong.
- Ensure Mod Compatibility: Check that the Mod is compatible with your Minecraft server version and any other mods you have installed.
常见问题
Custom World Border 支持哪些 Minecraft 版本?
Custom World Border 支持 Minecraft Java 版 1.21–1.21.4,共 5 个版本,可用的加载器:Fabric / Forge / NeoForge / Quilt。下载时注意选择和你游戏版本一致的文件。
Custom World Border 怎么安装?
先用 PCL2 或 HMCL 启动器安装对应版本的 Fabric / Forge / NeoForge / Quilt,再把下载的 .jar 文件放进游戏目录的 mods 文件夹,重新启动游戏即可。开启了版本隔离的,mods 文件夹在 versions/版本名 下面。运行环境:客户端 / 服务端。
Jodek 的其他作品
查看全部 →
Armor Stand Arms
盔甲架默认带有手臂!

No Enderman Grief
阻止末影人搬走方块
Mob Heads
玩家击杀生物时,它们有概率掉落头颅;掉落率配置简单,还支持掉落提示、收集进度成就等功能。

Sleep
更改跳过夜晚所需玩家数量——自定义睡眠的简单方式![睡眠加速、显示正在睡觉的玩家等]
评论
登录后评论和评分