Teyvat Cartographia
A Genshin Impact inspired world map and minimap: painted explored map, cave layers, pins, waypoints in the world and a walking path.
介绍


The world you explore becomes a soft painted map.
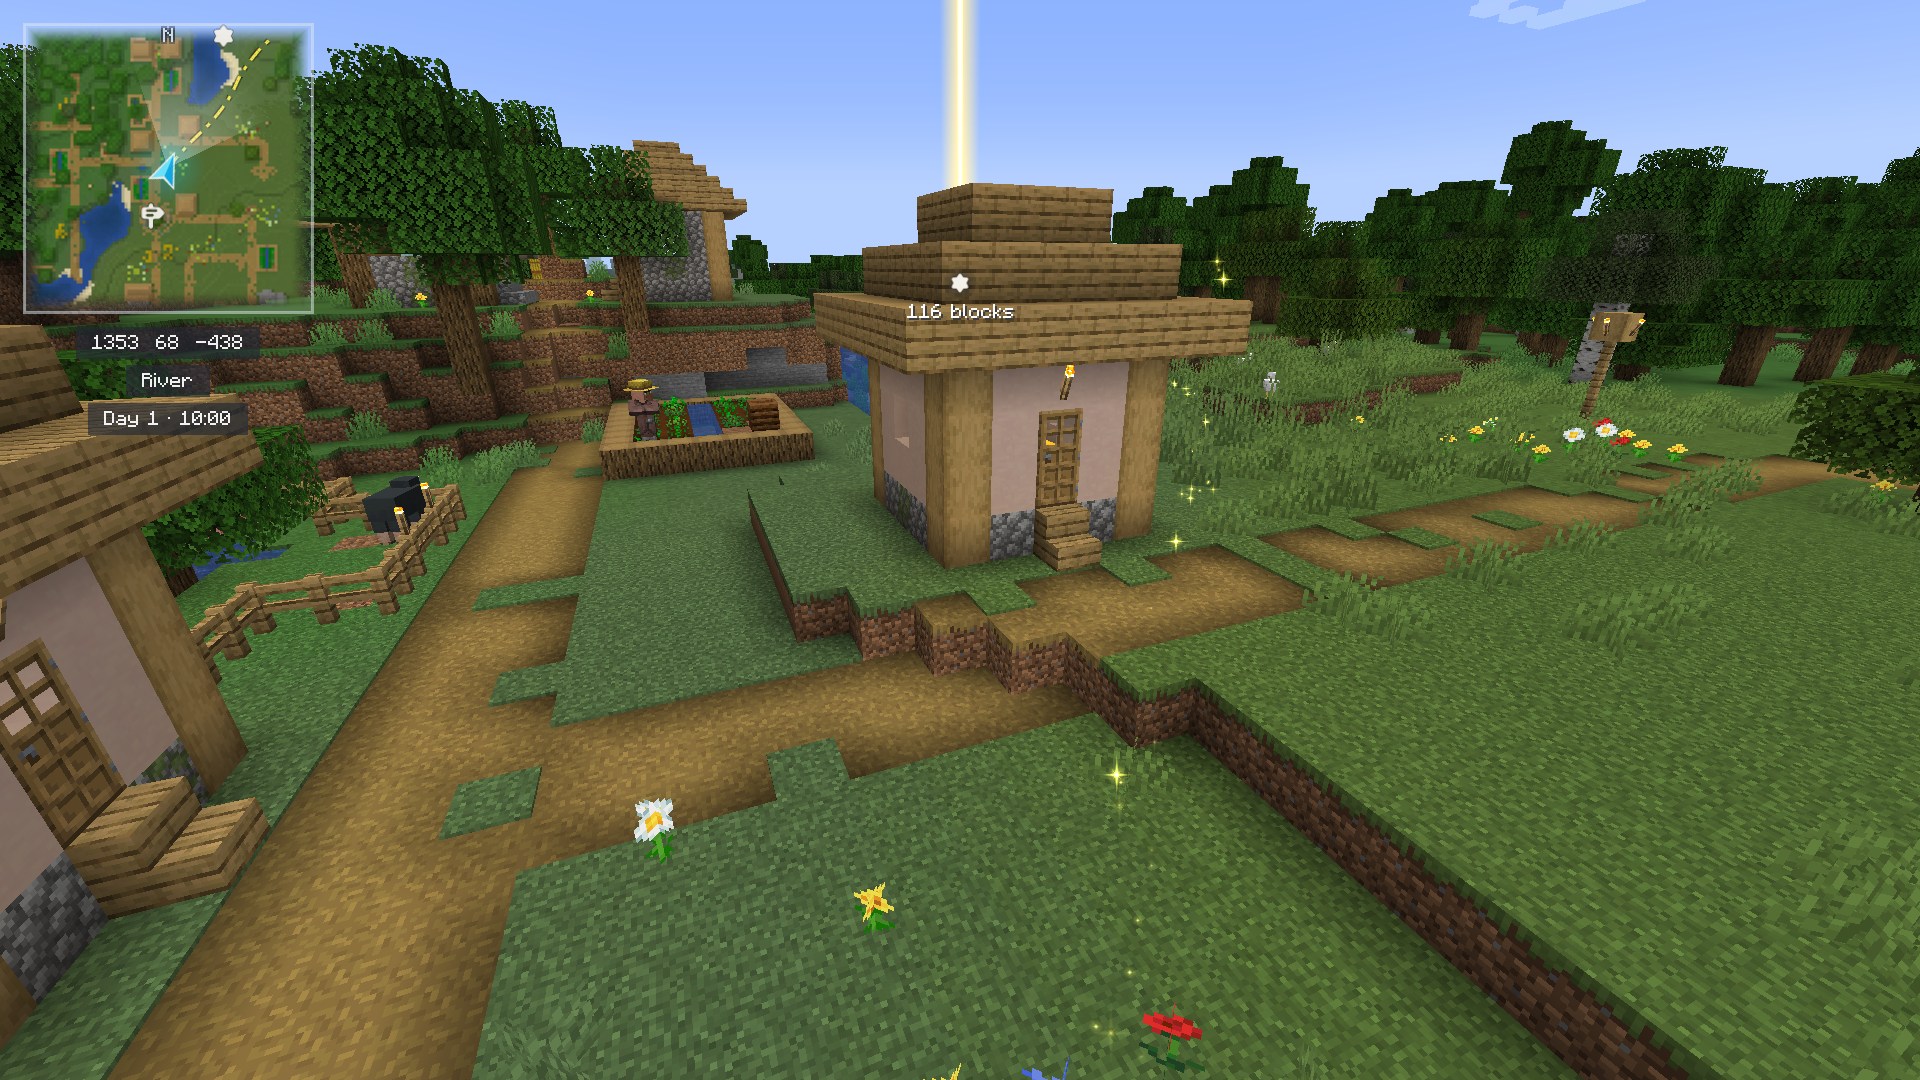
Full-screen world map, HUD minimap, cave layers, pins, a Genshin Impact style waypoint in the world and a walking path to it.


✨ Features
|
🎮 Controls
|
🎨 Themes
🧩 Compatibility
|
🐞 Report a bug
📚 Contents
- About
- Screenshots
- Installation
- Features
- Controls
- Themes
- Compatibility with mods
- Performance
- Where data is stored
- Building from source
- Bug reports and ideas
- License and credits
📖 About
Teyvat Cartographia is a client-side Minecraft mod that brings a
Genshin Impact inspired world map and minimap to Minecraft. The chunks you load are drawn as a map in the colours of their blocks, with relief
shading, water depth and contour lines, while Fog of War covers everything you have not seen yet.
Place pins, search for them and for biomes, track them, follow the path and find your way back home.
- Minecraft: 1.21.1, 26.1.2, 26.2 or 26.3 (Java Edition): a file of its own for each
- Mod loader: Fabric (Fabric Loader 0.16 or newer with Fabric API) or NeoForge (21.1 for 1.21.1, built against 21.1.257; 26.1.2, 26.2 or 26.3 for those games, built against 26.1.2.124, 26.2.0.93 and 26.3.0.99): one file for each, the same mod
- Java: 21 for 1.21.1, 25 for 26.1.2, 26.2 and 26.3
- Side: Client only. Servers don’t need it, so you can join vanilla and modded servers.
- Version: 1.0.0 for every game (1.21.1, 26.1.2, 26.2 and 26.3), the first stable release. The settings screen comes from the library Actually Amazing Config Screen 1.0.0, packed inside the mod (nothing to install).
- Languages: English, Russian
- License: MIT
Note: Teyvat Cartographia is a fan-made mod. It is not affiliated with or endorsed by HoYoverse, and it contains
no Genshin Impact assets: every texture, icon and the fog are original or CC0 (see credits).
📸 Screenshots
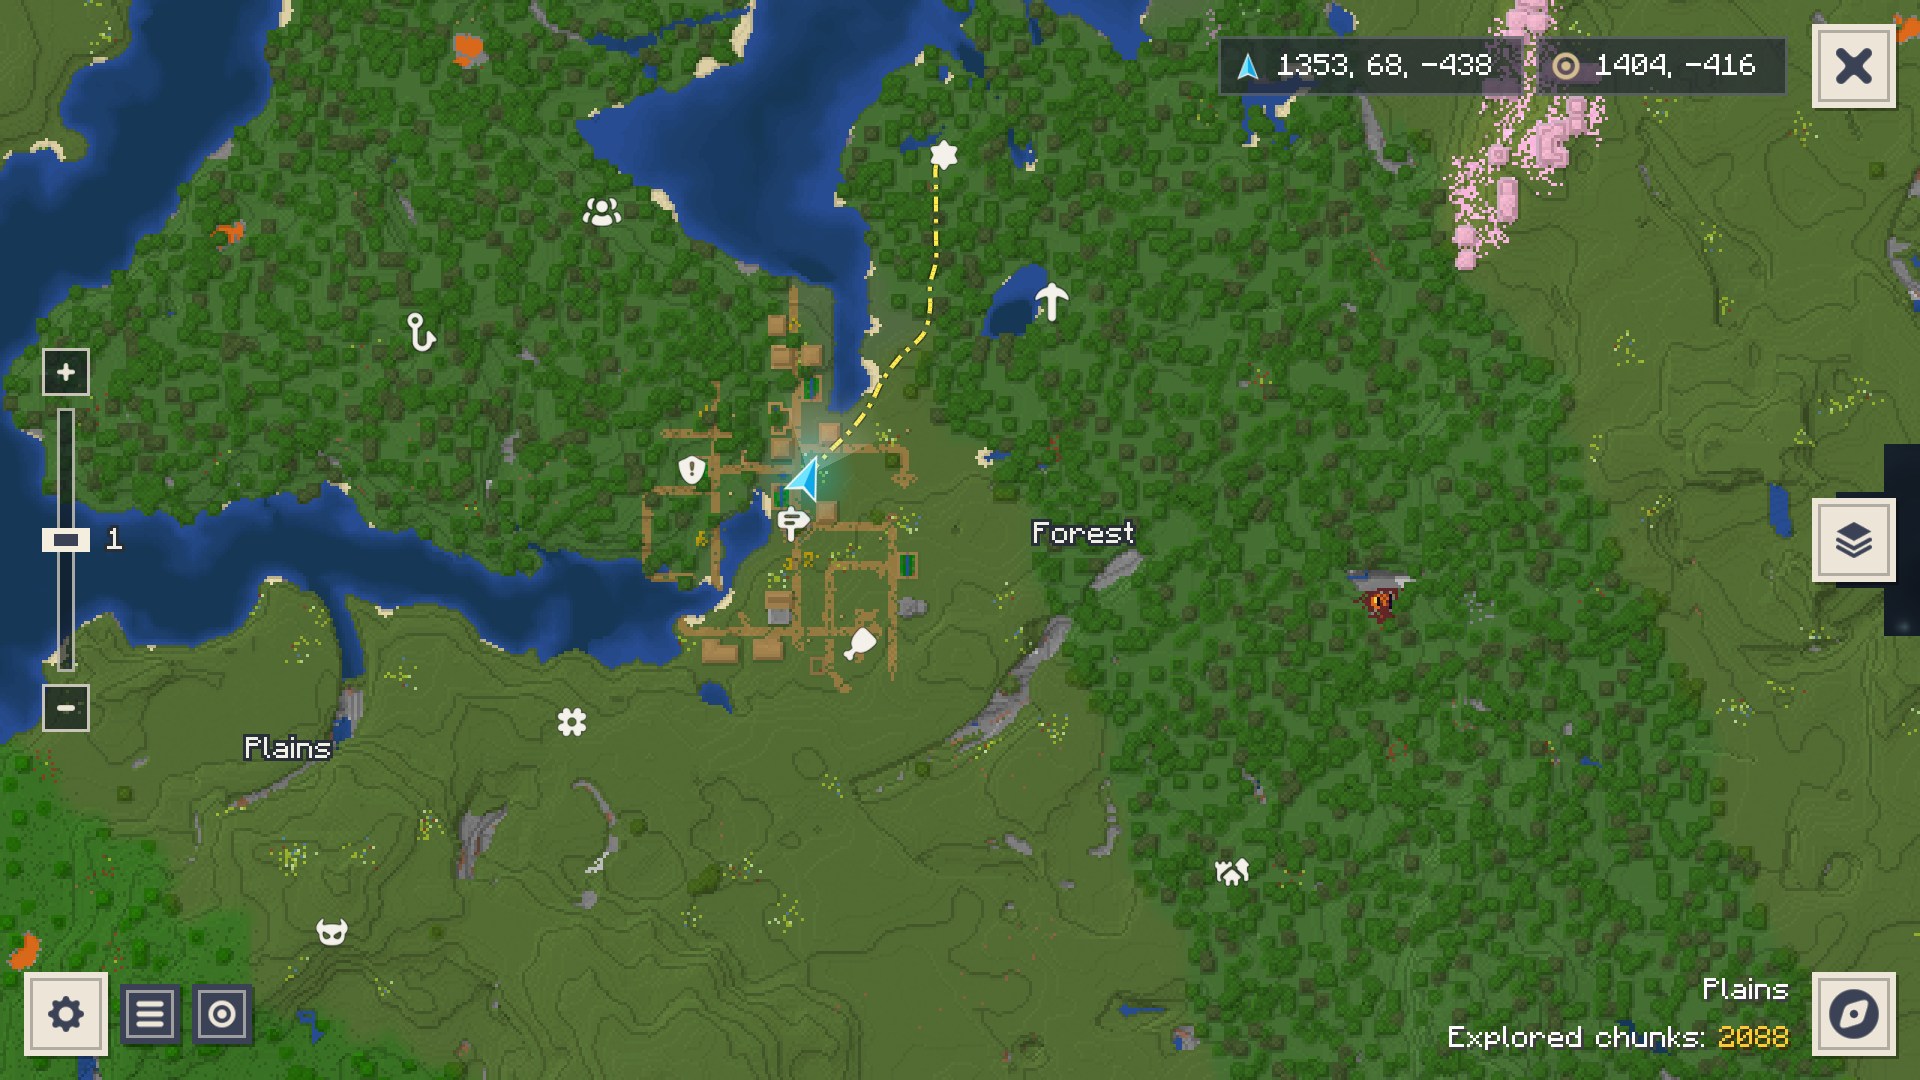
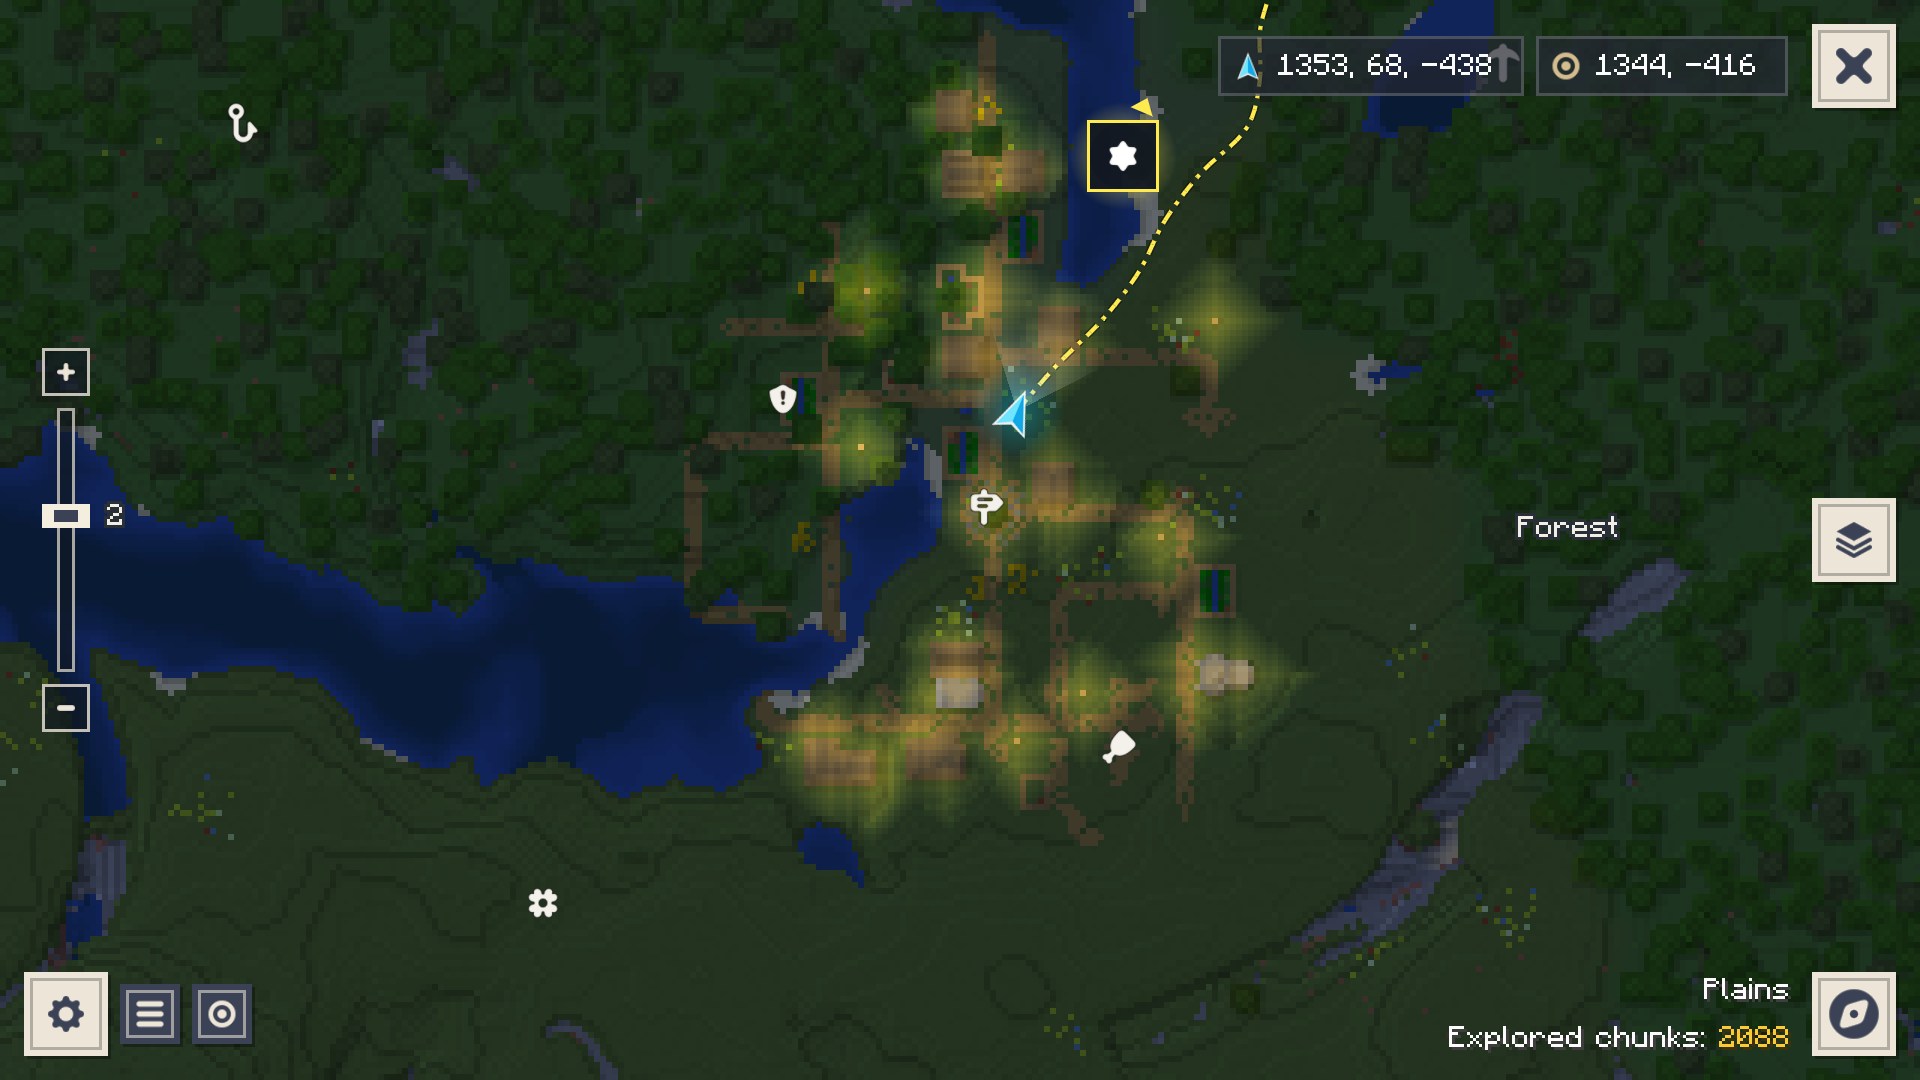
Left: World map with pins and the walking path.
Right: At night the map darkens, lit places keep their colour.
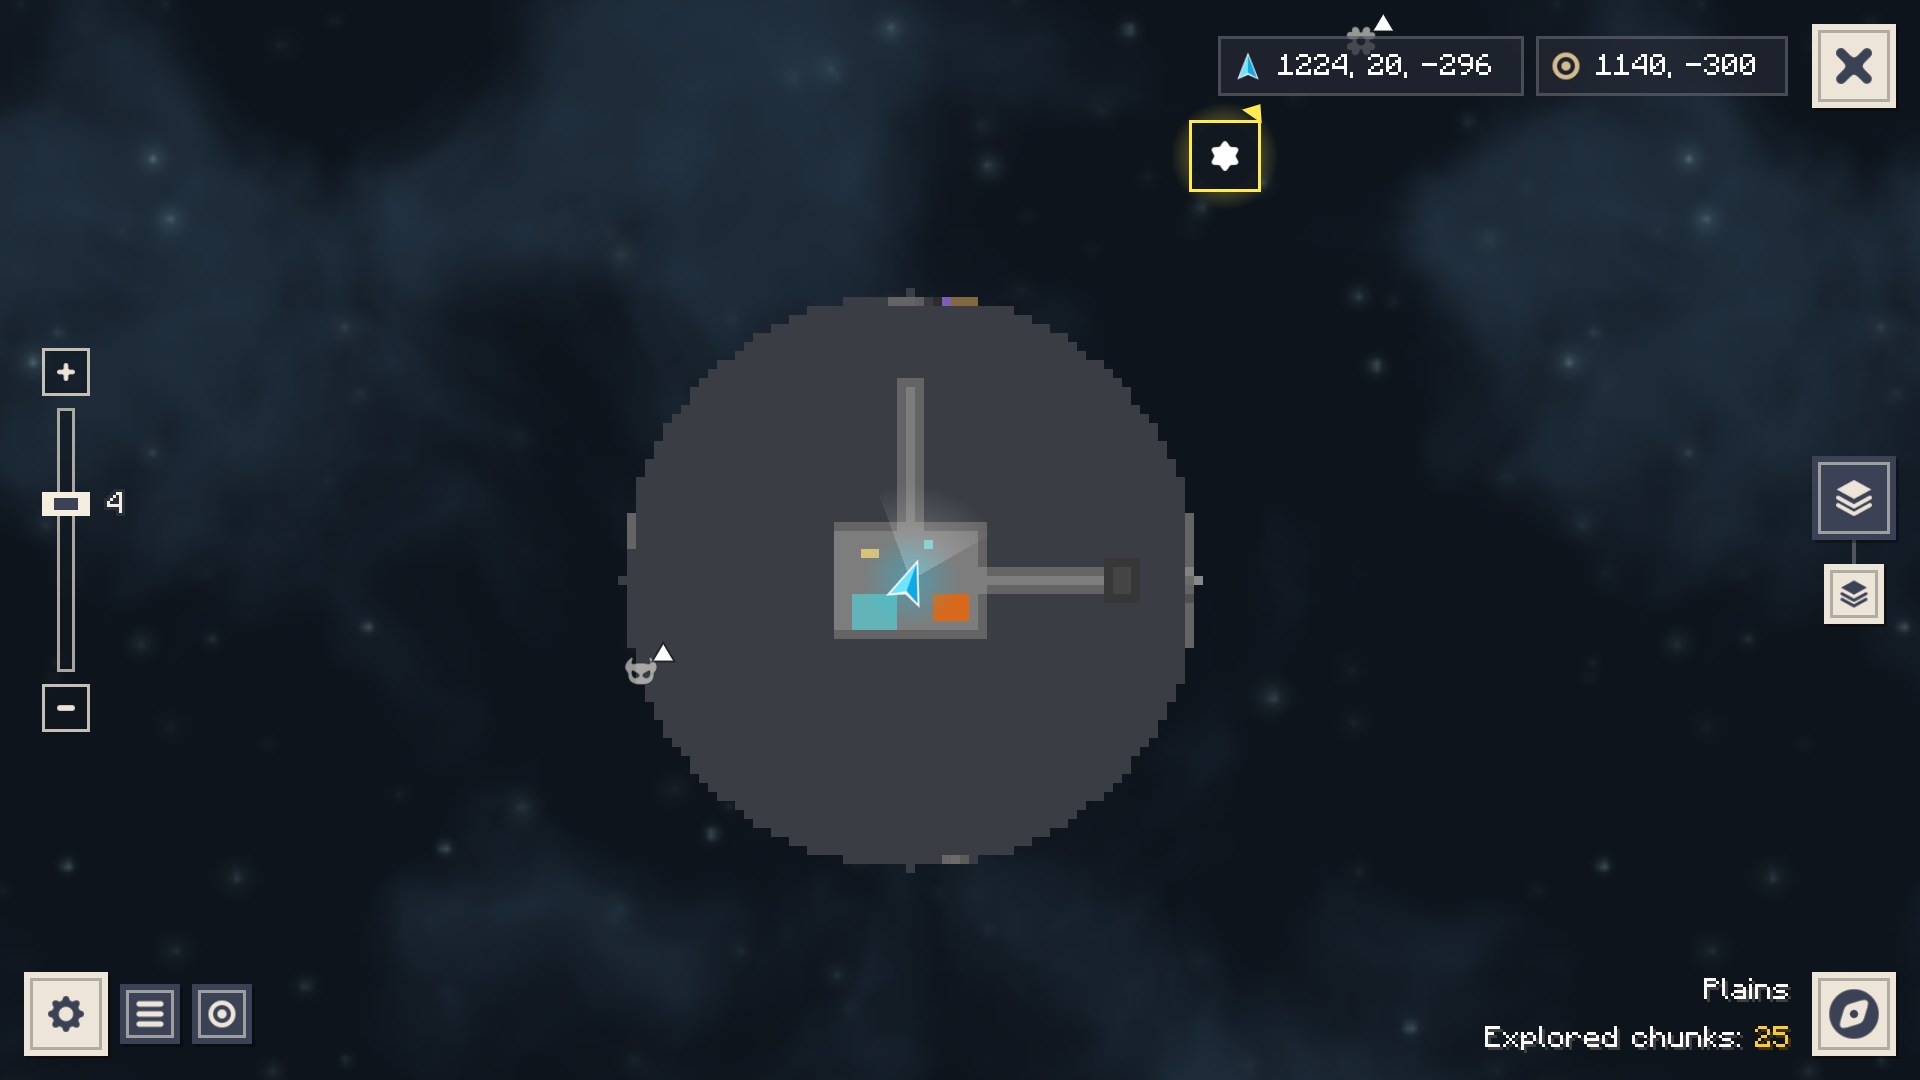
Left: Cave layer with the layer field at the right edge.
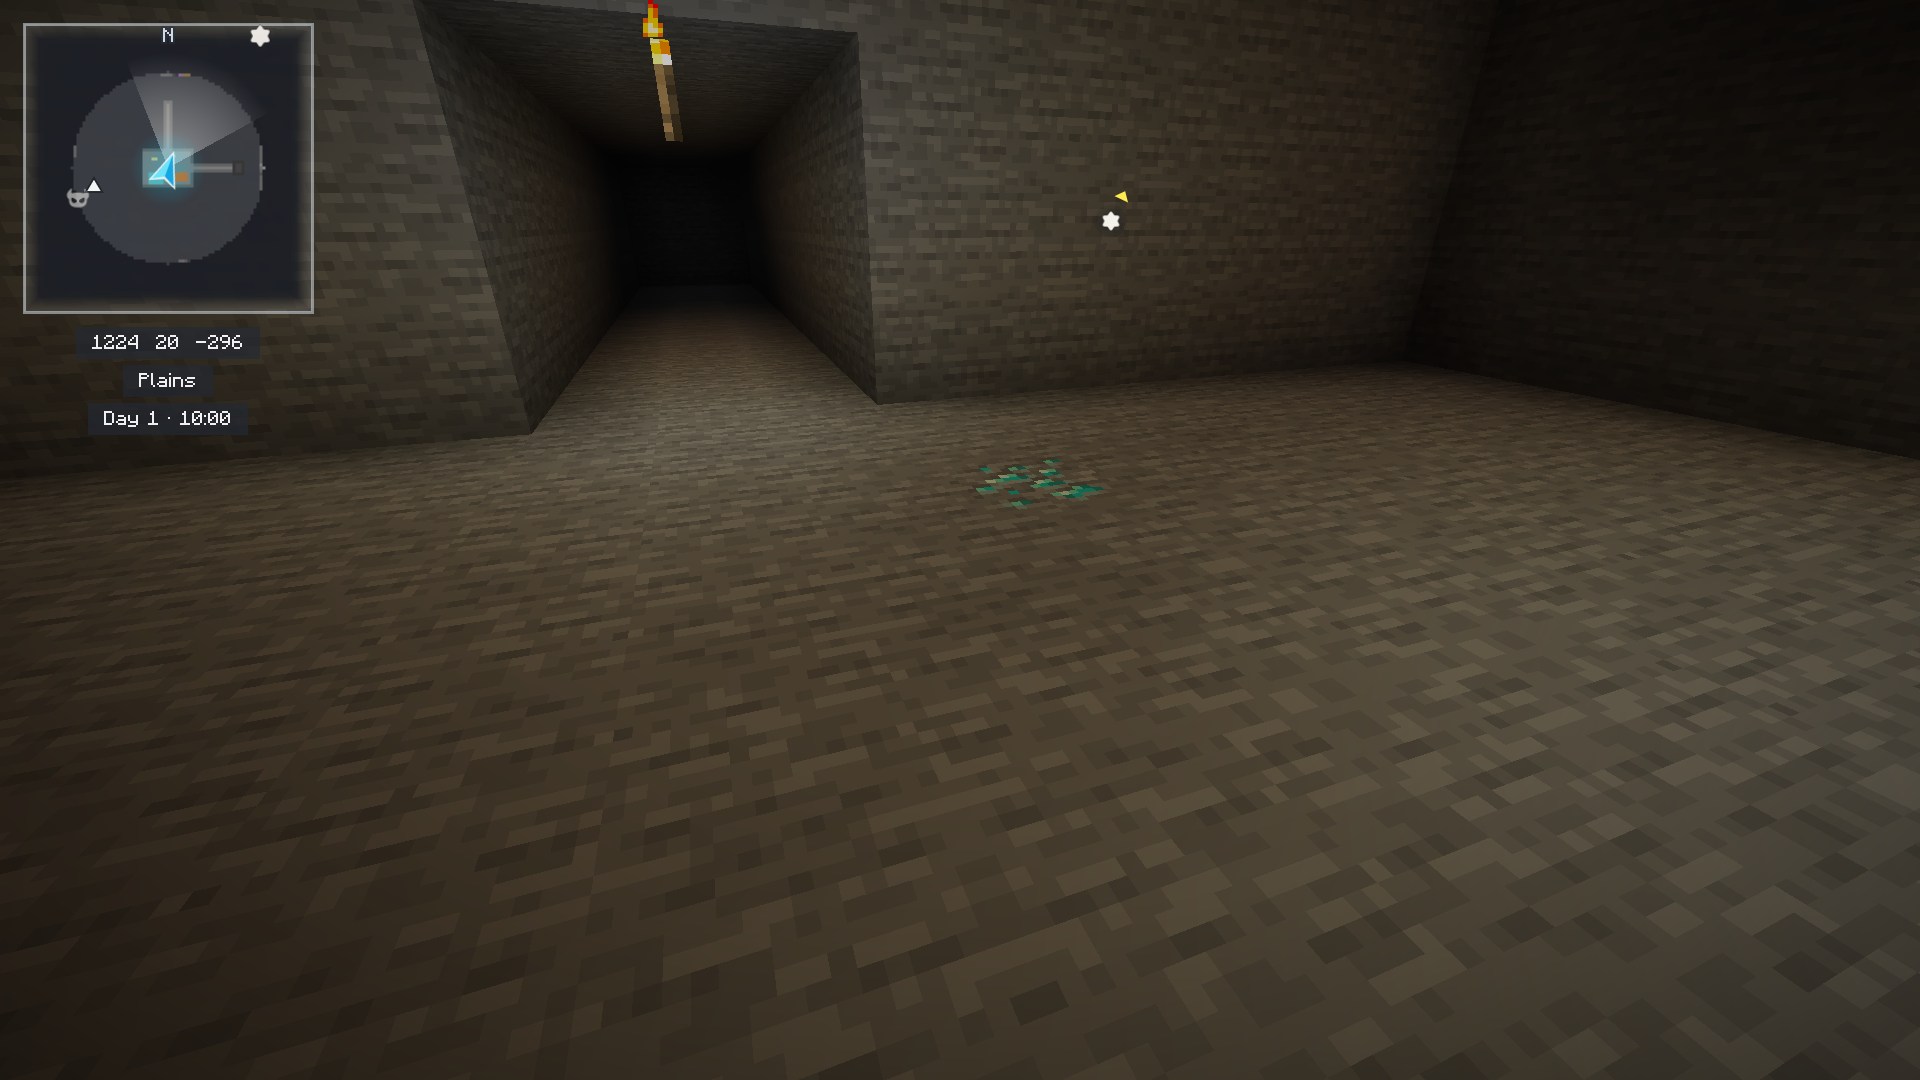
Right: The minimap switches to your cave layer.
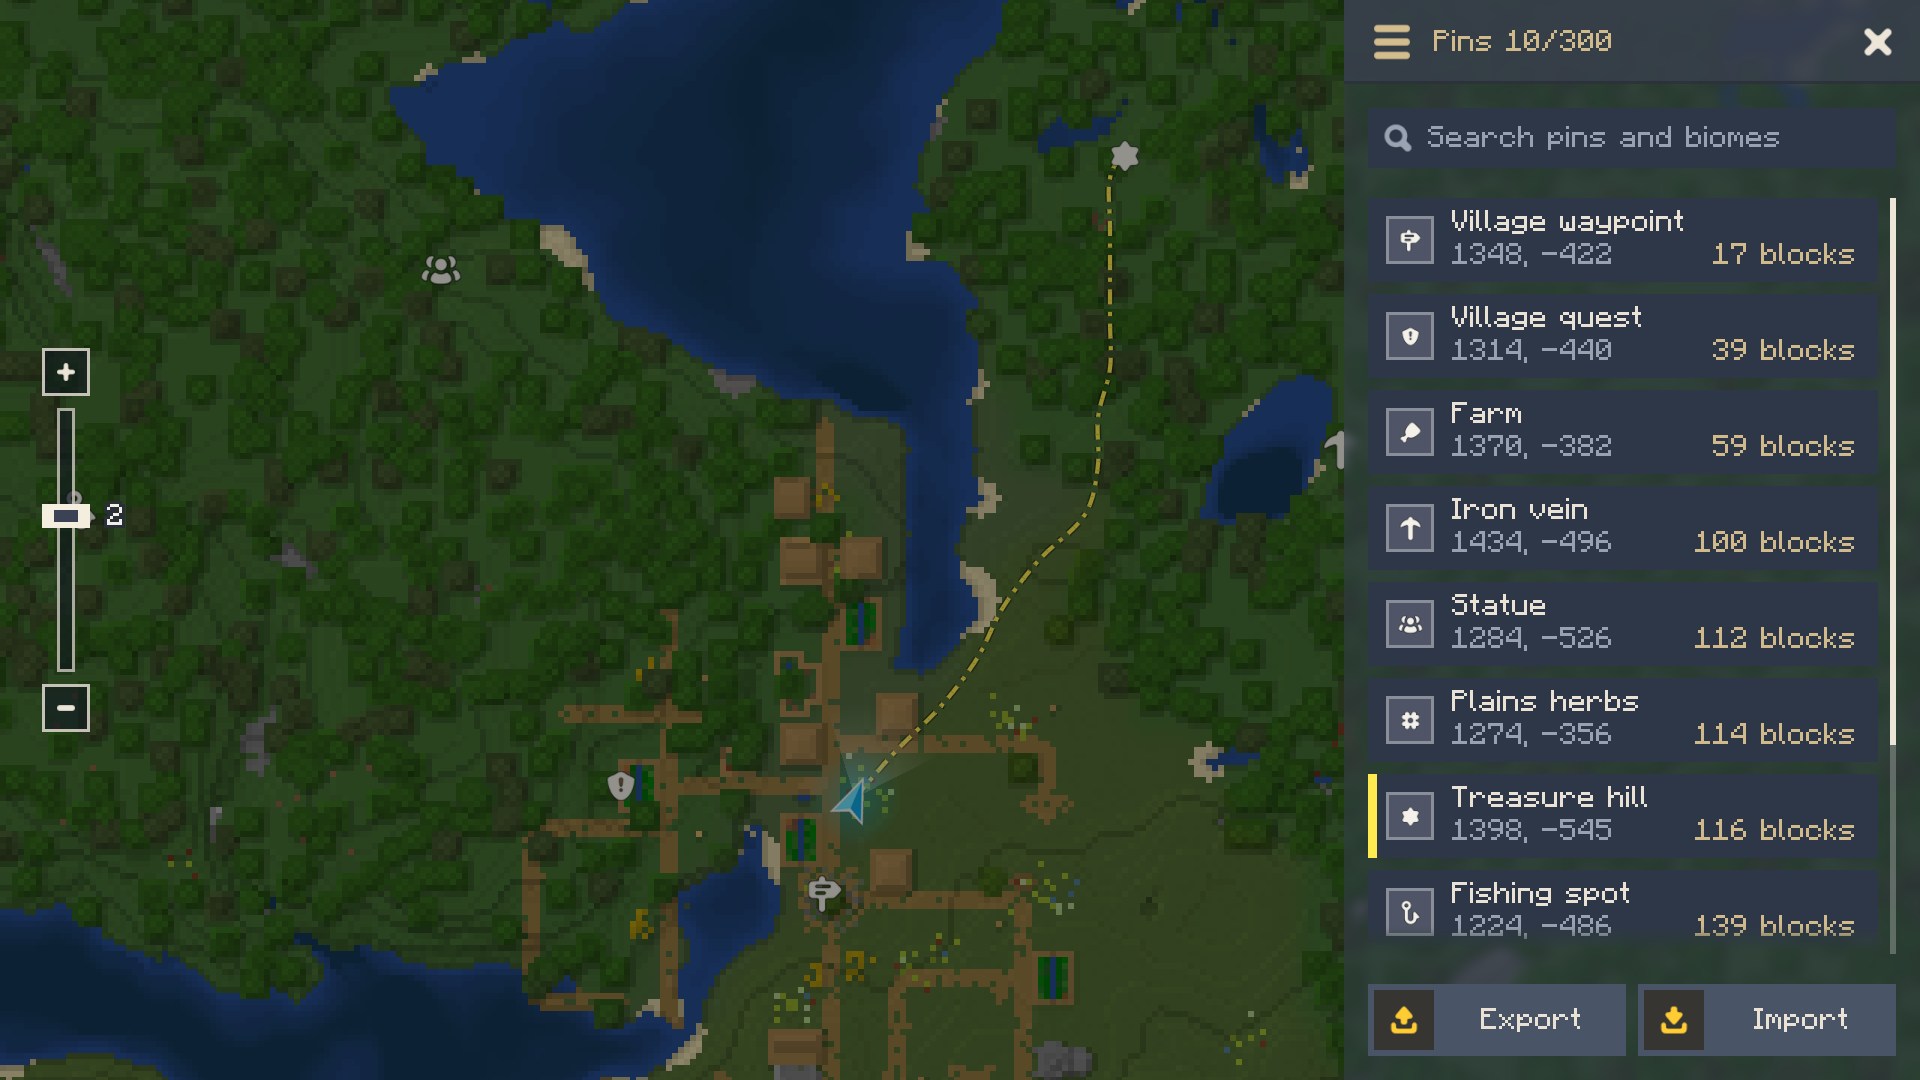
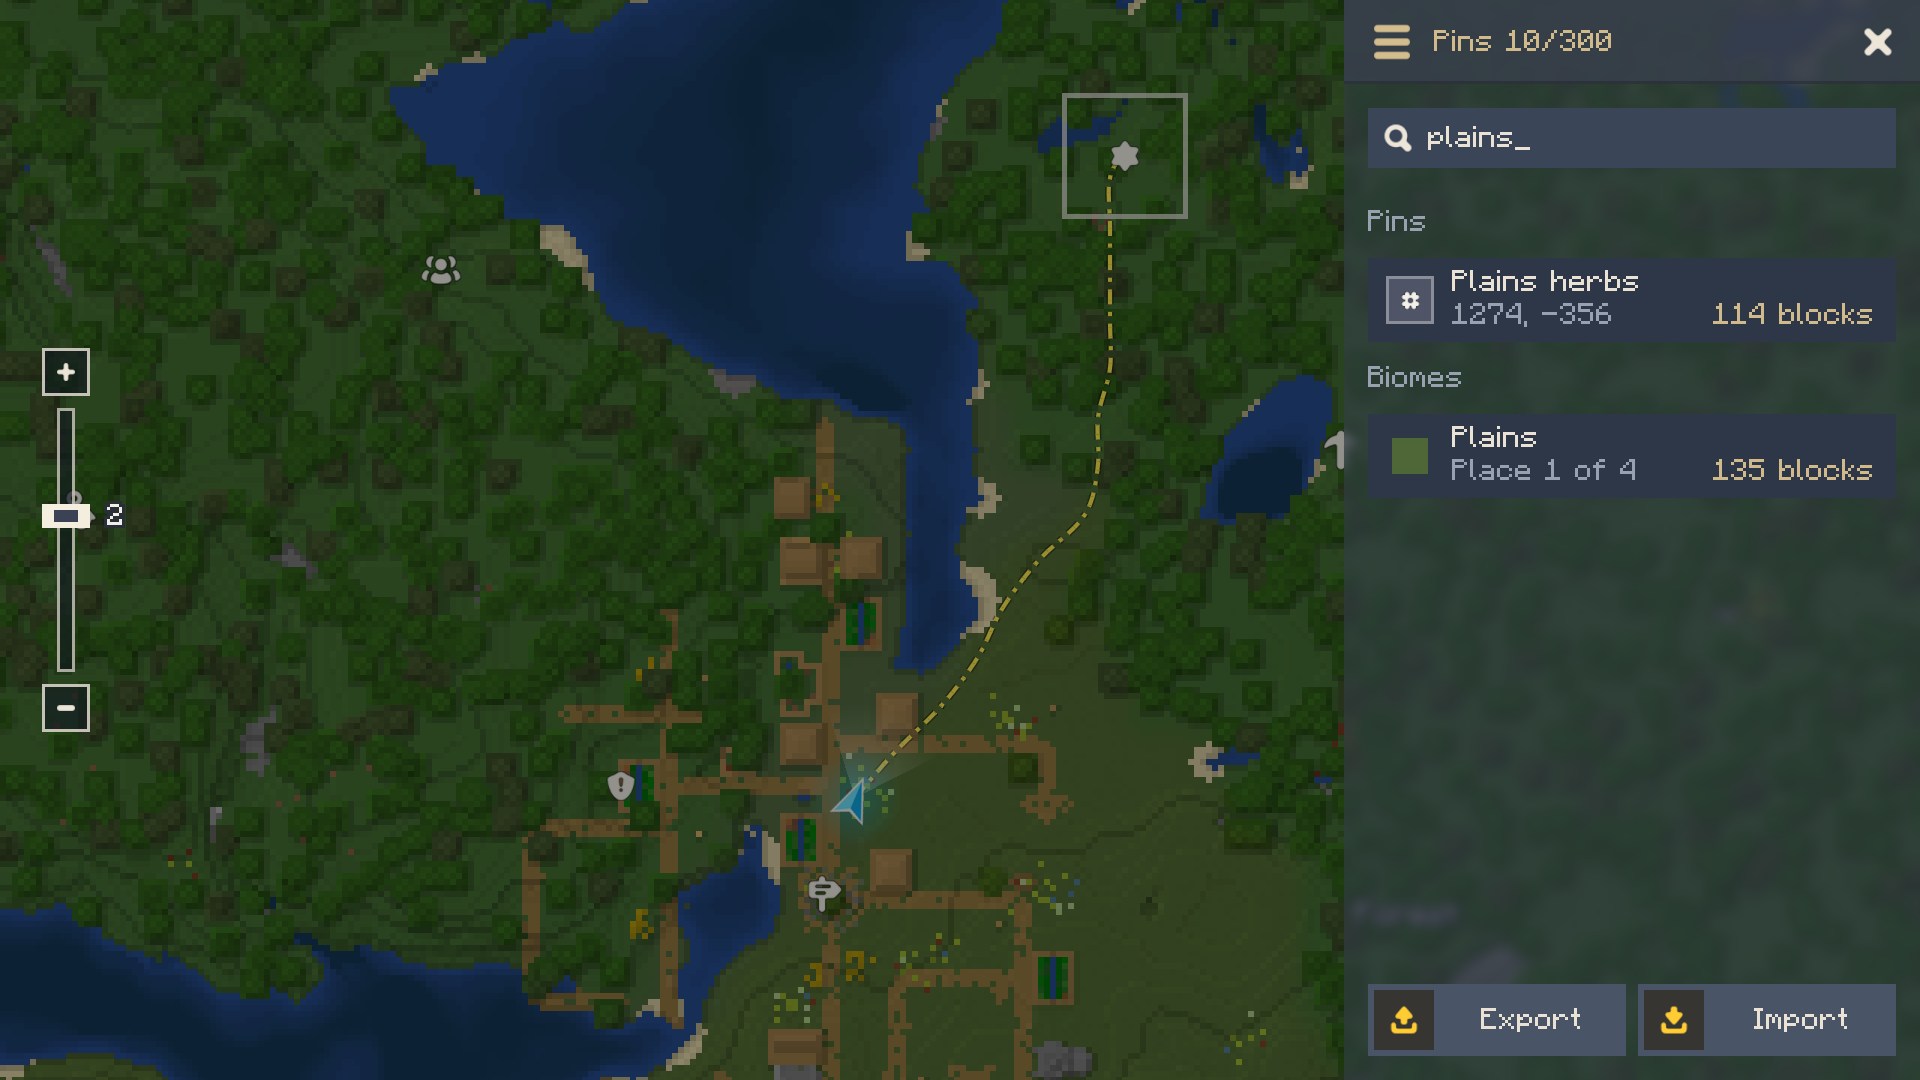
Left: Pin list sorted by distance.
Right: Map search (Ctrl+F): pins and explored biomes by name.
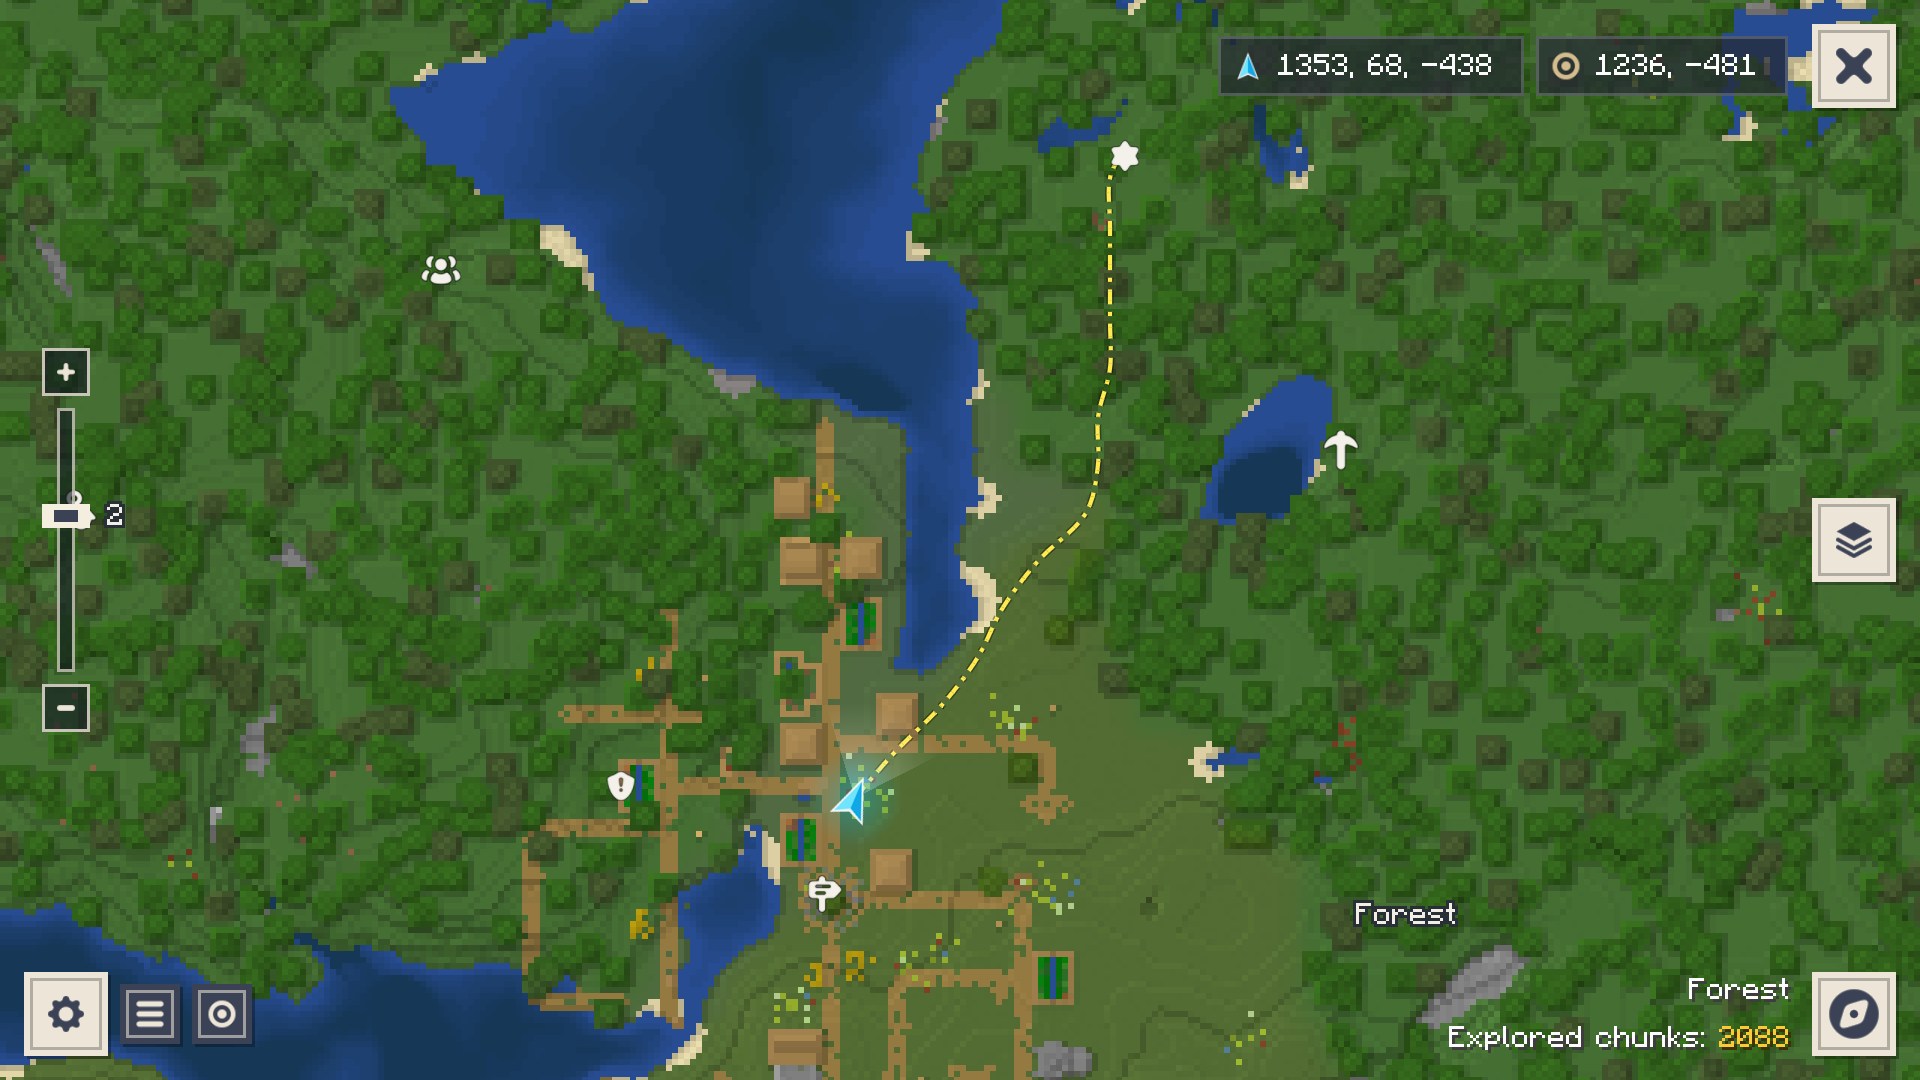
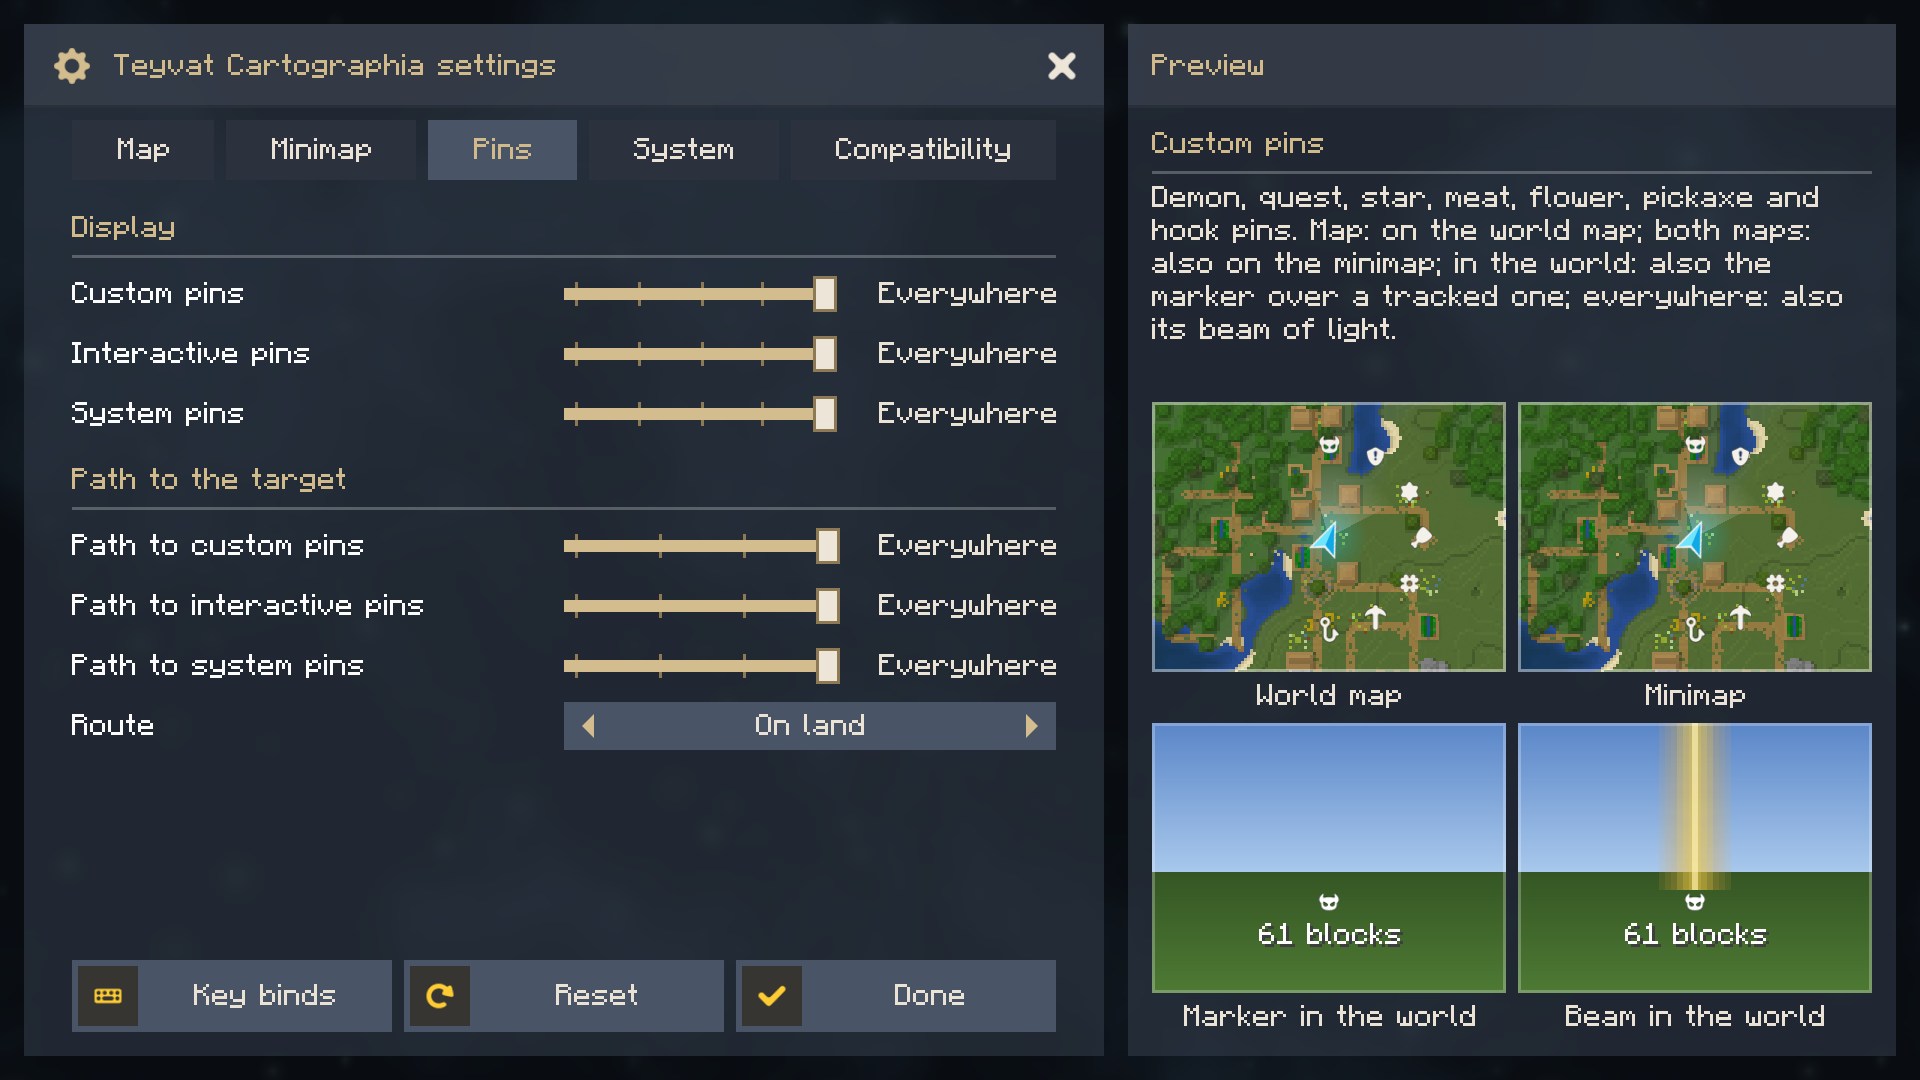
Left: The walking path goes round the water.
Right: Settings with a live preview of the setting under the mouse.
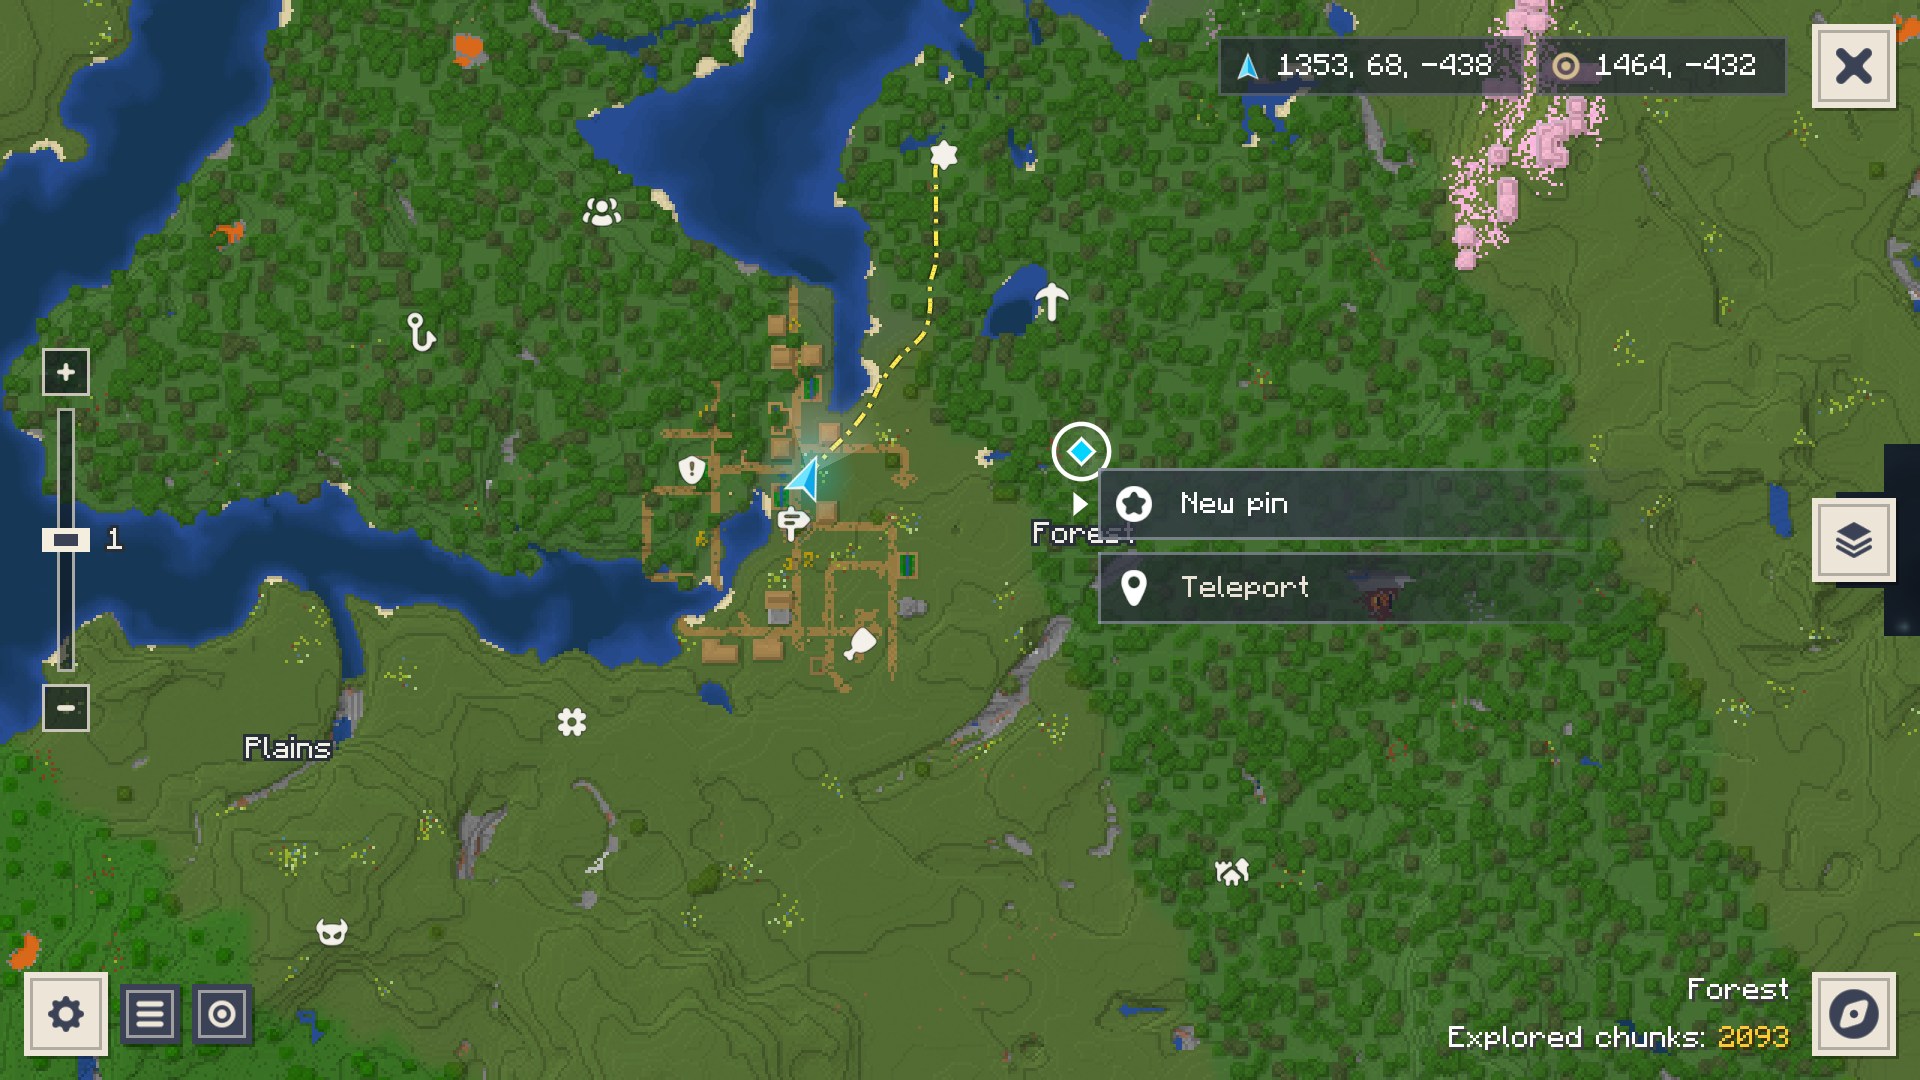
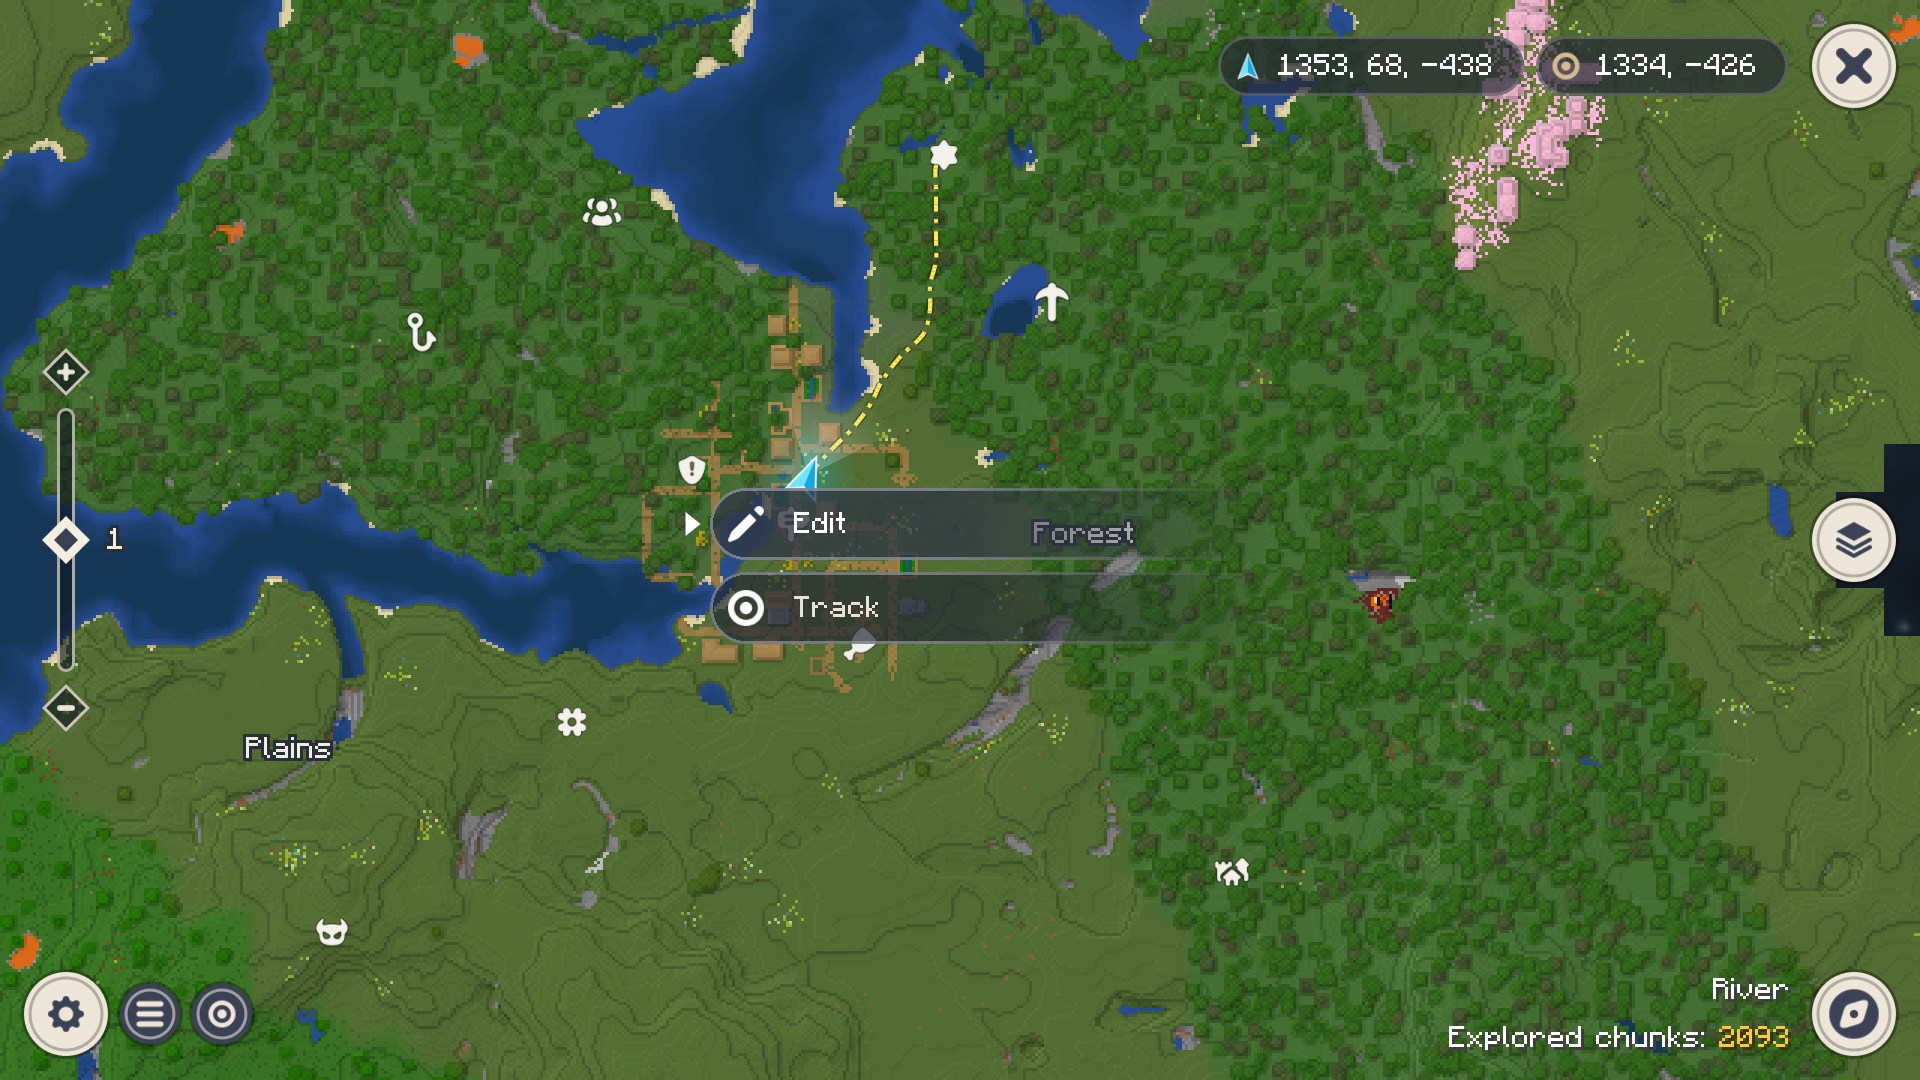
Left: Right-click menu on the ground: a new pin, or Teleport with cheats.
Right: On a pin: Edit and Track (rounded interface).
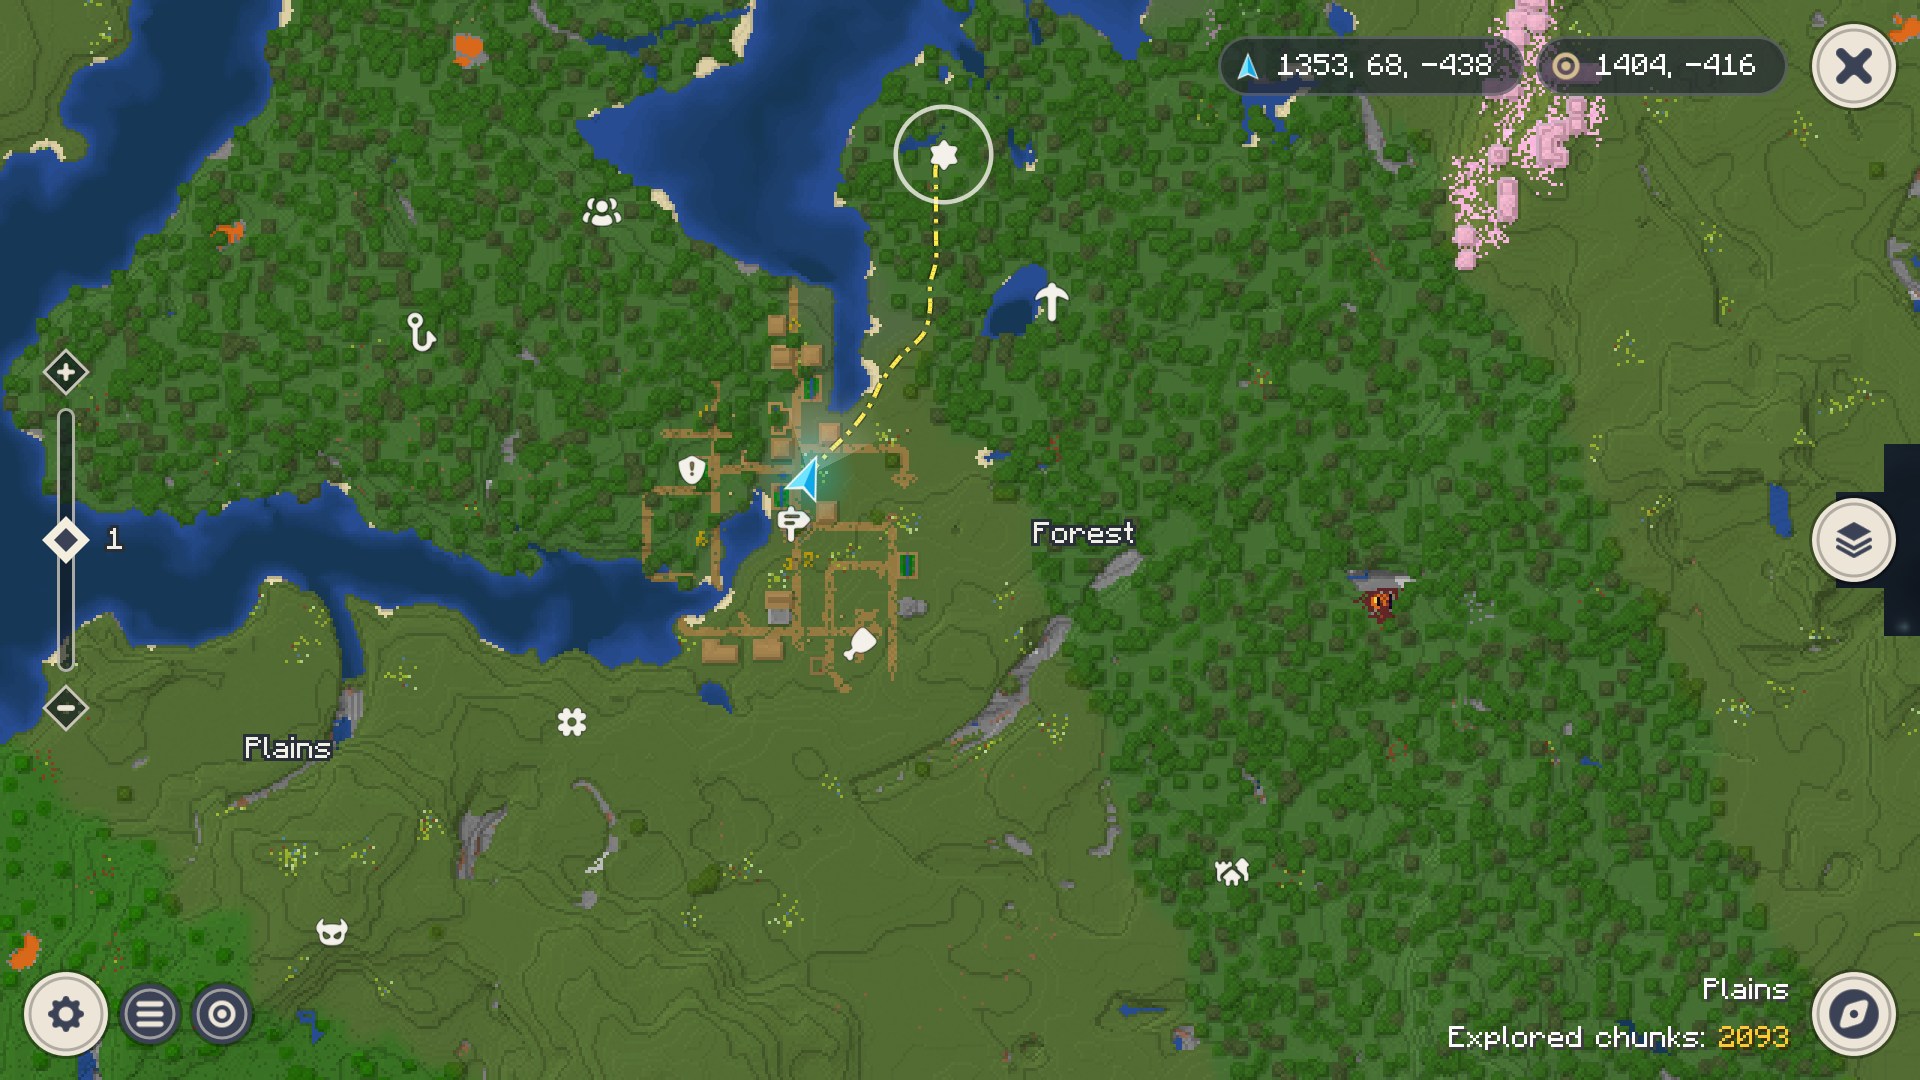
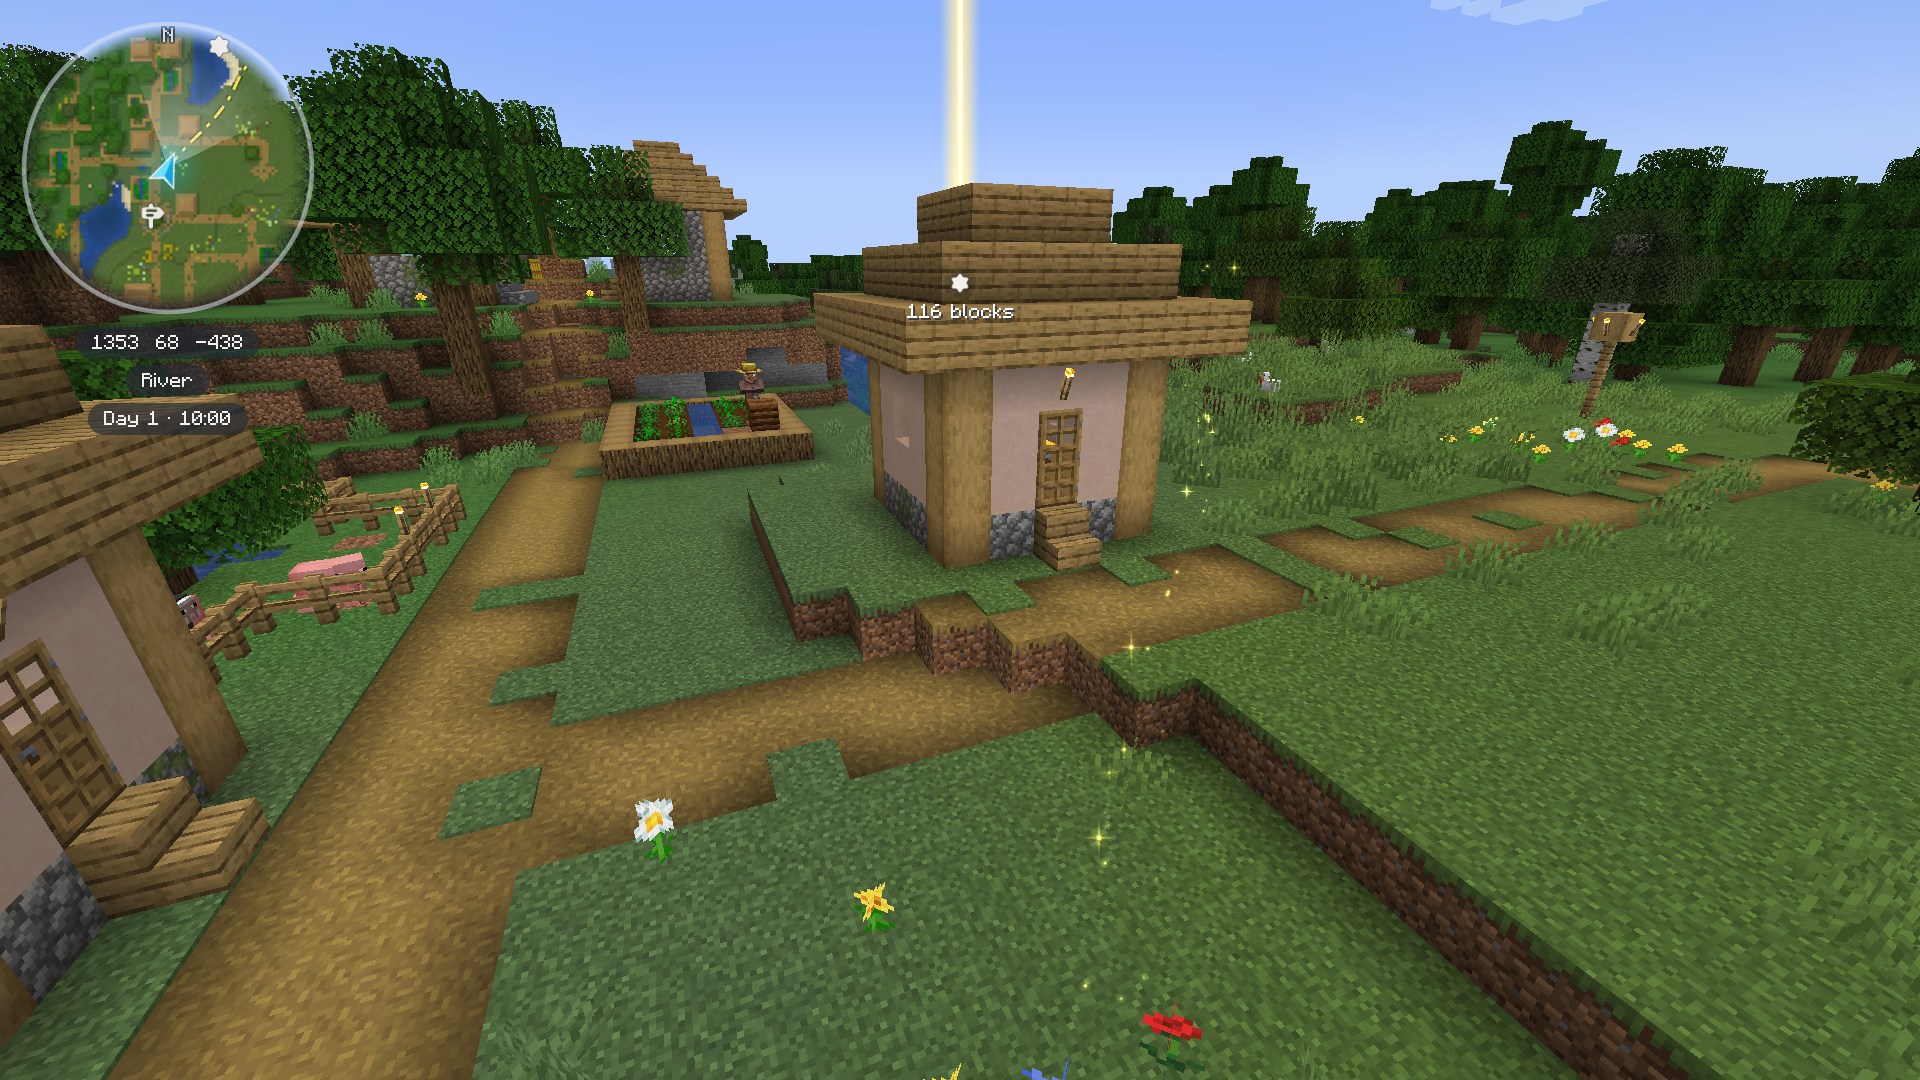
Left: Rounded interface (Settings > Map > Interface style).
Right: Round minimap (Settings > Minimap > Minimap shape).
📥 Installation
- Install a mod loader for your Minecraft (1.21.1, 26.1.2, 26.2 or 26.3): Fabric (Fabric Loader 0.16 or
newer) with Fabric API, or NeoForge (21.1 for
1.21.1, the same number as the game for 26.1.2, 26.2 and 26.3). - Download the file for your game and loader from Modrinth,
CurseForge or the
GitHub releases:
the part after+mcnames them:teyvatcartographia-v1.0.0+mc1.21.1-fabric.jaris for Minecraft 1.21.1 on Fabric,
teyvatcartographia-v1.0.0+mc26.3-neoforge.jarfor 26.3 on NeoForge. Put it into yourmods/folder. - Launch the game and press M in a world.
- Optional: make the minimap round (Settings > Minimap) or the interface rounded (Settings > Map). On Fabric,
Mod Menu adds a settings button to the mod list.
The Fabric file also runs on NeoForge through Sinytra Connector with
Forgified Fabric API (Connector Extras
adds its settings button to NeoForge’s mod list), but on NeoForge the NeoForge file is the better choice.
✨ Features
World map
- Cartography from real world data. Loaded client chunks are sampled (surface height, block map colour, water
depth, biome tint, block light) and shaded on background threads into 256 x 256 block regions. Nothing is loaded or
generated just for the map. Regions are cached in memory and on disk, so the map grows as you explore and survives
restarts. - Fog of War over unexplored land, painted regions with relief shading and contour lines. The map darkens at night,
while torches, lava and other lights keep their colour. The Nether (smoke and embers) and The End (a starry void)
have a fog of their own, soft wisps and glowing motes like the fog of the Genshin Impact map. - Biome name labels, biome under the cursor, player and cursor coordinates, explored chunk counter, zoom slider
(1/32 to 32, the zoom shown beside its thumb), optional chunk grid. Pins show at every zoom; at 1/16 and 1/32 the
biome names and the grid step aside. - Search in the pin list (or Ctrl+F): pins of every dimension by name, and the explored biomes by name. A
click flies the map to the result, switching the dimension if needed. A biome goes to its nearest explored place,
and each further click to the next one (“Place 2 of 5”); the spot is marked with a few rings. - Off-screen indicators for the player (green) and the tracked pin (gold).
- Separate maps per world or server and per dimension. The compass opens the list of mapped dimensions: Overworld,
The Nether, The End, then modded dimensions in alphabetical order. The Nether is mapped below its roof. - Its own mouse pointer in the theme’s colours on the map and in the settings: a hand over what you can click, a
text cursor in text fields, a move cross while you drag the map, arrows on the sliders. It is a system cursor, so it
never lags behind the mouse.
Map colours
- Every block is drawn in the colour of its texture, like Xaero’s Minimap: the average of the texture on its top,
with the biome tint of grass, leaves and water, blended smoothly from one biome to the next. This works for the
blocks of any mod and in every dimension, and follows your resource packs. - Blocks that tint themselves in the world (lily pads, stems, redstone, leaf litter, the leaves and grass of mods
with a palette of their own) take the colour they have at their place. - Plants colour their spot on the map. The arrow next to Settings > Map > Plants opens the list of every
plant of the game and your mods, with a search field and a switch for each: at first all of them show; switch
off the ones you do not want (flowers, if meadows look too busy). A solid plant switched off shows the ground under it. - Terrain detail (flat colours, shaded slopes, or slopes with contour lines), Deep water shading and Clear
shallow water (the ground seen through shallow water) in Settings > Map > Colours. - View cone and glow under the player arrow can be switched off (Settings > Map).
Cave layers
- In the Overworld, once you are underground (at least 4 blocks of natural ground in a row above your head: stone, dirt, sand, gravel, ores; the floors and roof of a house do not count), the caves within 32 blocks of
you are mapped in layers 16 blocks high: floor in block colours, water, lava and ores marked, shafts darker. - The minimap and the world map switch to the layer you are in.
- The layer field at the right edge of the world map works like the Genshin Impact map: the large button is the
surface, a click opens the cave layers in height order around it (at most 5, scrolled with the wheel or the small
arrows), a click on the large button goes back to the surface, and another click closes the field. - Pins made on a cave layer belong to it; pins of other layers are fainter with a small arrow up or down. Cave layers
can be switched off in Settings > Map.
Minimap
- Square or round (Settings > Minimap > Minimap shape), with “N” on the rim (and a fainter E, S and W while
it turns with the view), the player arrow and view cone, pins, the walking path and the tracked pin held on the rim
when it is far. - North up or rotating with the view; size (never larger than your screen holds), corner, offsets, opacity, zoom and
update rate (30 redraws a second while you move by default). An inner padding between the frame and the map, and
how wide and how strong its edge fades. In a bottom corner the lines go over it, mirrored. - Coordinates, biome (long names wrap onto two lines), a clock (game time, your computer’s time marked “IRL”, or
both side by side; 24-hour, 12-hour or 12-hour with AM/PM) and a day counter under it, with their own spacing, text size (Auto: a step smaller than the interface, always
sharp) and background opacity.
Pins and tracking
- Three kinds of pins:
- Custom, for every player: demon, quest, star, meat, flower, pickaxe and hook (the name of each shows when you
point at its tile); - Interactive: the waystones, dungeons, sharestones and warp plates of Waystones,
when it is in the game (see Compatibility with mods); - System: automatic points from real data, the world spawn and your last death location.
- Custom, for every player: demon, quest, star, meat, flower, pickaxe and hook (the name of each shows when you
- Rename, retype, delete; up to 300 pins per world, a pin list sorted by distance, saved per world and dimension.
- A right click on the world map opens a small menu: New pin on empty ground, Edit and Track on a pin.
Operators (permission level 2, or cheats in singleplayer) also get Teleport on the ground, in any dimension
the map shows, unexplored ground too. - Track a pin or an automatic point. Its beam, path and pointers are golden, like the path stars of Genshin Impact.
Tracking an automatic point ends on arrival. - Distances are in blocks everywhere and in 3D: from your feet to the floor of the point.
- Export and import from the pin list: save every pin of the world to a
.jsonfile, add the pins of such a file
(or of another world’smarkers.json); repeats are skipped. - Import from Xaero’s Minimap (its waypoints also show on Xaero’s World Map): the waypoints of the current world
are found on their own, or pick any waypoint file of a Xaero world. Settings > Compatibility > Xaero’s Minimap sets
the pin type they get and whether hidden waypoints and death points come too.
Pin in the world
- The tracked pin is shown in the 3D world (from the In the world step of its kind) like a Genshin Impact waypoint for a minute after you start tracking or
press the pulse key: constant size, visible through terrain, the distance in blocks under it. - Off screen it slides along an ellipse around the centre, above the hotbar and around the minimap.
- A golden beam of light rises from the target at any distance (hidden behind terrain, drawn after the clouds),
fading out softly towards its top and growing with the distance, so a far pin’s beam still stands tall; it fades in
over a second when the pin comes onto the screen and out when it goes to the edge. Closer than 10 blocks the pin
fades out. A white arrow shows a target well above or below you. - The pulse key sends a thin diamond closing in on the pin in one second, and the glyph flashes when it arrives.
Walking path
- Searched once when you start tracking (and by the pulse key when you are more than 8 blocks off the line), never
while you walk. - A precise path over the loaded terrain (128 blocks around you) follows a coarse path over the explored map (up to
1024 blocks). It goes round lava, tree trunks, walls and mountains, takes steps of up to 2 blocks and shallow water
straight on, swims across narrow water (up to 16 blocks) and leads out of the water when you are swimming. The Route
setting chooses the way: By land it walks round wider water, By water it goes by boat straight over, and
By air it is a straight line to the pin whatever lies between, for elytra and aircraft. - The world map and the minimap draw it as a golden dash-dot line, grey through unexplored land and in the colour of
the sea over water, with a sea icon where each longer crossing begins, without the part you have already walked. By
air the line is near white (dark grey over unexplored land) with a cloud on it ahead of you. In the world, golden
sparkles follow the path, within 64 blocks of the camera.
Settings
- The gear on the map holds quick switches: custom and system pins, the path to the target, plants, biome names, chunk grid,
and with Waystones its stones and the path to them. The list scrolls when it does not fit. - The full settings screen (also from the mod list: NeoForge’s, or Mod Menu’s on Fabric) has a tab for each part: Map (appearance; what the
map shows: plants, caves; colours; the world map), Minimap (display, size and position, look, extra
information), Pins (display and path to the target for custom and system pins), System (performance) and
Compatibility (The Nether and End fogs, and the supported mods in the game: see Compatibility with mods). - Live preview: point at a setting and the card beside the list shows it, with what it does. The map around you
as it will look, the minimap at its real size and where it sits, the three terrain detail modes, the
cave layers, the plants, each pin kind on the world map, the minimap and in the world, the mapping
speed and memory, the mods’ fogs and samples. It changes as you move a slider. The settings screen is never larger
than GUI 3 on a 1080p screen (GUI 4 there shows it as GUI 3); in a narrow window without room for the card the
setting under the mouse shows its description as a tooltip instead. A small reset icon beside a setting you changed
puts its default back (since 0.9.0). - Other mods can add their own part to Compatibility (since 0.9.0, through
Actually Amazing Config Screen, the library the settings
screen is made with). - A setting with parts is one slider in steps: each pin kind goes Off, Map, Both maps, In the world (the marker over a
tracked pin), Everywhere (its beam too); its path Off, Map, Both maps, Everywhere (the stars); the clock Off, Game,
Real, Both. - Every list (the settings, plants, pins, overlapping pins on the map) glides as it scrolls, with no steps, and its
rows dissolve softly at the top and bottom edges. - Reset to defaults and a shortcut to key binds. Stored in
config/teyvatcartographia-client.json(the
teyvatcartographia-client.tomlof 0.4 and earlier is taken over once).
🎮 Controls
| Where | Action | Control |
|---|---|---|
| In game | Open world map | M (rebindable) |
| In game | Toggle minimap / minimap zoom in / zoom out | N / = / – (rebindable) |
| In game | New pin where you stand (opens the map with the pin editor) / stop tracking | B / Z (rebindable) |
| In game | Pulse the tracked pin (shows the pin and the path stars again) | V (rebindable) |
| World map | Pan | drag with the left mouse button, or WASD / arrow keys |
| World map | Zoom (keeps the point under the cursor) | mouse wheel, +/-, or the slider on the left |
| World map | Context menu | right-click: on empty ground New pin and, for operators (cheats in singleplayer), Teleport; on a pin Edit (Open for an automatic point) and Track |
| World map | Create a pin | right-click empty ground, New pin, choose icon and name, Confirm |
| World map | Overlapping pins | left-click the spot, pick one from the list in the lower right corner |
| World map | Edit or track a pin | left-click it: rename, type, delete, Track |
| World map | Close the pin panel | left-click empty ground (it creates no pin); a left click on another pin opens that one |
| World map | Search pins and biomes | Ctrl+F, or the field at the top of the pin list; Enter opens the first result |
| World map | Centre on the player | Space, the locate button, or the player’s edge indicator |
| World map | Cave layers | the layer button at the right edge (see Cave layers) |
| World map | Settings / pin list / dimensions | gear and list buttons (bottom left), compass (bottom right) |
| World map | Close | Esc or M (Esc closes an open side panel first) |
🎨 Themes
Three choices, each on its own (Settings > Map > Appearance, and the shape in Settings > Minimap):
- Theme: colours, icons and the Fog of War. Default (
default) is built in and always available; a resource
pack may add more, and the list shows only themes whose pack is enabled. Other themes fall back to its assets. - Minimap shape: Square (the default) or Round.
- Interface style: Rectangular (the default), flat panels, buttons and tiles with square corners, or
Rounded, with circles, capsules and rounded corners.
So the minimap can be round while the menus stay rectangular, or the other way round, with any theme.
A custom theme comes as a resource pack: put it into resourcepacks/, enable it in the game, and its theme appears in
the setting.
Making your own theme
Every theme follows the same layout, assets/teyvatcartographia/themes/<id>/:
theme.json(required):{ "name": "..." }: a translation key (teyvatcartographia.theme.<id>) or plain text. Makes the theme selectable.colors.json(optional): Colours as"key": "#AARRGGBB"or"#RRGGBB". Keys are the colour fields ofrender/Theme.java;themes/default/colors.jsonlists them all. Missing keys keep the built-in defaults.icons/64/<name>.png(optional, 64 x 64): Icons. Missing ones (or the whole folder) fall back to thedefaulticons.fog.png(optional): Seamless background for unexplored space (256 x 256 indefault), repeated every 512 GUI units whatever its resolution. Afog.jsonbeside it may set"repeat"(GUI units). Falls back to thedefaultfog.fog/<namespace>/<path>.png,.json(optional): A fog of one dimension (indefault:fog/aether/the_aether.pnga sea of clouds,fog/minecraft/the_nether.pngsmoke and embers,fog/minecraft/the_end.pnga starry void,fog/the_sift/the_sift.pnga pearly haze), also on the minimap. The.jsonmay say{ "island_shadow": true }(the land casts a shadow on it) and"repeat".dimensions/<namespace>/<path>.json(optional): Map colours of one dimension’s blocks,{ "blocks": { "<block id>": "#AARRGGBB" } }(for exampledimensions/aether/the_aether.json). They replace the texture colours of those blocks; a theme’s file replaces thedefaultone of that dimension.cursors/<name>.png,cursors/hotspots.json(optional, 64 x 64): The mouse pointers of the menus (white, tinted with thecursorcolours) and the pixel of each that clicks. Fall back to thedefaultones.
A theme does not set any shapes: the minimap shape and the interface style are the player’s settings. Colour keys
are named by their role, not their shape: icon_button_* is a round or a square button, info_box_* a capsule or a
rectangle. Resource packs are merged, so a pack can change a few keys of any theme or add a new theme. Changes apply
when the theme is picked, or on F3+T.
🧩 Compatibility with mods
Teyvat Cartographia draws the blocks of any mod in the colours of their textures and lists modded dimensions on the
world map, so most mods work without anything special. A few get more: with one of them in the game,
Settings > Compatibility has a part for it.
| Mod | What it gets |
|---|---|
| Waystones | Its waystones, sharestones and warp plates on the world map and the minimap, like the teleport waypoints of Genshin Impact: the ones you have activated with their names, the ones you have only seen in grey, a waystone of a dungeon as a dungeon. Track them like any pin; teleporting stays with Waystones. Where the stones and the path to them show is in its part, and both switch on or off in the world map’s quick settings. |
| Xaero’s Minimap | Import of its waypoints (also those of Xaero’s World Map) into your pins: the current world’s are found on their own. The pin type they get, and whether hidden waypoints and death points come too, are in its part. |
| The Aether | A Fog of War of its own, a sea of clouds seen from above, with the floating islands casting a soft shadow on it (on the world map and the minimap). No cave layers under the islands. |
| Mielon’s The Sift | A pearly haze in the colours of its ichor as the Fog of War; its rainbow ichor and ichor snow shimmer on the map in their own colours (each can be switched off); its cyan willows keep their colour. |
| Biomes O’ Plenty, Regions Unexplored | Their biomes, leaves, grass and plants in their own colours (compared side by side with Xaero’s Minimap in 16 places); their plants in the Plants list. |
| Vanilla Backport, Tiny Takeover Backport | The pale garden, leaf litter, bushes and the other new blocks in the colours the game gives them. |
| Sodium, Iris | Work alongside (checked on Fabric and on NeoForge): the minimap, the map, the beam and the path sparkles draw as without them. |
| Sodium Extra | When its FPS counter (or coordinates) is shown in the minimap’s corner, the minimap moves clear of it. |
| Mod Menu | On Fabric, a settings button for the mod in its list. |
| VulkanMod (Fabric), VulkanMod Reforged (NeoForge) | Work with their Vulkan renderer: the map, the minimap, the path with its sparkles and the beam look as with OpenGL, the lists dissolve at their edges and the blur under the menus works. |
The Nether and The End have fogs of their own too (each can be switched off in Compatibility > Minecraft); a resource pack theme can add a fog for any other dimension (see
Themes). Players with other minimaps keep them: this mod changes nothing in the world and needs nothing
from the server.
⚡ Performance
The mod is meant to cost at most 2 to 3% FPS:
- Every HUD element is drawn into a cached texture and redrawn only when what it shows changes; a still minimap costs
about one textured quad per frame, and a moving one is redrawn at most at its update rate. - Per-frame paths do not allocate memory. Chunk reading and shading run on worker threads; the path searches run on
the main thread in slices of at most 1 ms per tick, and only while the path is shown. - A chunk whose data did not change triggers no texture upload, no disk write and no minimap refresh. Biome tints are
sampled on a 4 x 4 block grid and interpolated. - The first search in a world reads the explored map once on a background thread (about 1 second per 1000 map
regions) and keeps a small biome index; later searches only read what was explored since. - On the world map, the fog is one quad, and the grid, the path and the labels are each drawn in a single call. Far
out the map is drawn from small copies of the regions, so even zoom 1/32 costs only a few textures.
💾 Where data is stored
- Settings:
config/teyvatcartographia-client.json - Map regions:
teyvatcartographia/<world>/<dimension>/r.<x>.<z>.png+.dat(heights and metadata) +.lod.png(64 x 64 thumbnail for far zoom) +index.txt+format.txt(the map format; a map of an older format is deleted and mapped again) - Cave layers:
teyvatcartographia/<world>/<dimension>/caves/b<layer>/ - Biome index for the search:
teyvatcartographia/<world>/<dimension>/biomes.idx - Pins and the tracked target:
teyvatcartographia/<world>/markers.json - Exported pins (default folder):
teyvatcartographia/exports/
<world> is sp_<save folder> in singleplayer and mp_<server address> on servers.
🛠️ Building from source
Requirements: JDK 21 for Minecraft 1.21.1 (branch main) or JDK 25 for Minecraft 26.1.2, 26.2 and 26.3 (branch
mc26), internet on the first build. On mc26, -Pmc=26.2 or -Pmc=26.3 builds for that game (26.1.2 without it).
On main the build reads Actually Amazing Config Screen
from the local Maven repository: build it first (./gradlew publishToMavenLocal in its repository, at the tag
v<aacs_version> named in gradle.properties), as the GitHub workflows do.
./gradlew buildOn Windows: gradlew.bat build. The project follows the layout of
MultiLoader-Template: the shared code is in common/ (compiled
against the game alone, with the unit tests), the loaders’ own parts in fabric/ and neoforge/, the shared build
rules in buildSrc/. One code base builds both files: fabric/build/libs/teyvatcartographia-v<version>+mc<game>-fabric.jar
and neoforge/build/libs/teyvatcartographia-v<version>+mc<game>-neoforge.jar.
./gradlew :fabric:runClient or ./gradlew :neoforge:runClient starts a development client with the mod.
🐞 Bug reports and ideas
Found a bug, a crash or have an idea? Open an issue
on GitHub and pick the matching form. A few tips that help a lot:
- Make sure you are on the latest version and look through the
existing issues first. - If you play with other mods, try to reproduce the problem with Teyvat Cartographia alone.
- Attach
logs/latest.log(and the crash report fromcrash-reports/after a crash) as a link to a
GitHub Gist or a paste site, plus a screenshot if the problem is visual.
Release notes for every version are in
CHANGELOG.md.
📜 License and credits
Teyvat Cartographia is released under the MIT License.
Source code: github.com/Tapacywka/teyvat-cartographia.
- All textures and the player arrow are original; every pin gets a thin dark outline and is scaled to the same
visual weight. - All other icons (the pins, the automatic points and the interface icons) come from
Game Icon Pack by Nieobie, released under
CC0 1.0. Thank you! - All text uses the vanilla Minecraft font. No Genshin Impact assets are included.
- The settings screen is made with Actually Amazing Config Screen
(MIT, by the same author), packed inside the mod.
常见问题
Teyvat Cartographia 支持哪些 Minecraft 版本?
Teyvat Cartographia 支持 Minecraft Java 版 1.21.1–26.3,共 4 个版本,可用的加载器:Fabric / NeoForge。下载时注意选择和你游戏版本一致的文件。
Teyvat Cartographia 怎么安装?
先用 PCL2 或 HMCL 启动器安装对应版本的 Fabric / NeoForge,再把下载的 .jar 文件放进游戏目录的 mods 文件夹,重新启动游戏即可。开启了版本隔离的,mods 文件夹在 versions/版本名 下面。
Tapacywka 的其他作品
查看全部 →
Excalibur | Modern World Creation Compat
Excalibur 资源包与 Modern World Creation 模组的兼容补丁。

Excalibur | Better ModList & Mod Menu Compat
Excalibur 资源包与 Better ModList 和 Mod Menu 模组的兼容性补丁。

Simply Optimized Continued
经过深入研究的顶尖优化整合包,专注于纯粹的性能提升。

Excalibur | Overflowing Bars Compat
Excalibur 资源包与 Overflowing Bars 模组的兼容补丁。
评论
登录后评论和评分